Oft gestallte Froen (FAQ) op Pionex
Registration
Why Can’t I Receive Emails from Pionex
If you are not receiving emails sent from Pionex, please follow the instructions below to check your email’s settings:1. Are you logged in to the email address registered to your Pionex account? Sometimes you might be logged out of your email on your devices and hence can’t see Pionex’s emails. Please log in and refresh.
2. Have you checked the spam folder of your email? If you find that your email service provider is pushing Pionex emails into your spam folder, you can mark them as “safe” by whitelisting Pionex’s email addresses. You can refer to How to Whitelist Pionex Emails to set it up.
Addresses to whitelist:
- [email protected]
- [email protected]
- [email protected]
- [email protected]
- [email protected]
- [email protected]
- [email protected]
- [email protected]
- [email protected]
- [email protected]
- [email protected]
- [email protected]
- [email protected]
- [email protected]
- [email protected]
4. Is your email inbox full? If you have reached the limit, you won’t be able to send or receive emails. You can delete some of the old emails to free up some space for more emails.
5. If possible, register from common email domains, such as Gmail, Outlook, etc.
Why Can’t I Receive SMS Verification Codes
Pionex continuously improves our SMS Authentication coverage to enhance user experience. However, there are some countries and areas currently not supported.If you cannot enable SMS Authentication, please refer to our Global SMS coverage list to check if your area is covered. If your area is not covered on the list, please use Google Authentication as your primary two-factor authentication instead.
If you have enabled SMS Authentication or you are currently residing in a country or area that’s in our Global SMS coverage list, but you still cannot receive SMS codes, please take the following steps:
- Ensure that your mobile phone has a good network signal.
- Disable your anti-virus and/or firewall and/or call blocker apps on your mobile phone that might potentially block our SMS Code number.
- Restart your mobile phone.
- Try voice verification instead.
- Reset SMS Authentication.
Login
How to Change Account Email
If you wish to change the email registered to your Pionex account, please follow the step-by-step guide below.After logging in to your Pionex account, click[Profile] - [Security].
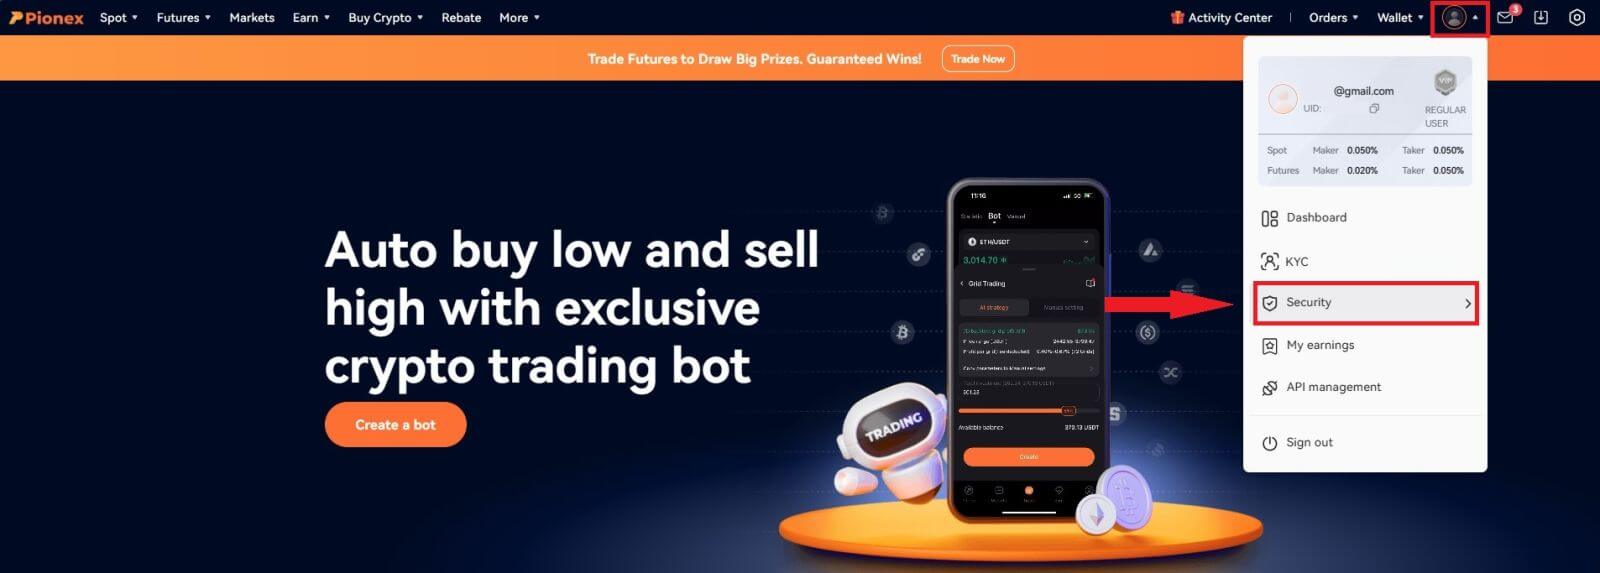
Click [Unbind] next to [Email Verification].
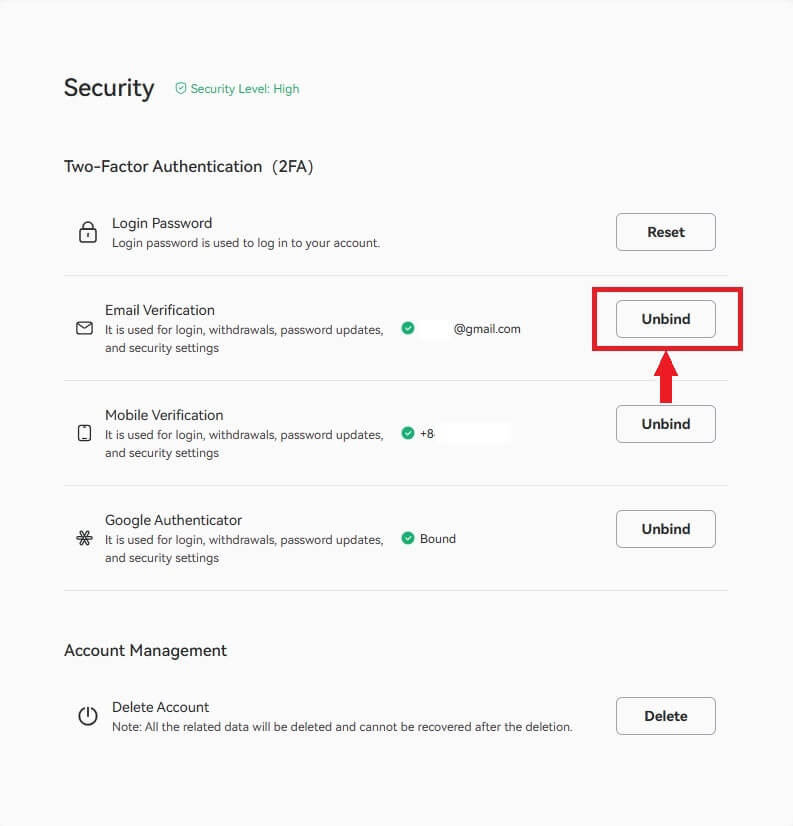
To change your registered email address,you must haveenabled Google Authentication and SMS Authentication (2FA).
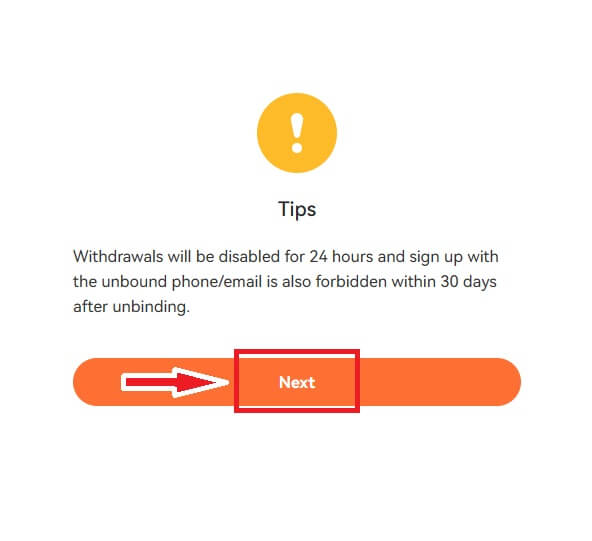
Please note that after changing your email address, withdrawals from your account will be disabled for 24 hoursand signing up with the unbound phone/email is also forbidden within 30 days after unbindingfor security reasons.
If you wish to proceed, click[Next].
How to reset Google Authenticator【Google 2FA】
If you have uninstalled Google Authenticator, changed your mobile device, reset the system, or encountered any similar actions, the initial connection becomes invalid, rendering your Google verification (2FA) code inaccessible.In such cases, it is necessary to reinstate your previous connection or submit a request to us for resetting Google Authenticator. After logging in again, you can then re-enable Google Authenticator.
How to manually reset Google Authenticator
1. Device Transfer
Fir Äre Google Authenticator Kont vun engem alen Apparat op en neien ze transferéieren, befollegt dës Schrëtt: Op dem alen Apparat, klickt op d'Ikon ≡ uewe lénks vun der App, wielt [Transfer Accounts] a wielt dann [Konten exportéieren]. Wielt de Kont deen Dir exportéiere wëllt a maacht déiselwecht Schrëtt op dem neien Apparat andeems Dir [Konten transferéiert], klickt op [Import Accounts] a scannt den QR Code deen um alen Apparat ugewise gëtt. Dëse manuelle Prozess garantéiert den erfollegräichen Transfer vun Ärem Google Authenticator Kont vum alen Apparat op den neien.
2. Reset iwwer geheime Schlëssel
Wann Dir de 16-Zifferen Schlëssel während dem Bindungsprozess behalen hutt, befollegt dës Schrëtt fir Ären ursprénglechen 2FA-gebonnene Kont am Google Authenticator ze restauréieren: Klickt op d'(+) Ikon an der ënneschter rechter Ecke vum Google Authenticator . Da gitt de 16-Zifferen Schlëssel am Feld [Geheime Schlëssel], wielt [Zäitbaséiert] fir den Typ vum Schlëssel, kontrolléiert datt all déi erfuerderlech Informatioun richteg ausgefëllt ass, an dréckt op [Add]. Dëst wäert d'Verbindung mat Ärem ursprénglechen 2FA-gebonnene Kont am Google Authenticator erëmfannen.
Wéi gëlle fir Google Authenticator zréckzesetzen
Wann Dir net fäeg sidd manuell zréckzesetzen, frot w.e.g. e Reset vun eis un.
APP Versioun zréckgesat Entrée:
1. Wann Dir Äre Kont Zuel a Passwuert gitt, klickt op "Lost 2-Faktor Authenticator?" ënnendrënner fir de Google Authenticator Reset Prozess unzefänken.
2. Fëllt d'Basis Account Authentifikatioun fir Är Identitéit z'iwwerpréiwen an ze garantéieren datt de Reset autoriséiert ass. Liest d'Notifikatioun virsiichteg a befollegt de Systemguide fir relevant Kontinformatioun ze liwweren. (Mir wäerten automatesch d'Inputinformatioun beurteelen op Basis vun Ärem Kont Sécherheetsniveau während der Iwwerpréiwung. 3. No der Iwwerpréiwung vun der Applikatioun wäerte mir de Google Authenticator innerhalb vun 1-3 Aarbechtsdeeg
unbinden an Iech iwwer de Fortschrëtt per E-Mail informéieren. W.e.g. bemierkt: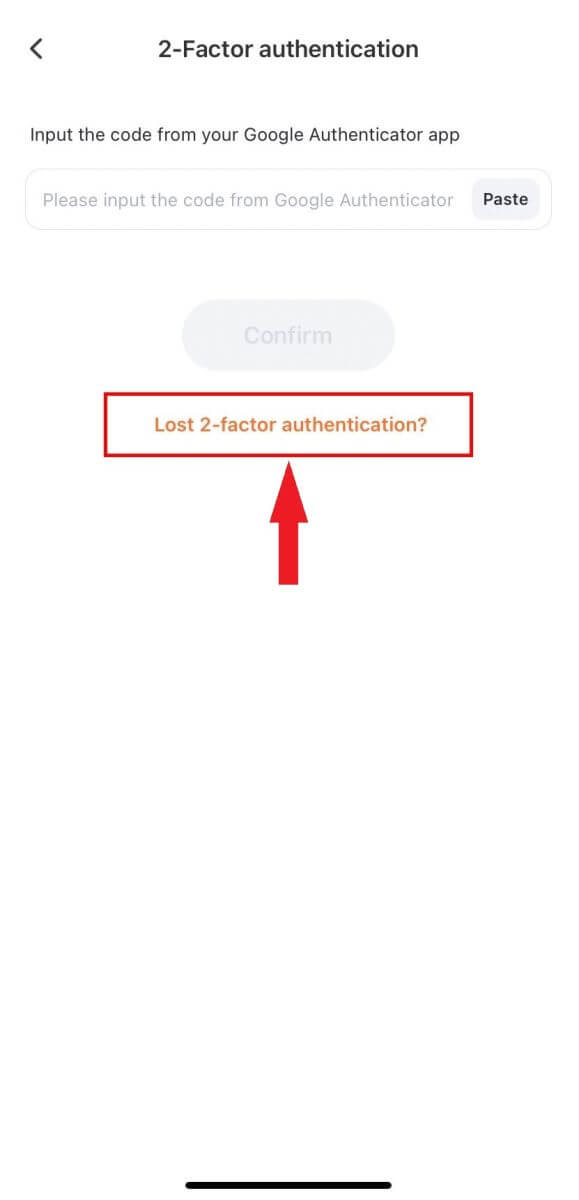
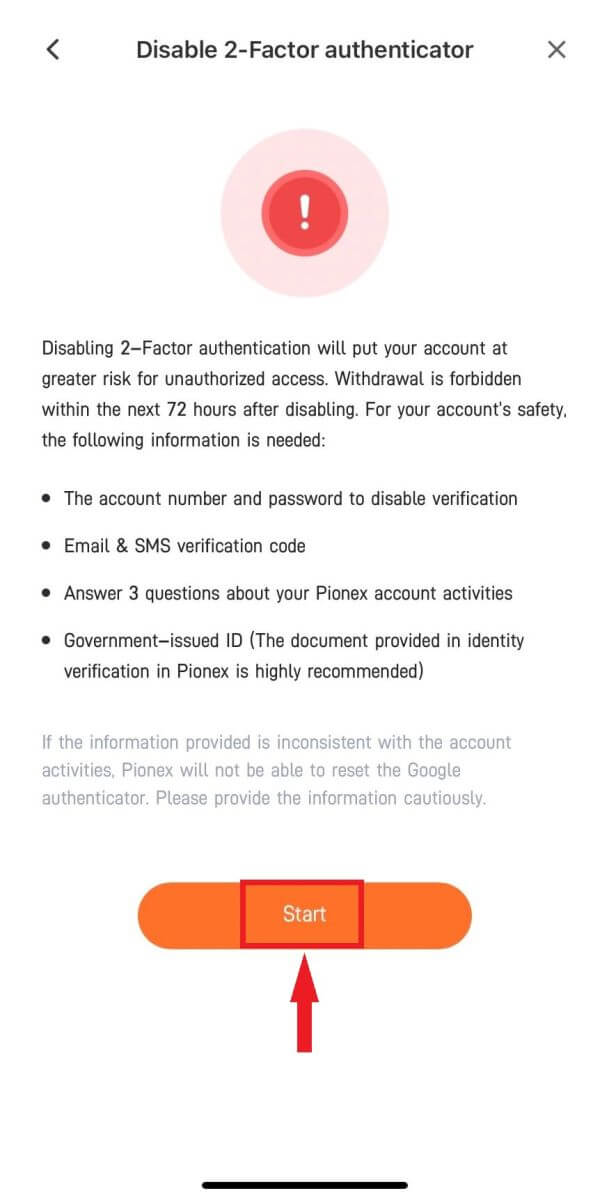
- De Resetprozess erfuerdert 1-3 Aarbechtsdeeg fir Iwwerpréiwung an Ofschloss (ausser Nationalfeierdeeg).
- Wann Är Demande refuséiert gëtt, kritt Dir eng E-Mail Notifikatioun vu [email protected], déi alternativ Léisunge ubitt.
- Nom Reset vum Google Authenticator, loggt Iech direkt op Äre Kont un fir de Google Authenticator nei ze binden.
Wéi deaktivéiert SMS / E-Mail manuell wann Dir ageloggt sidd
If you want to change or disable one of the authenticator verification of your account.It is required to bind SMS/Email and Google 2FA at the same time. You can follow the steps below to self-service and disable the authenticator.
How to disable:
1. Begin by signing in to your Pionex account. Click on the account avatar and select "Security".

2. Identify the Email/SMS option you wish to deactivate and click on"Unbind"to disable it.
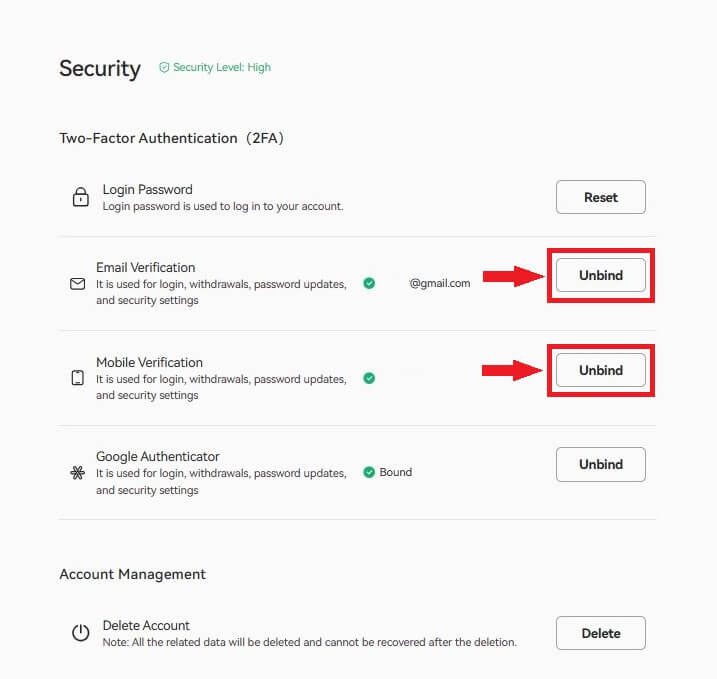
Please notice:
Following the unbinding process, Pionex will temporarily suspend your withdrawal function for 24 hours. Additionally, the information you unbind will remain suspended for 30 days after the unbinding action.
3. Once you click "Next step", enter the Google 2FA code, and then click"Confirm".
If you encounter a 2FA code error, refer to this link for troubleshooting.
4. Verify both the email and SMS verification codes, then click"Confirm"again.
If you are unable to receive one of the verification codes due to factors like a mobile phone change or email account suspension, find an alternative solution here.
5.Congratulations! You have successfully unbound Email/SMS authentication.
For the safety of your account, please re-bind at your earliest convenience!
How to Bind Google Authenticator
You may bind Google Authenticator as the following steps:
Web
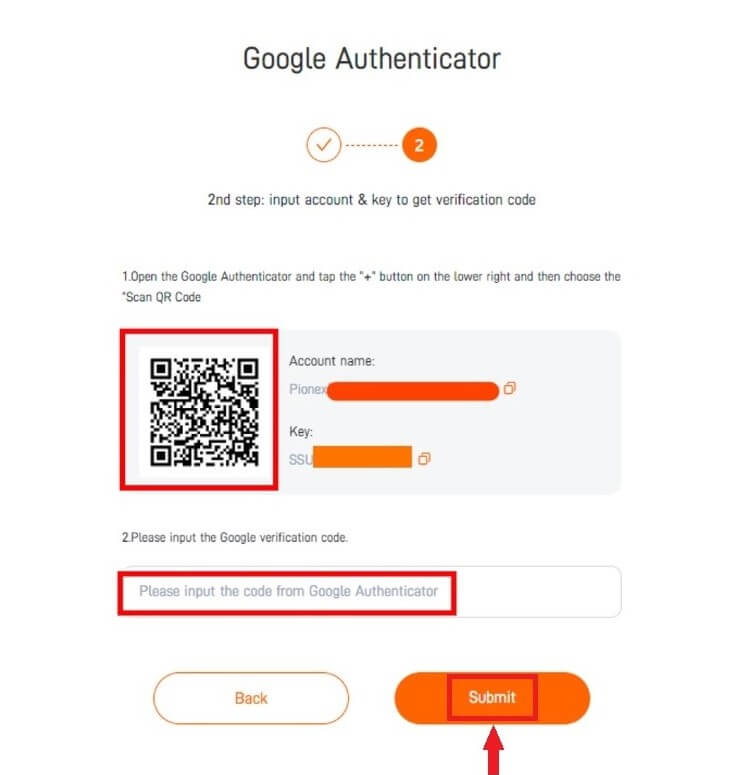
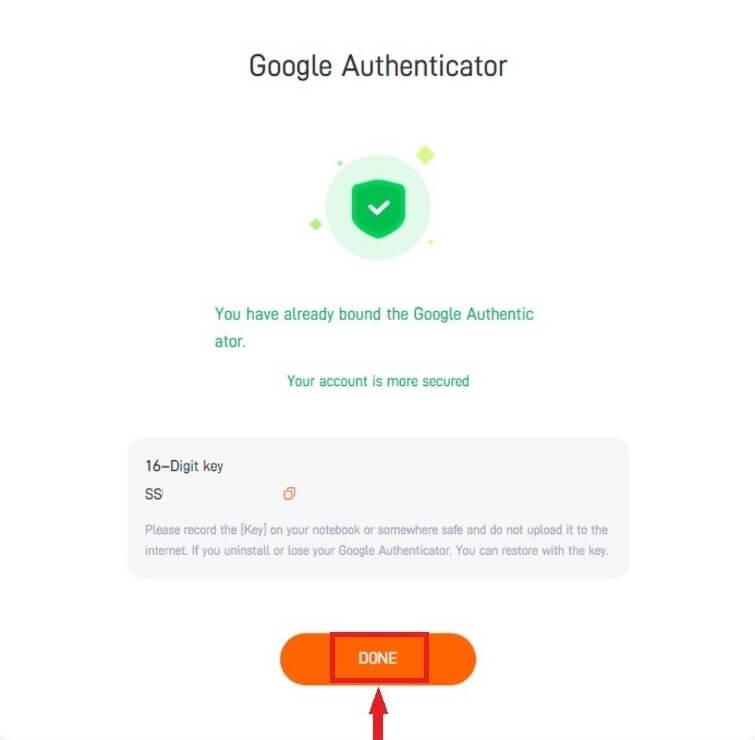
1. Navigate to your Avatar on Pionex.com, select"Security", then go to"Google Authenticator"and click"Set".
2. Install the [Google Authenticator] App on your mobile device.
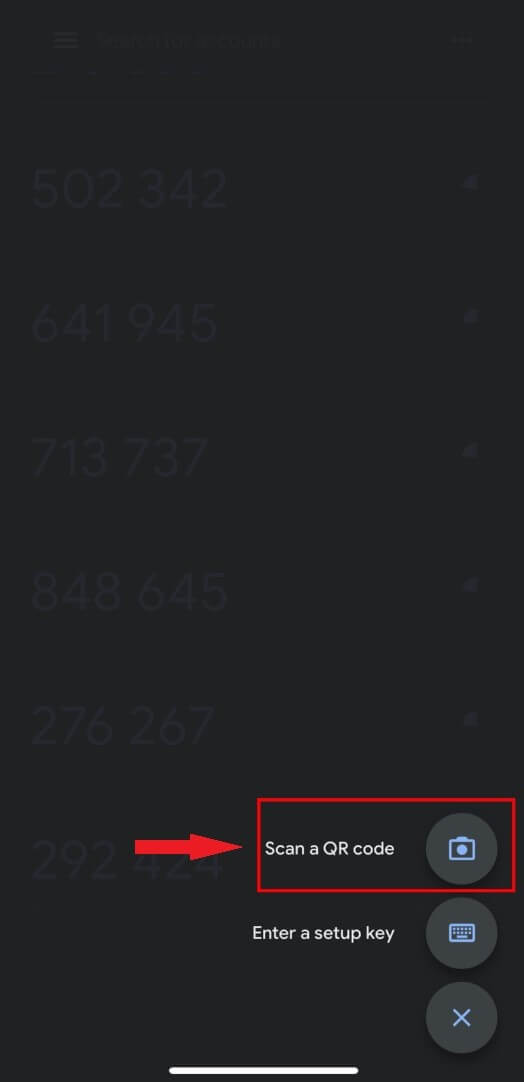
3. Open your Google Authenticator and select“Scan a QR code“.
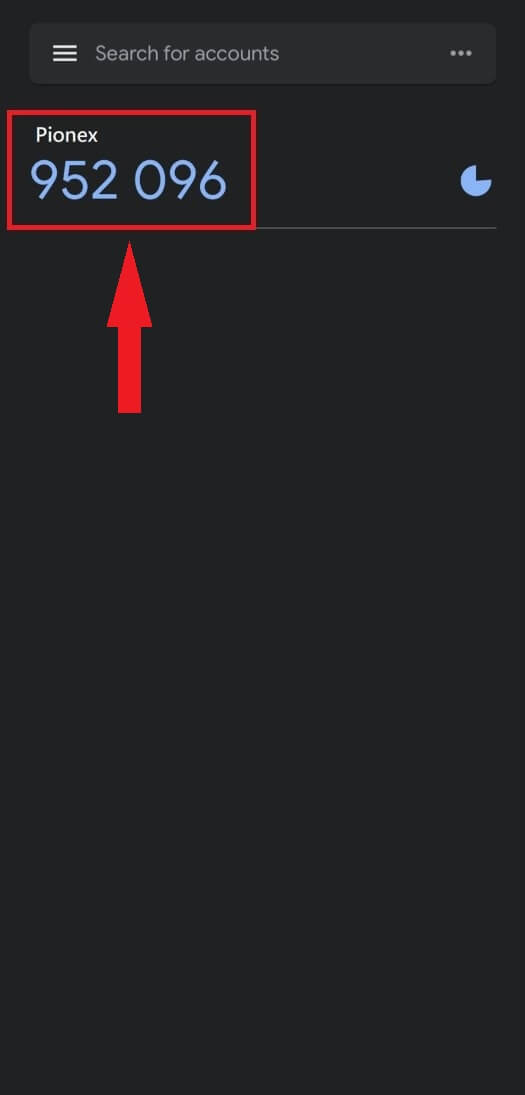
4. Obtain a 6-digit verification code (valid within every 30 seconds) for your Pionex account. Input this code on your website page.
5. Congratulations! You have successfully linked Google Authenticator to your account.
Remember to record the [Key] in a secure location, like a notebook, and avoid uploading it to the internet. In case of uninstallation or loss of Google Authenticator, you can reset it using the [Key].
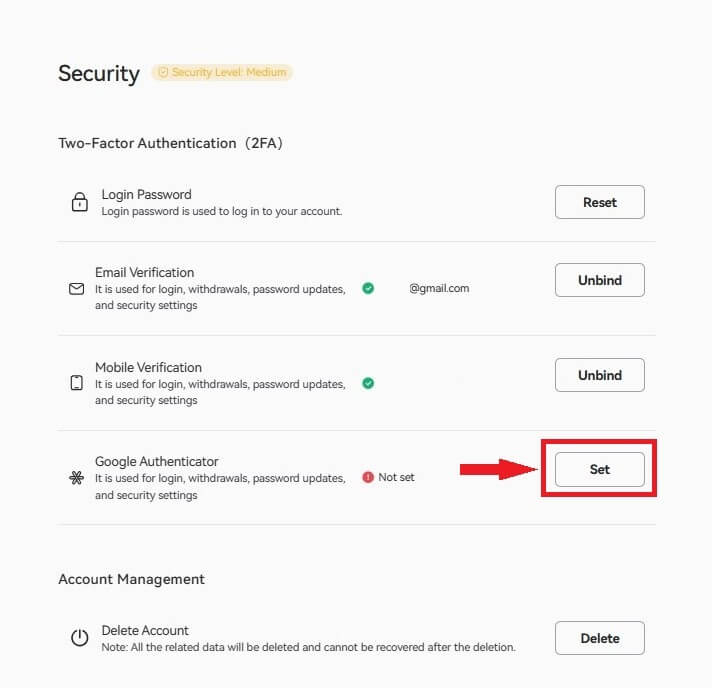
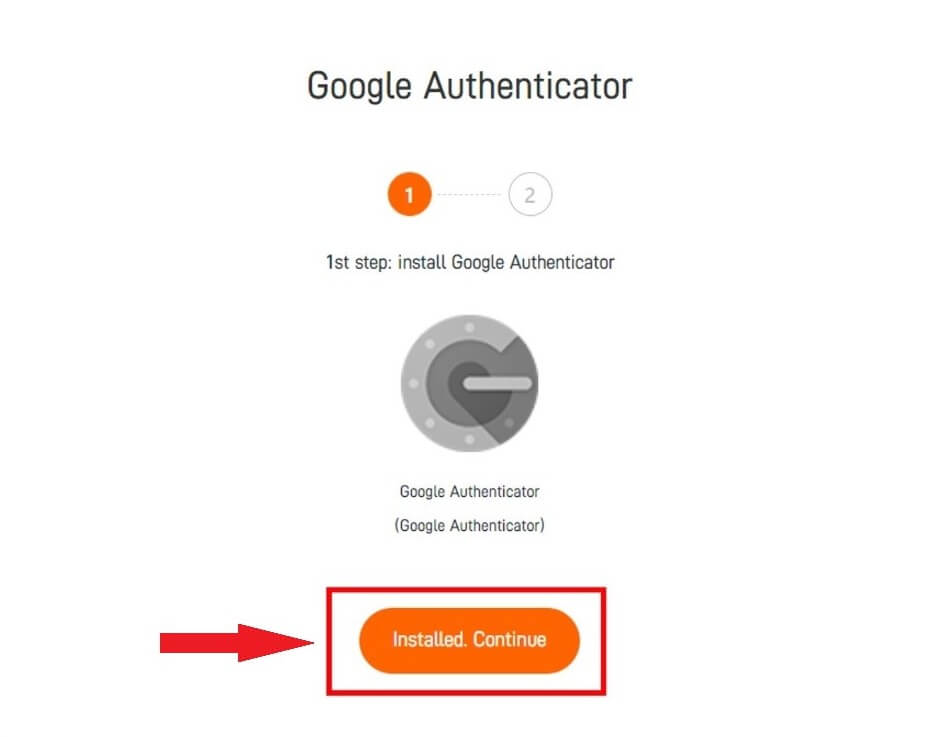
App
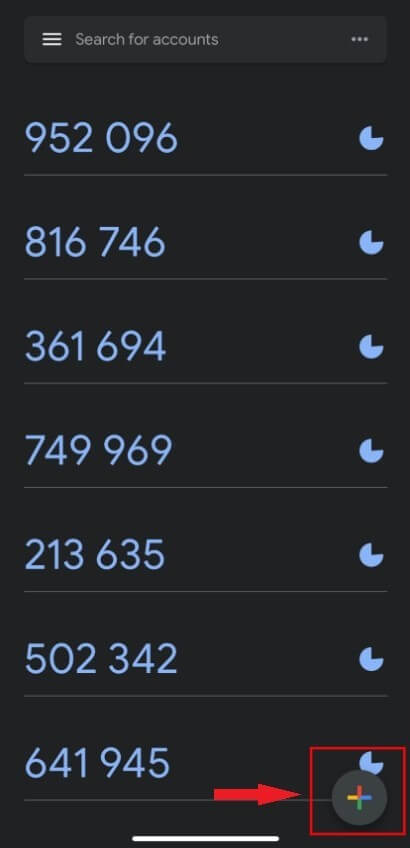
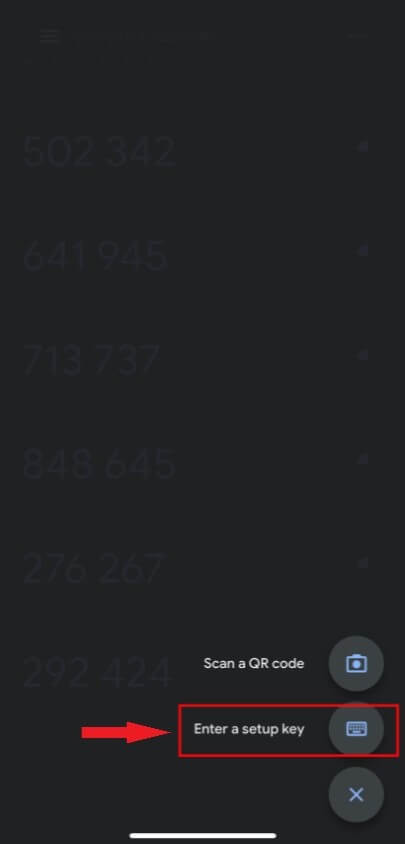
1. Launch the Pionex APP and go to“Account” --“Settings” --“Security” --“2-Factor authenticator” --“Google Authenticator” --“Download”.
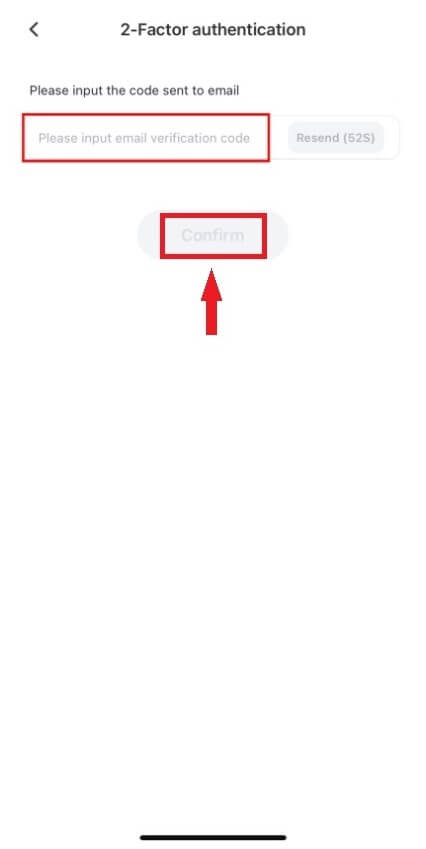
2. Enter your Email/SMS verification code.
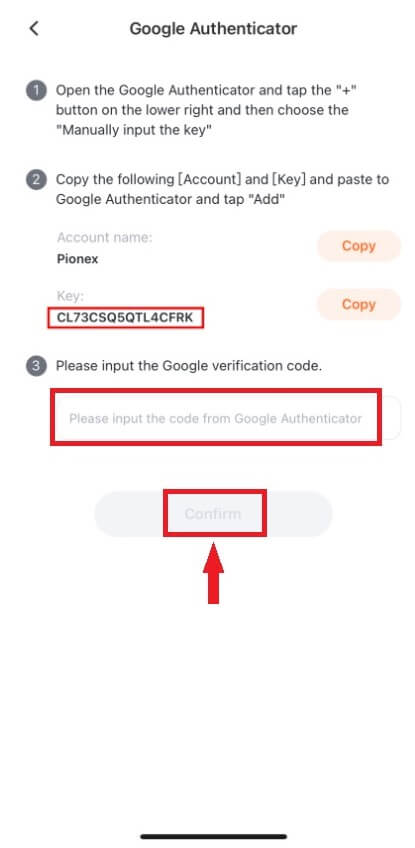
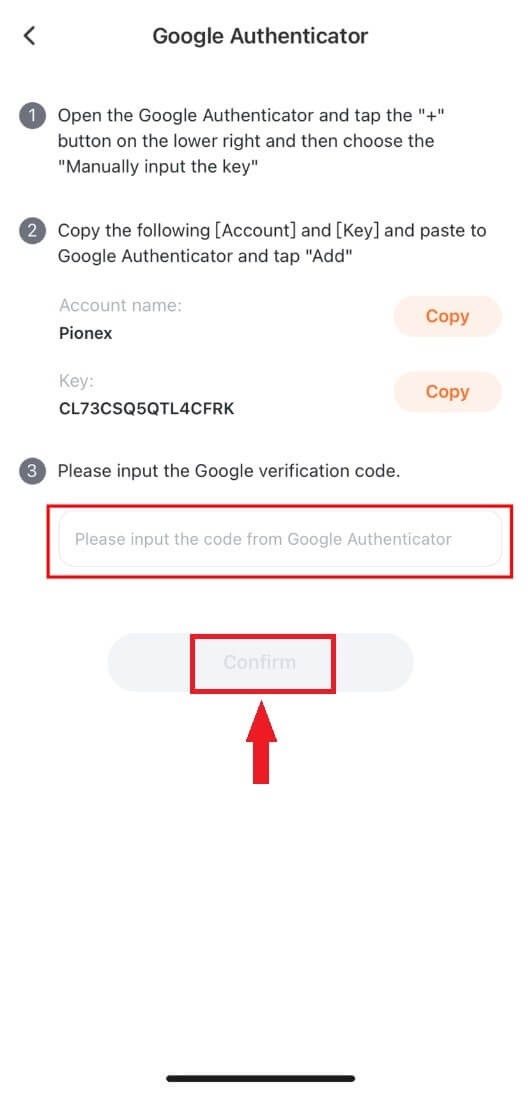
3. Follow the system prompts to copy and paste the Pionex account name and Key (secret key) into Google Authenticator.
4. Obtain a 6-digit verification code (valid only within 30 seconds) for your Pionex account.
5. Zréck op d'Pionex APP a gitt de kritt Verifikatiounscode.
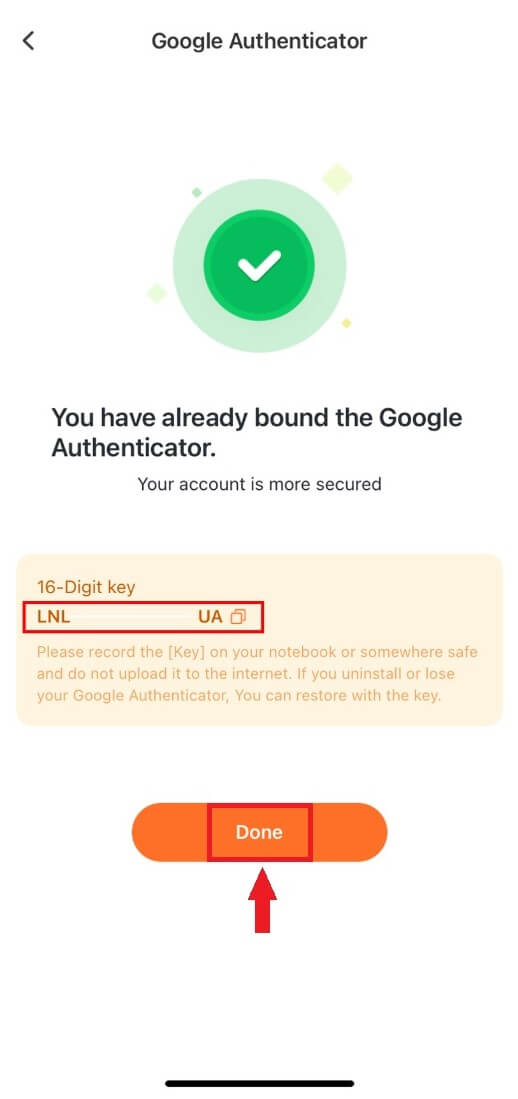
6. Gratulatioun! Dir hutt Google Authenticator erfollegräich mat Ärem Kont verbonnen.
Notéiert w.e.g. den [Schlëssel] an Ärem Notizbuch oder iergendwou sécher an luet se net op den Internet erop. Wann Dir Äre Google Authenticator deinstalléiert oder verléiert. Dir kënnt et mat der [Schlëssel] zrécksetzen.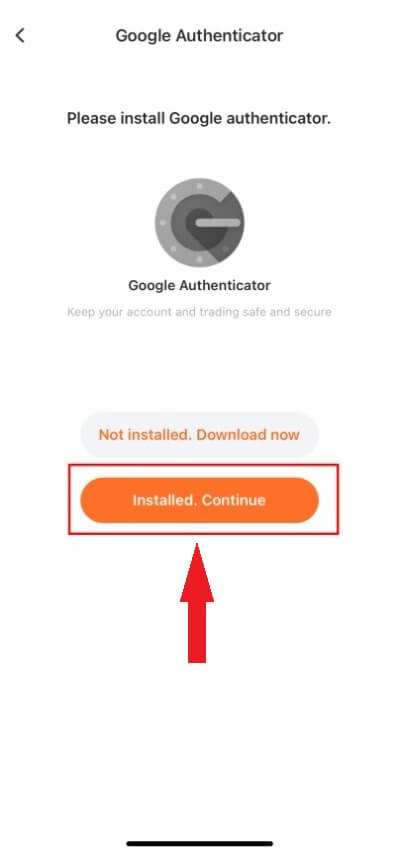

Verifikatioun
Firwat soll ech zousätzlech Zertifikainformatioun ubidden?
An ongewéinleche Fäll wou Äre Selfie net mat den geliwwerten ID-Dokumenter entsprécht, musst Dir zousätzlech Dokumenter ofginn an op manuell Verifizéierung waarden. W.e.g. bewosst datt de manuelle Verifizéierungsprozess iwwer e puer Deeg ka verlängeren. Pionex prioritär e grëndlechen Identitéitsverifizéierungsservice fir d'Fongen vun de Benotzer ze schützen, an et ass entscheedend fir sécherzestellen datt d'Materialien, déi proposéiert ginn, de spezifizéierte Viraussetzunge während dem Informatiounsfäegkeetsprozess entspriechen.
Identitéitsverifizéierung fir Krypto mat Kreditt / Bankkaart ze kafen
Fir eng sécher a konform Fiat Gateway-Erfarung ze garantéieren, mussen d'Benotzer déi Krypto-Währungen mat Kreditt- oder Bankkaarte kafen, Identitéitsverifizéierung ënnerhuelen. Déi, déi schonn d'Identitéitsverifikatioun fir hire Pionex Kont ofgeschloss hunn, kënnen nahtlos mat Krypto Akeef weidergoen ouni zousätzlech Informatioun erfuerderlech. D'Benotzer, déi extra Informatioun brauchen, kréien Ufroe beim Versuch e Krypto-Kaaf mat enger Kredit- oder Bankkaart ze maachen.
All Niveau vun der Identitéitsverifizéierung ofzeschléissen wäert zu verstäerkte Transaktiounsgrenzen féieren, wéi hei ënnendrënner detailléiert. All Transaktiounsgrenze sinn an Euro (€) denominéiert, onofhängeg vun der benotzte Fiat Währung, a kënne liicht an anere Fiat Währungen schwanken op Basis vun den Austauschsätz.
Basis Info Verifizéierung: Dëse Niveau beinhalt d'Verifizéierung vum Numm, Adress an Gebuertsdatum vum Benotzer.
Gemeinsam gescheitert Grënn an d'Methoden op Pionex
APP:Click“Account”--“Security”--“Identity verification”.
Web:Click your profile avatar on the top-right of the page then into“Account”--“KYC”--“Check detail”.
If the verification fails, click"Check"and the system will display a prompt revealing the specific reasons for the failure.
Common reasons for verification failure and troubleshooting steps are as follows:
1. Incomplete Photo Upload:
Confirm that all photos have been successfully uploaded. The submit button will activate after all photos are uploaded.
2. Outdated Webpage:
If the webpage has been open for an extended period, simply refresh the page and re-upload all the photos.
3. Browser Issues:
If the problem persists, try using the Chrome browser for KYC submission. Alternatively, use the APP version.
4. Incomplete Document Photo:
Ensure that every edge of the document is captured in the photo.
If you are still unable to verify your KYC, please send an email to [email protected] the subject"KYC failure"and provide yourPionex account Email/SMSin the content.
The KYC team will assist you in re-checking the status and respond via email. We appreciate your patience!
Deposit
Coins or Networks not supported on Pionex
Exercise caution when depositing coins or utilizing networks that are not supported by Pionex. If a network is not endorsed by Pionex, there is a possibility that you may be unable to recover your assets.If you discover that the coin or network is not supported by Pionex, kindly complete the form and await our processing (Note that not all coins and networks may be accommodated).
Why do some coins need a memo/tag?
Certain networks utilize a shared address for all users, and the memo/tag serves as a crucial identifier for transfer transactions. For instance, when depositing XRP, it is essential to provide both the address and memo/tag for a successful deposit. If there is an incorrect memo/tag entry, please complete the form and anticipate a processing time of 7-15 business days (Note that not all coins and networks may be accommodated).Minimum deposit amount
Ensure that your deposit amount exceeds the specified minimum, as deposits below this threshold cannot be completed and are irretrievable.
Additionally, you can verify the minimum deposit and withdrawal amounts.
What do I do when I do not receive the deposit in my Pionex account?
If you haven’t received the deposit after7 business days, please furnish the following details to service agents or email[email protected]:- Owner’s name of the bank account.
- Owner’s name of the Pionex account along with the account email/phone number (including country code).
- Remittance amount and date.
- A screenshot of the remittance information from the bank.
Withdrawal
Why hasn’t my withdrawal arrived on Pionex even though it shows as completed on my external platform/wallet?
This delay is attributed to the confirmation process on the blockchain, and the duration varies based on factors such as the coin type, network, and other considerations. As an illustration, withdrawing USDT via the TRC20 network mandates 27 confirmations, whereas the BEP20 (BSC) network necessitates 15 confirmations.Withdrawals returned from other exchanges
In certain instances, withdrawals to alternative exchanges might be reversed, requiring manual processing.
While there are no fees for depositing coins into Pionex, withdrawing coins may incur charges from the withdrawal platform. The fees are contingent on the specific coin and network utilized.
If you encounter a situation where your crypto is returned from other exchanges, you can complete a form for asset recovery. We will reach out to you via email within1-3 business days. The entire process spans up to10 working daysand may involve a fee ranging from 20 to 65 USD or equivalent tokens.
Why is my [Available] balance less than [Total]balance?
The reduction in[Available]balance compared to[Total]balanceis typically due to the following reasons:- The active trading bots commonly lock funds, rendering them unavailable for withdrawal.
- Manually placing sell or buy limit orders typically results in the funds being locked and unavailable for use.
What’s the minimum withdrawal amount?
Please refer to the[Fees]page or the[Withdrawal]page for detailed information.If I only hold a small amount, how to withdraw it?
We recommend converting them into XRP (Mainnet) or ETH (BSC), both of which offer a low minimum withdrawal limit and nominal fees.Why is my withdrawal reviewing time so long?
Withdrawals of substantial amounts undergo manual review to ensure security. If your withdrawal has exceeded one hour at this point, kindly reach out to Pionex’s online customer service for further assistance.My withdrawal has been completed, but I haven’t received it yet.
Kindly review the transfer status on the withdrawal transaction page. If the status indicates [Complete], it signifies that the withdrawal request has been processed. You can further verify the status on the blockchain (network) through the provided "Transaction ID (TXID)" link.
If the blockchain (network) confirms a successful/completed status, yet you have not received the transfer, please reach out to customer service at the receiving exchange or wallet for confirmation.
Crypto Trading
What is a Limit Order
When analyzing a chart, there are instances where you aim to acquire a coin at a specific price. However, you also want to avoid paying more than necessary for that coin. This is where a limit order becomes essential. Various types of limit orders exist, and I will elucidate the distinctions, their functionalities, and how a limit order differs from a market order.When individuals engage in cryptocurrency transactions, they encounter various purchasing options, one of which is the limit order. A limit order involves specifying a particular price that must be reached before the transaction is completed.
For example, if you aim to purchase Bitcoin at $30,000, you can place a limit order for that amount. The purchase will only proceed once the actual price of Bitcoin reaches the designated $30,000 threshold. Essentially, a limit order hinges on the prerequisite of a specific price being attained for the order to be executed.
What is Market Order
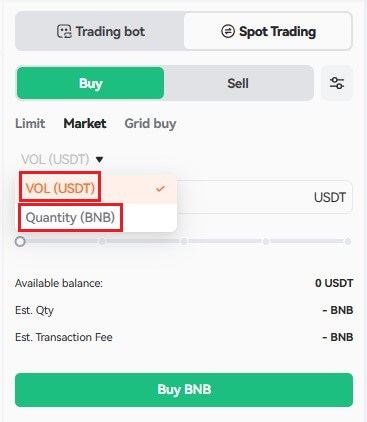
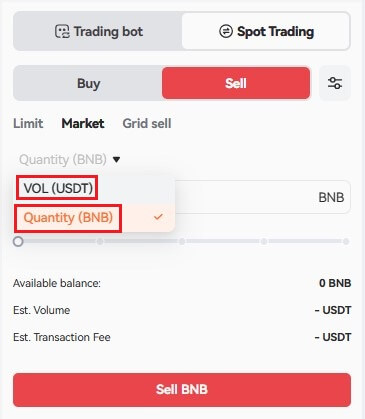
A market order is promptly executed at the prevailing market price upon placement, facilitating swift execution. This order type is versatile, allowing you to utilize it for both buying and selling transactions.You can select [VOL] or [Quantity] to place a buy or sell market order. For example, if you want to buy a certain quantity of BTC, you can enter the amount directly. But if you want to buy BTC with a certain amount of funds, such as 10,000 USDT, you can use [VOL] to place the buy order.
How to View My Spot Trading Activity
You can view your spot trading activities from theOrdersand clickSpot Orders. Simply switch between the tabs to check your open order status and previously executed orders.1. Open orders
Under the[Open Orders]tab, you can view details of your open orders, including:
- Trading pair
- Order operation
- Ordertime
- Order Price
- Order Quantity
- Filled
- Action

2. Order history
Order history displays a record of your filled and unfilled orders over a certain period. You can view order details, including:
- Trading pair
- Order operation
- Filled time
- Average Price/Order Price
- Filled/Order Quantity
- Total
- Transaction fee
- Change
- Order Status


