How to Login and Verify Account in Pionex
Be sure to secure your Pionex account - while we do everything to keep your account secure, you also have the power to increase the security of your Pionex account.

How to Login Account in Pionex
How to Login to Pionex with Phone Number/Email
1. Go to Pionex Website and click on "Sign in".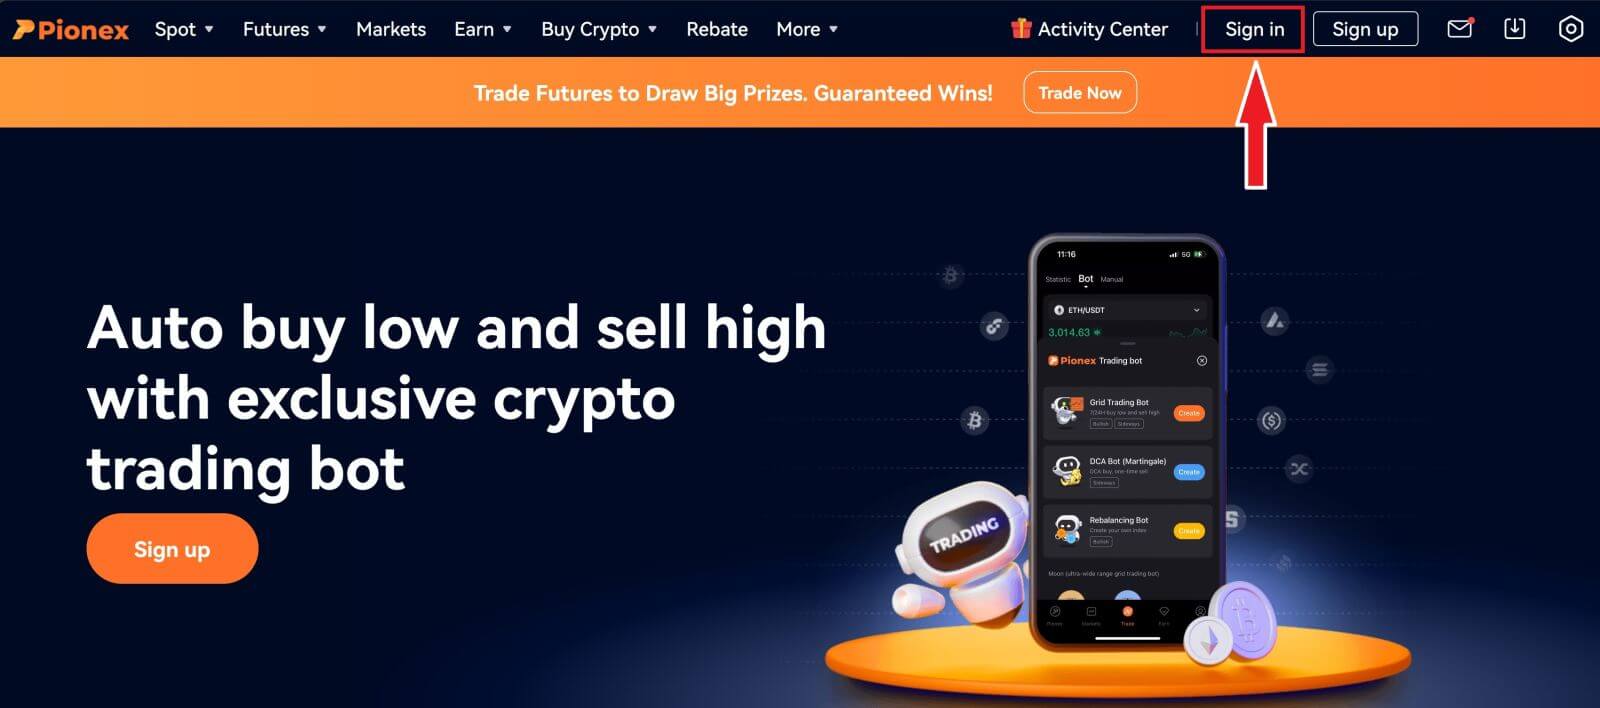
2. Enter your Email / Phone Number and the Password.
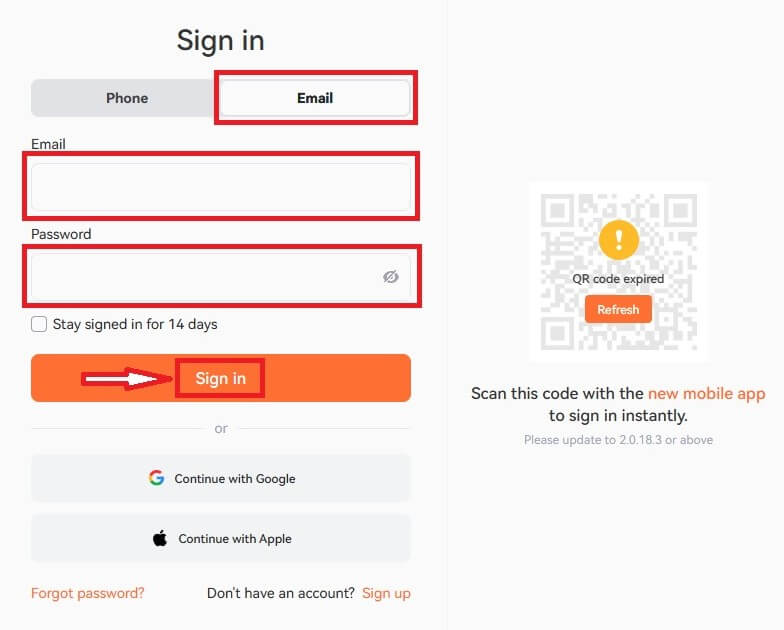
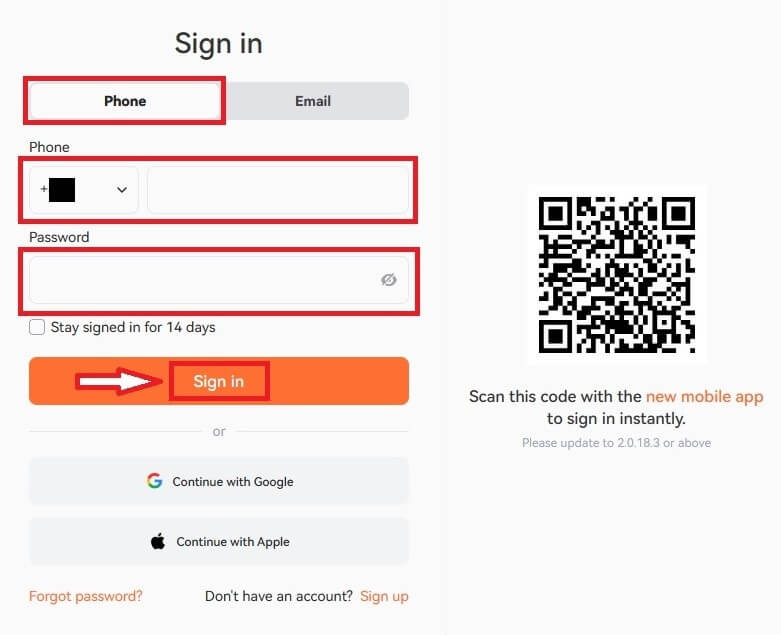
3. If you’ve set SMS verification or 2FA verification, you will be directed to the Verification Page to enter SMS verification code or 2FA verification code.
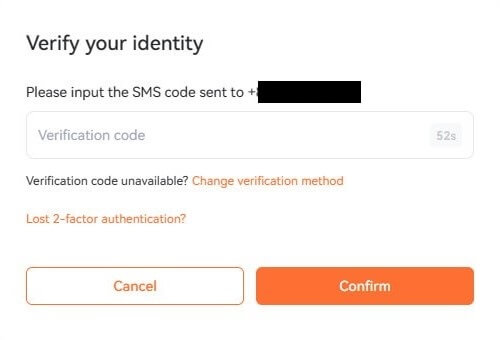
4. After entering the correct verification code, you can successfully use your Pionex account to trade.
How to Login to Pionex with your Google account
1. Go to Pionex Website and click [Sign in].
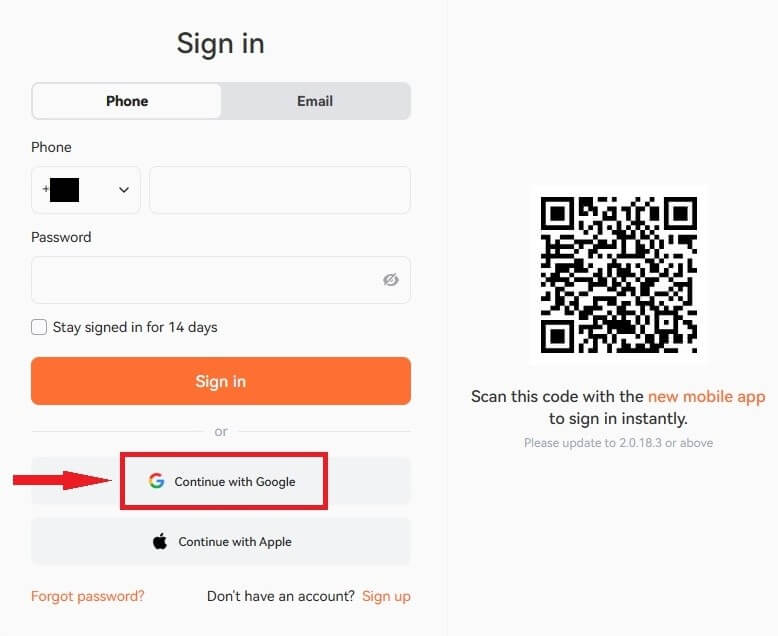
2. Select a Login method. Select [Continue with Google].
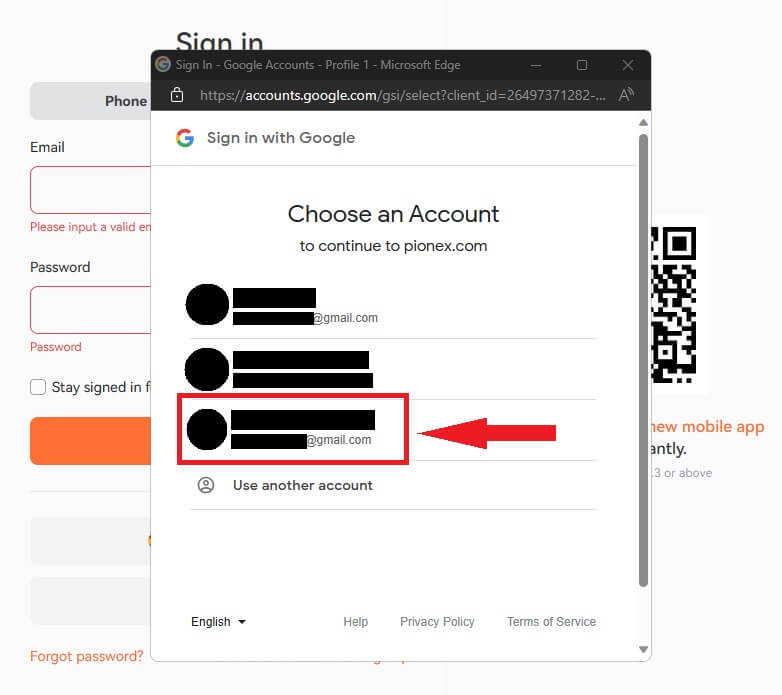
3. Choose your Google account to sign in to Pionex.
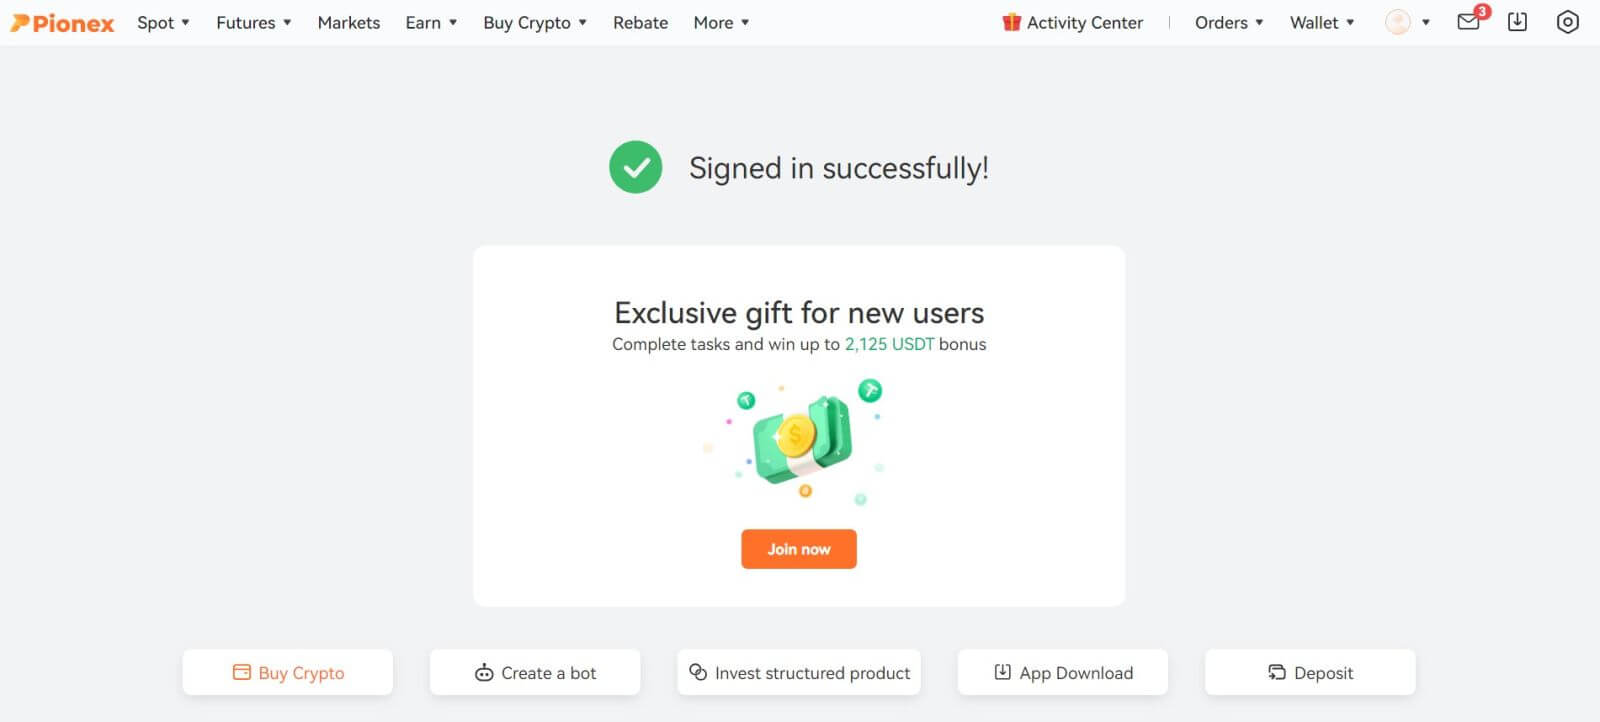
4. Congratulations, you have successfully signed in to Pionex.

How to Login to Pionex with your Apple account
With Pionex, you also have an option to log into your account through Apple. To do that, you just need to:1. On your computer, visit Pionex and click "Sign in".

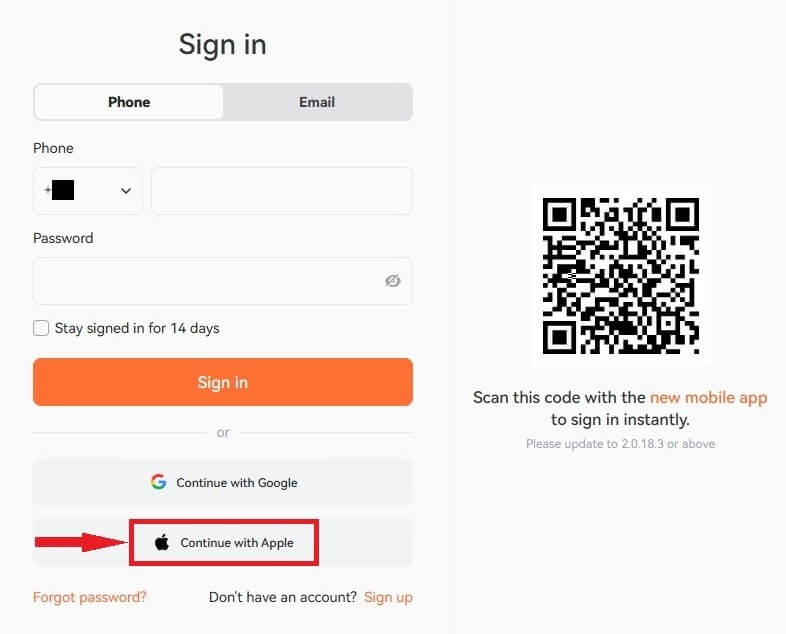
2. Click "Continue with Apple" button.
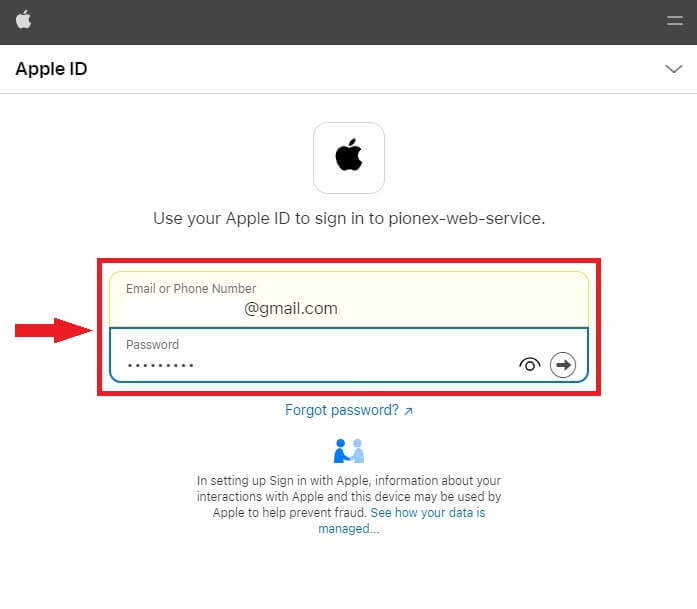
3. Enter your Apple ID and password to sign in to Pionex.
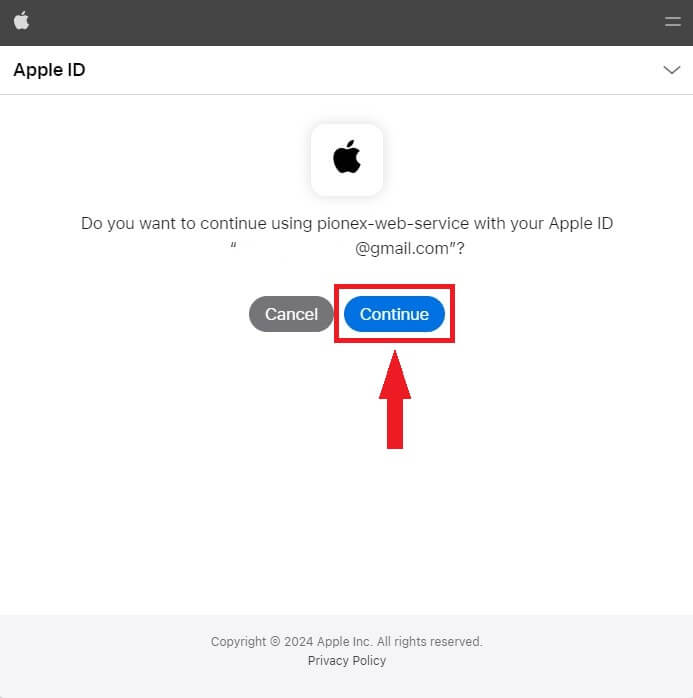
4. Click "Continue".
5. Congratulations, you have successfully signed in to Pionex.

How to Login to the Pionex Android app
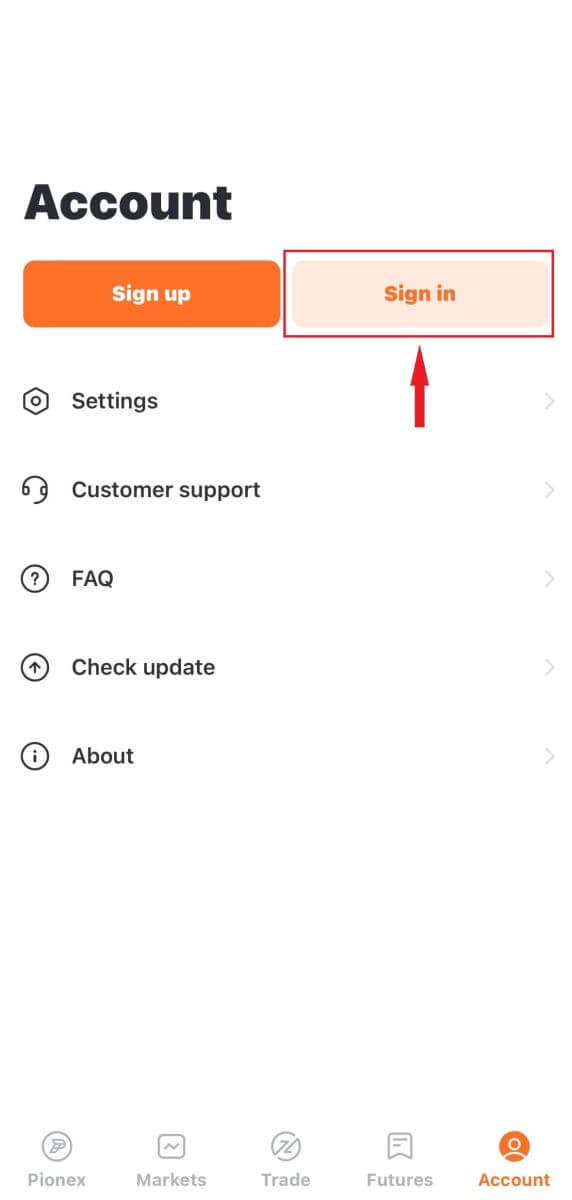
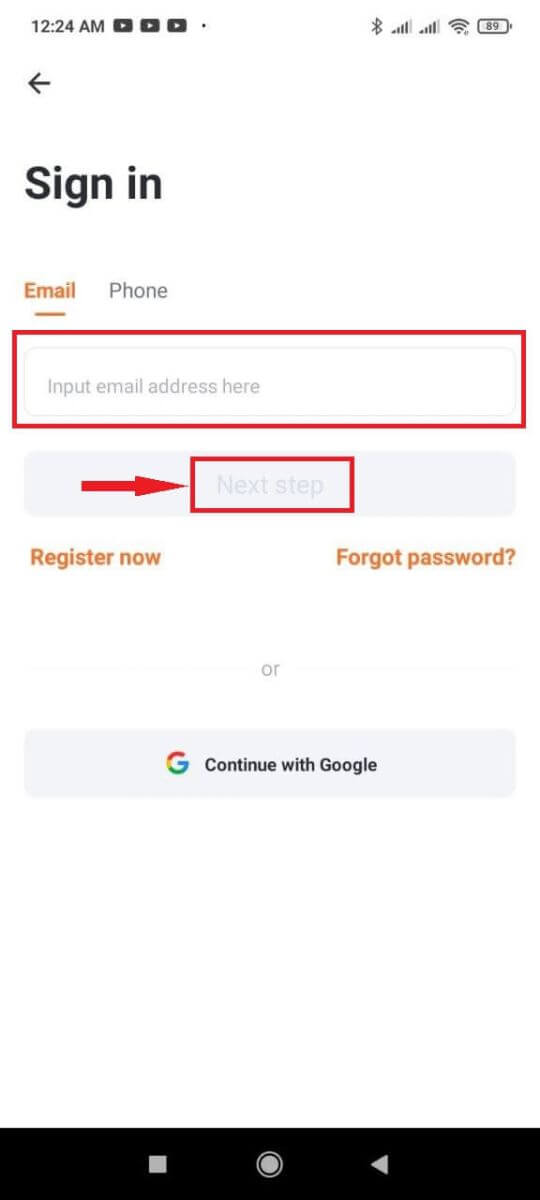
Authorization on the Android mobile platform is carried out similarly to authorization on the Pionex website. The application can be downloaded through the Google Play on your device. In the search window, just enter Pionex and click "Install".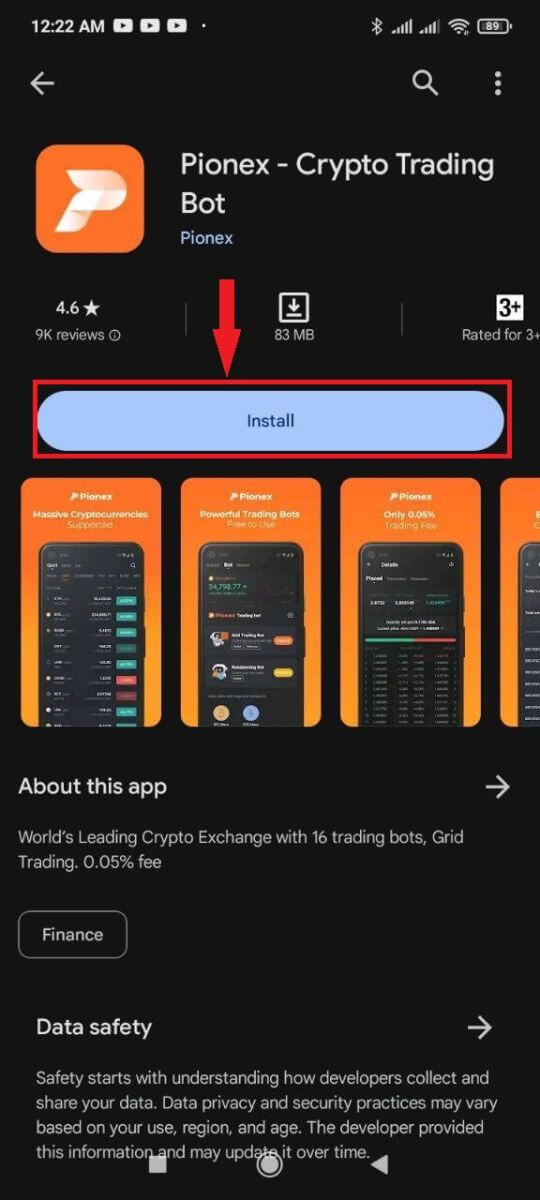
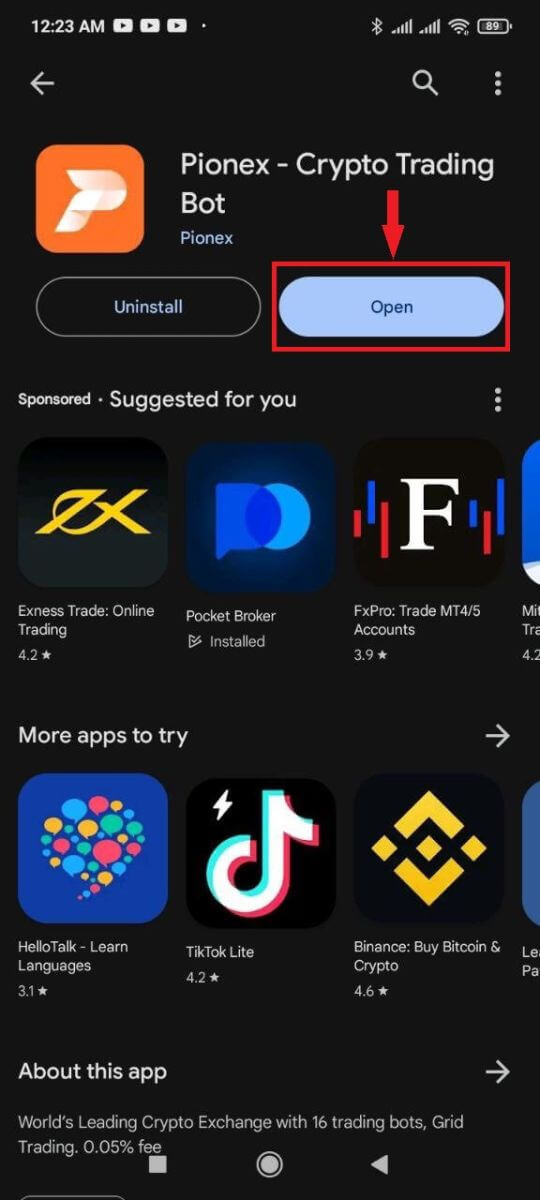
Wait for the installation to complete. Then you can open and sign in to start trading.

How to Login to the Pionex iOS app
You have to visit the App Store and search using the key Pionex to find this app. Also, you need to install the Pionex App from App Store.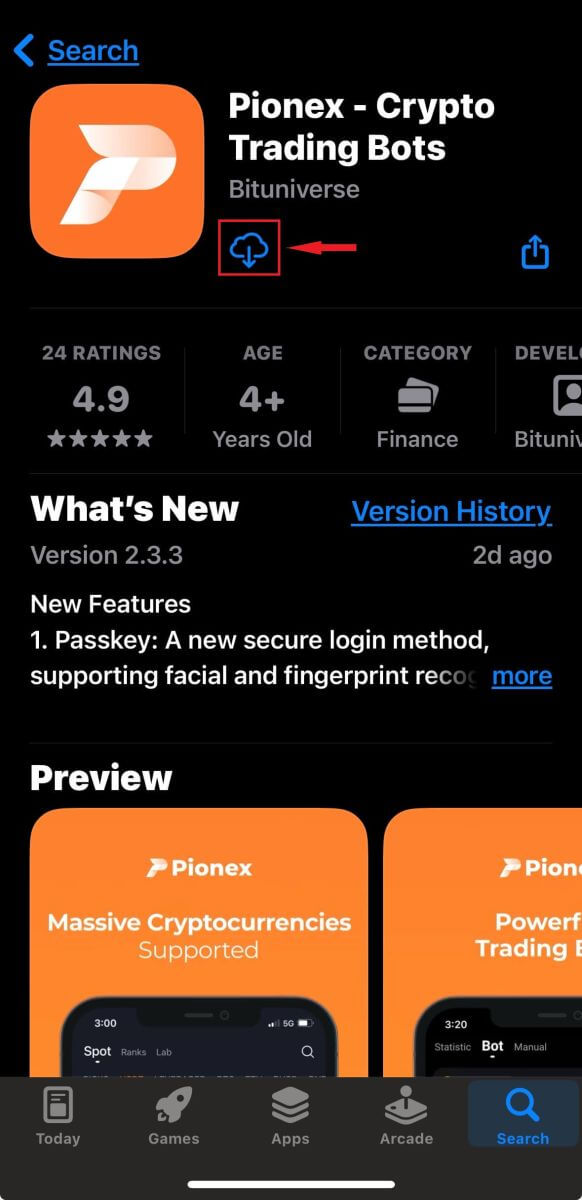
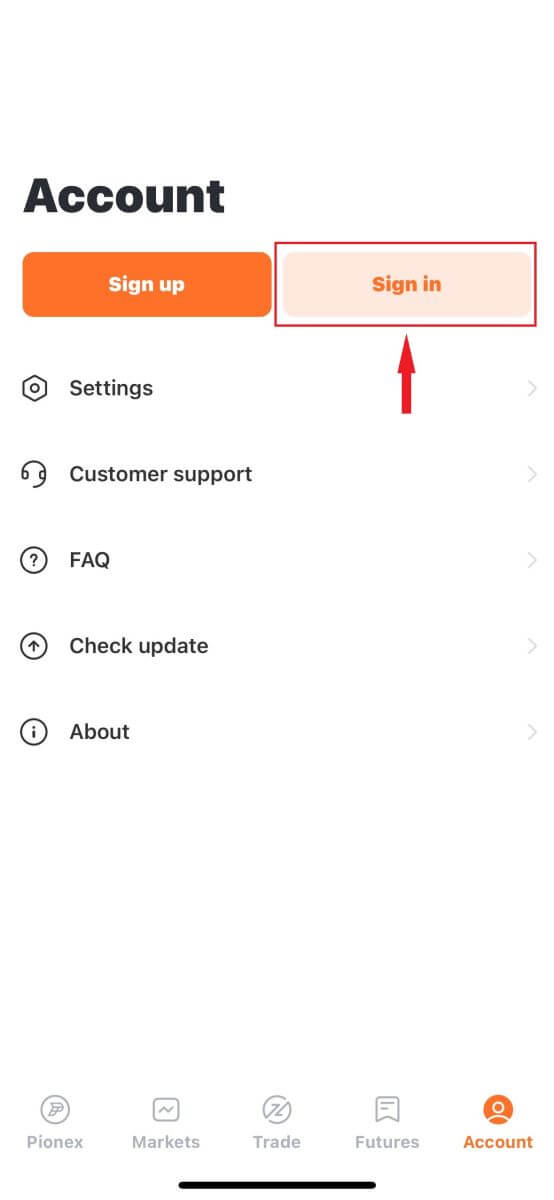
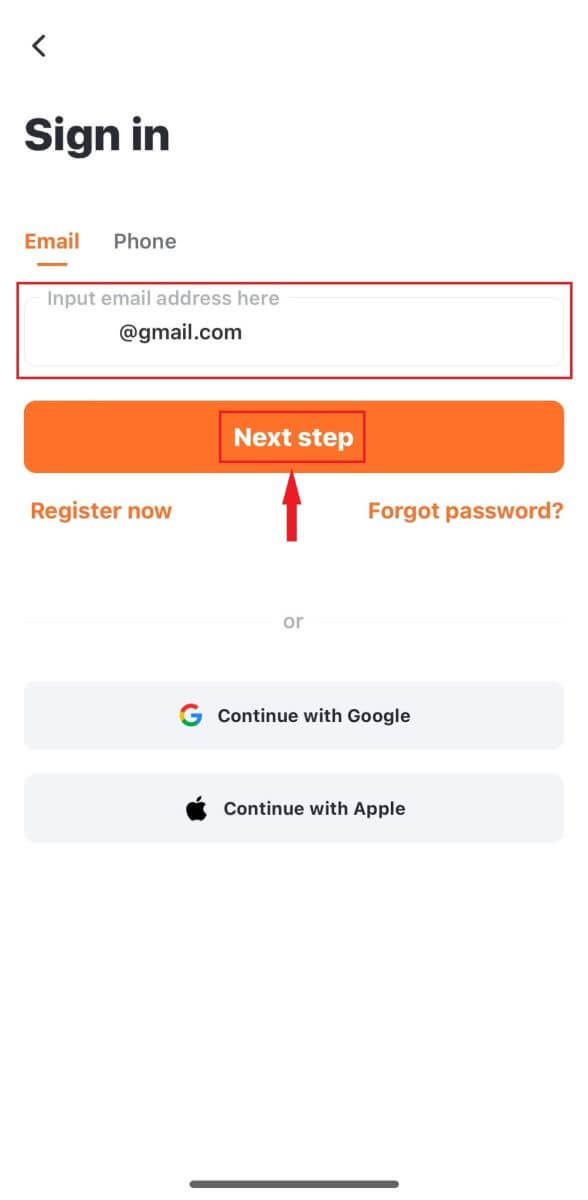
After installation and launching, you may sign in to Pionex iOS mobile app by using your email address, phone number, and Apple or Google account.


Forgot my password on Pionex
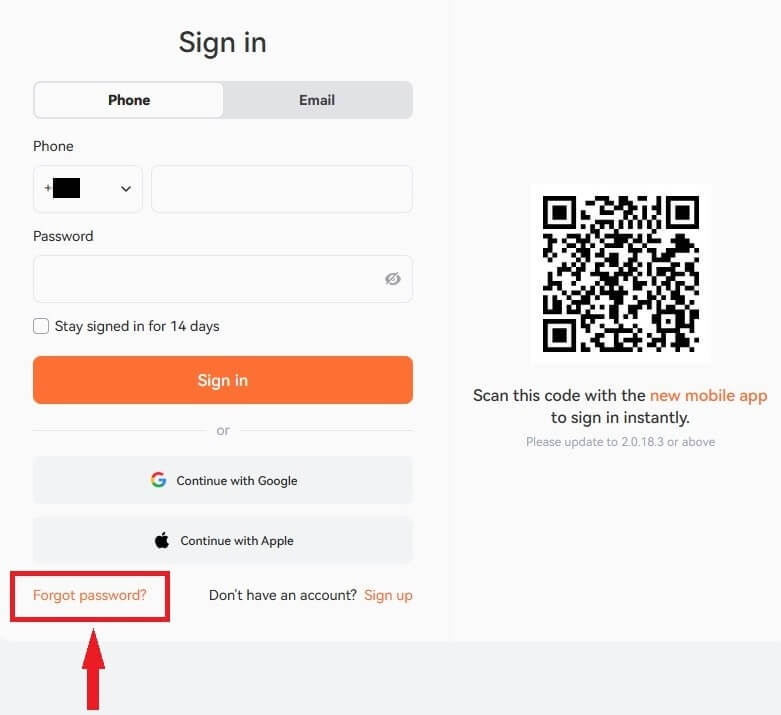
You can reset your account password from the Pionex Website or App. Please note that for security reasons, withdrawals from your account will be suspended for 24 hours after a password reset.1. Go to the Pionex Website and click [Sign in].

2. On the sign in page, click [Forgot Password?].
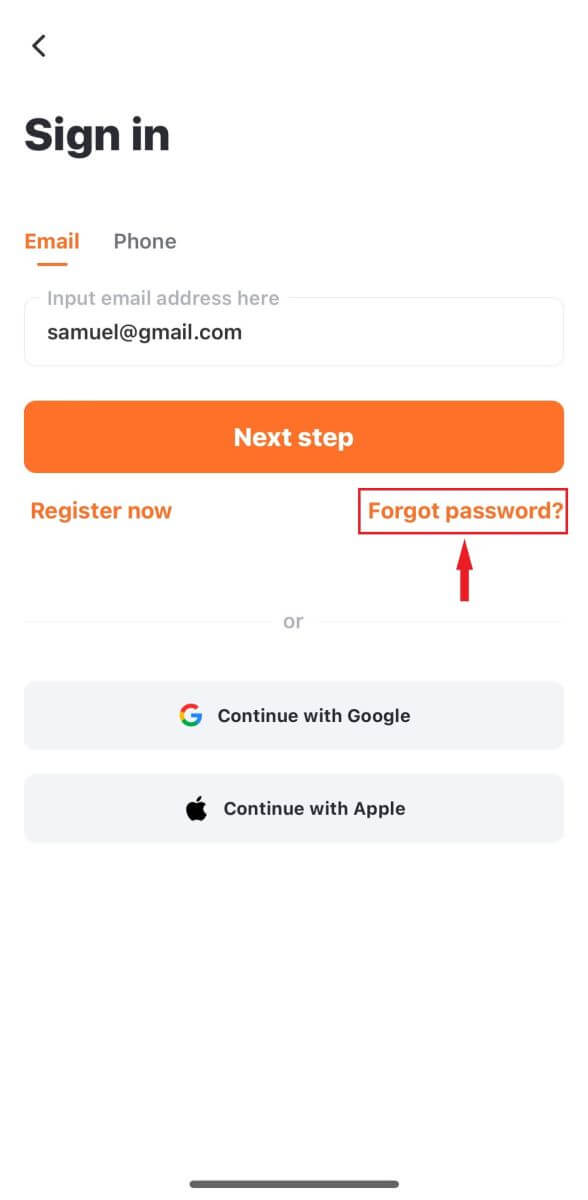
If you are using the App, click [Forgot password?] as below.


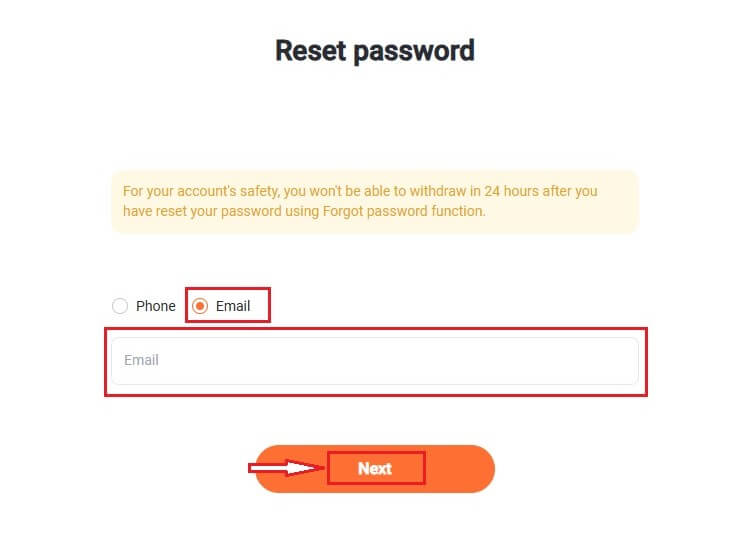
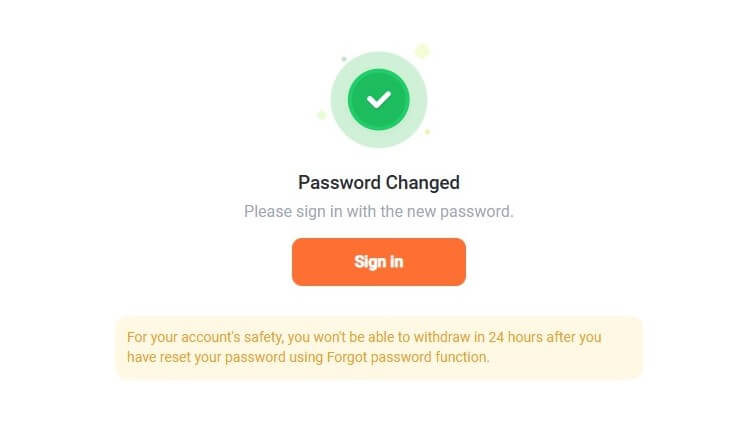
Please note that for your account’s safety, you won’t be able to withdraw in 24 hours after you have reset your password using Forgot password function.
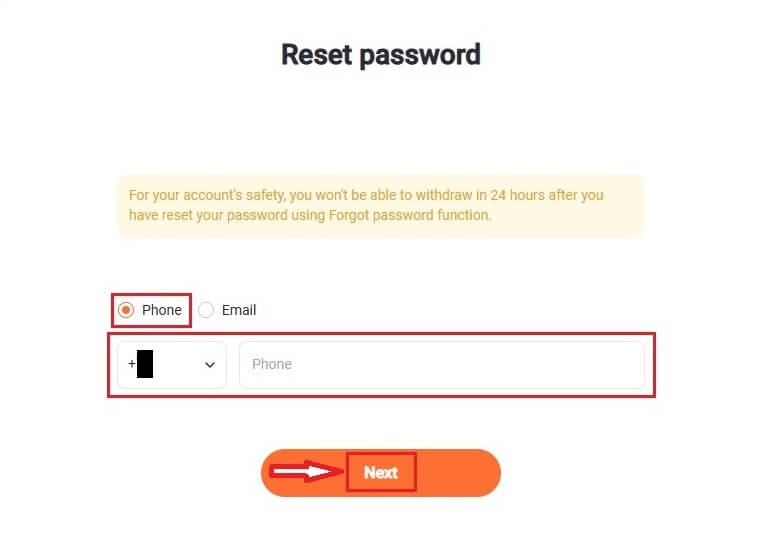
3. Enter your account email or phone number and click [Next].
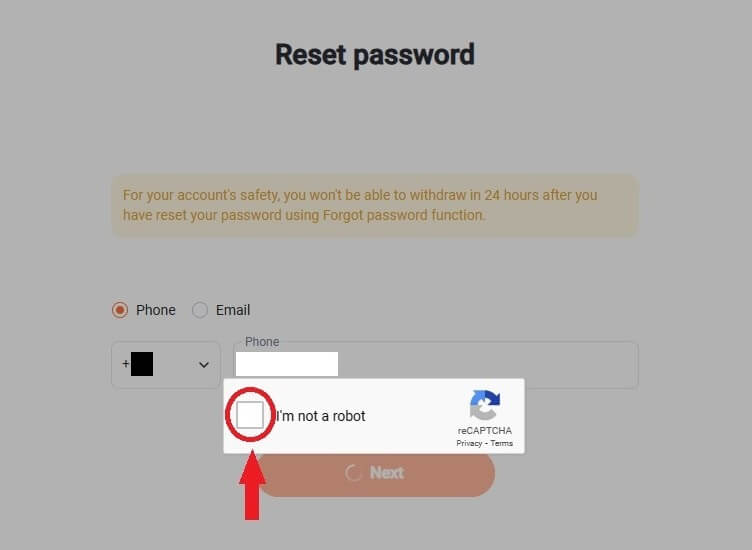
4. Click on "I’m not robot" to complete security verification.
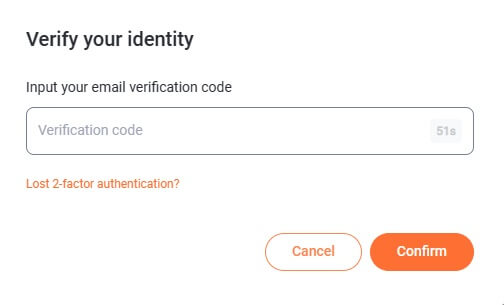
5. Enter the verification code you received in your email or SMS, and click [Confirm] to continue.
Notes
- If your account is registered with an email and you have enabled SMS 2FA, you can reset your password through your mobile number.
- If your account is registered with a mobile number and you have enabled email 2FA, you can reset the login password using your email.
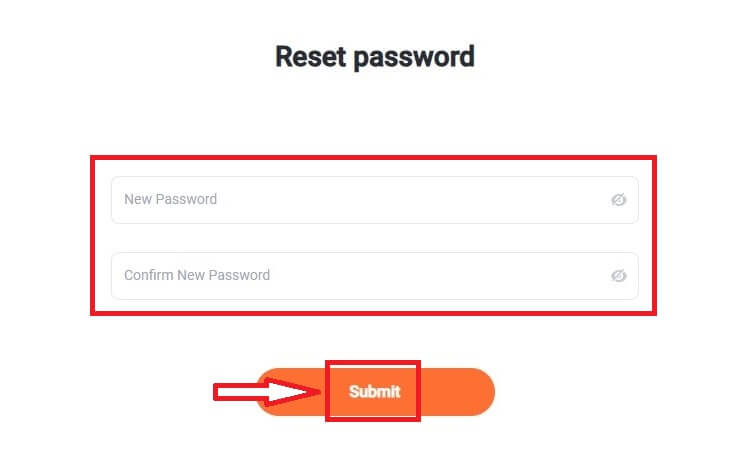
7. Your password has been reset successfully. Please use the new password to log in to your account.
Frequently Asked Questions (FAQ)
How to Change Account Email
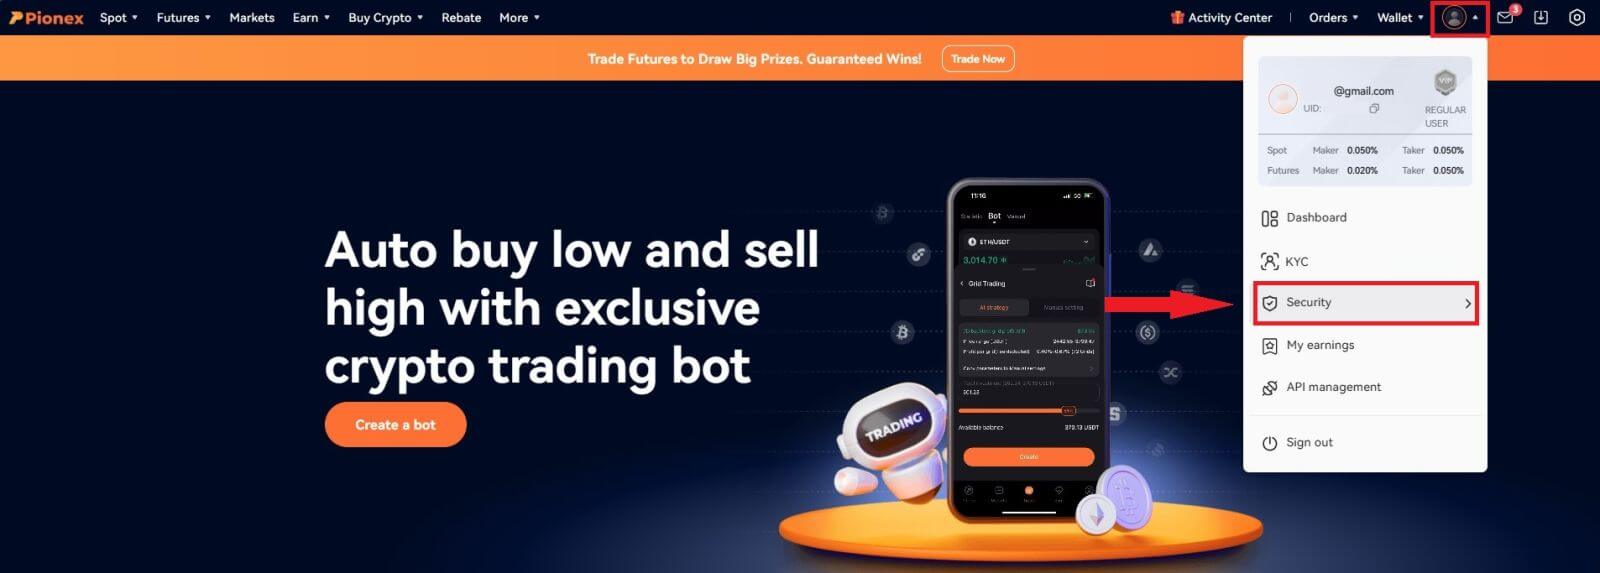
If you wish to change the email registered to your Pionex account, please follow the step-by-step guide below.After logging in to your Pionex account, click [Profile] - [Security].
Click [Unbind] next to [Email Verification].
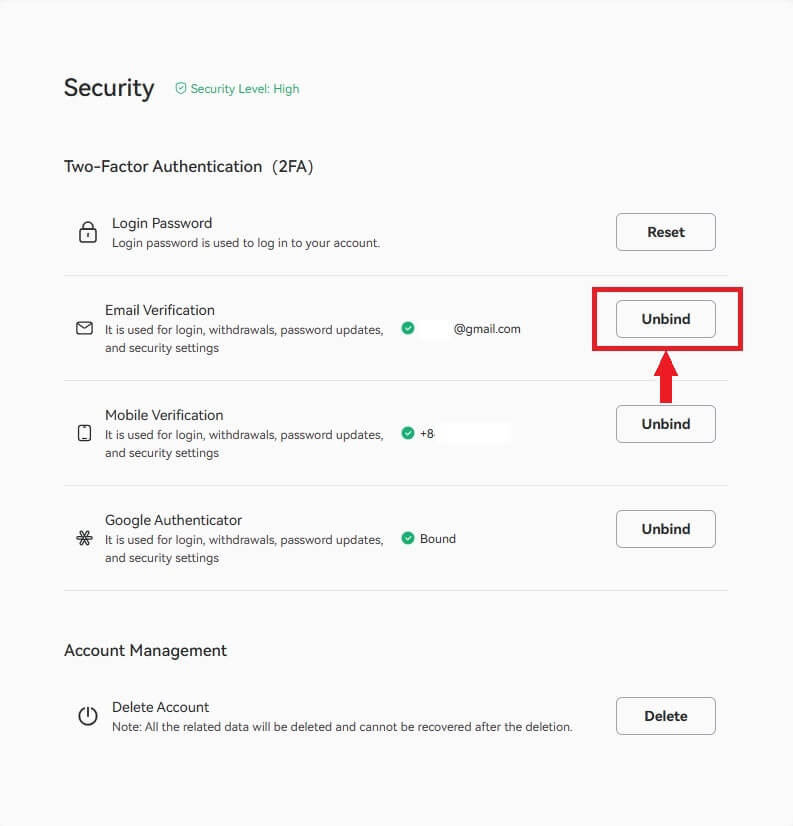
To change your registered email address, you must have enabled Google Authentication and SMS Authentication (2FA).
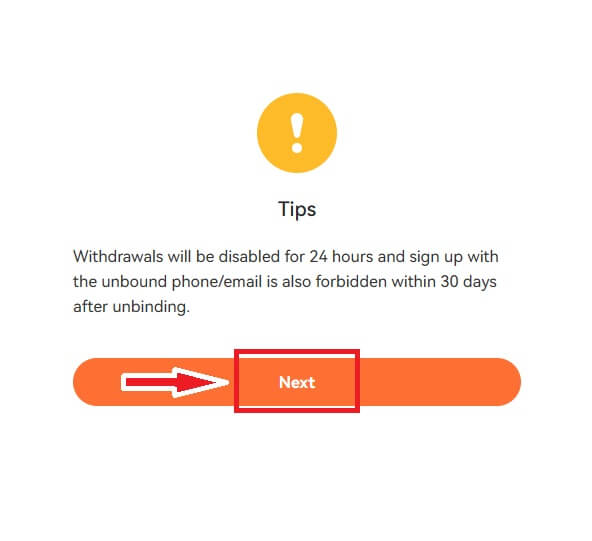
Please note that after changing your email address, withdrawals from your account will be disabled for 24 hours and sign up with the unbound phone/email is also forbidden within 30 days after unbinding for security reasons.
If you wish to proceed, click [Next].
How to reset Google Authenticator【Google 2FA】
If you have uninstalled Google Authenticator, changed your mobile device, reset the system, or encountered any similar actions, the initial connection becomes invalid, rendering your Google verification (2FA) code inaccessible.
In such cases, it is necessary to reinstate your previous connection or submit a request to us for resetting Google Authenticator. After logging in again, you can then re-enable Google Authenticator.
How to manually reset Google Authenticator
1. Device transfer
To transfer your Google Authenticator account from an old device to a new one, follow these steps: On the old device, click the ≡ icon at the top-left of the app, choose [Transfer Accounts], and then select [Export Accounts]. Pick the account you want to export and perform the same steps on the new device by selecting [Transfer Accounts], clicking [Import Accounts], and scanning the QR code displayed on the old device. This manual process ensures the successful transfer of your Google Authenticator account from the old device to the new one.
2. Reset via secret key
If you have retained the 16-digit key provided during the binding process, follow these steps to restore your original 2FA-bound account in Google Authenticator: Click the (+) icon in the lower right corner of Google Authenticator, choose [Enter a setup key], and input "Pionex (your Pionex account)" in the [Account name] field. Then, enter the 16-digit key in the [Secret key] field, select [Time-based] for the Type of key, verify that all the required information is correctly filled, and press [Add]. This will reinstate the connection to your original 2FA-bound account within Google Authenticator.
How to apply to reset Google Authenticator
If you are unable to reset manually, please request a reset from us.
APP version reset entry:
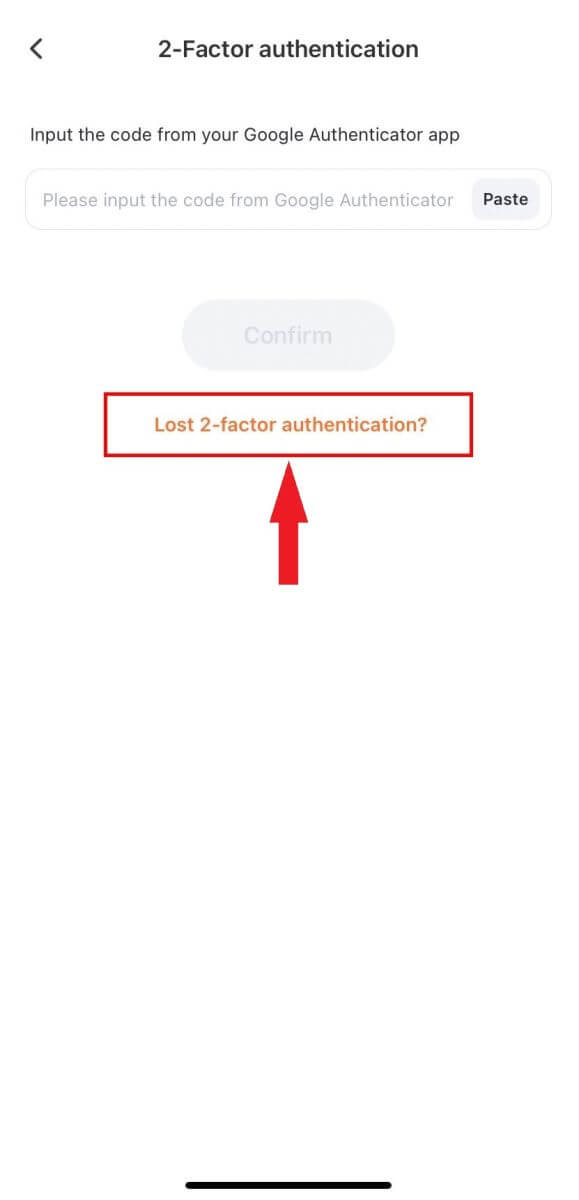
1. Upon entering your account number and password, click on "Lost 2-factor authenticator?" below to initiate the Google Authenticator reset process.
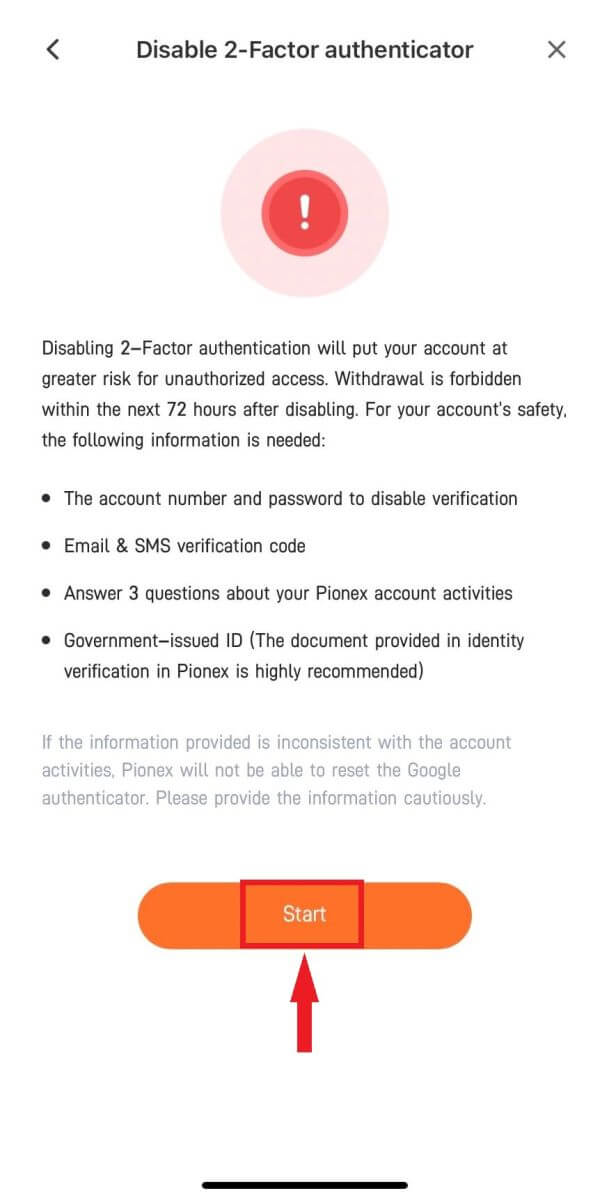
2. Complete basic account authentication to verify your identity and ensure the reset is authorized. Carefully read the notification and follow the system guide to provide relevant account information. (We will automatically assess the input information based on your account security level during the review.)
3. After the application review, we will unbind the Google Authenticator within 1-3 working days and notify you of the progress via email.
Please notice:
- The reset process requires 1-3 working days for review and completion (excluding national holidays).
- If your application is declined, you will receive an email notification from [email protected], providing alternative solutions.
- Following the reset of Google Authenticator, promptly log in to your account to rebind the Google Authenticator.
How to disable SMS/Email manually when logged in
If you want to change or disable one of the authenticator verification of your account.
It is required to bind SMS/Email and Google 2FA at the same time. And you can follow the steps below to self-service disable the authenticator.
How to disable:
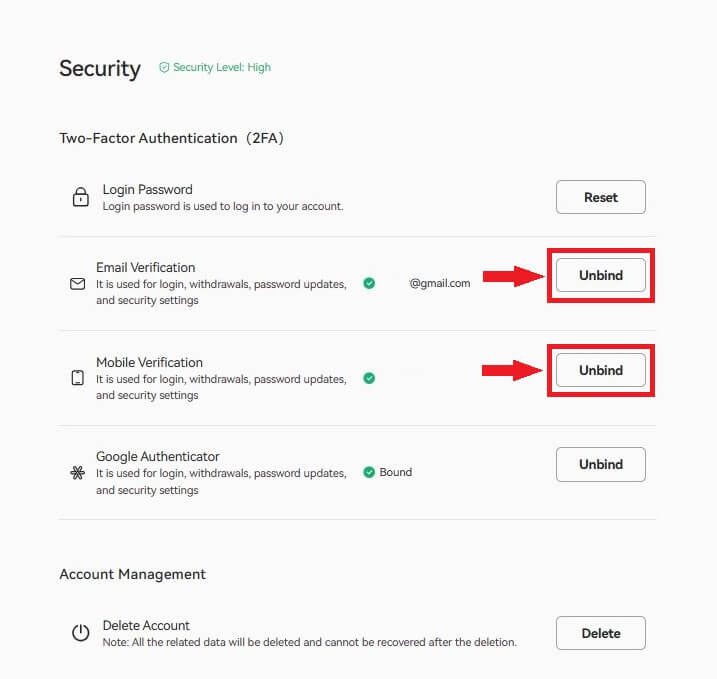
1. Begin by signing in to your Pionex account. Click on the account avatar and select "Security".

2. Identify the Email/SMS option you wish to deactivate, and click on "Unbind" to disable it.
Please notice:
Following the unbinding process, Pionex will temporarily suspend your withdrawal function for 24 hours. Additionally, the information you unbind will remain suspended for 30 days after the unbinding action.
3. Once you click "Next step," enter the Google 2FA code, and then click "Confirm".
If you encounter a 2FA code error, refer to this link for troubleshooting.
4. Verify both the email and SMS verification codes, then click "Confirm" again.
If you are unable to receive one of the verification codes due to factors like a mobile phone change or email account suspension, find an alternative solution here.
5. Congratulations! You have successfully unbound Email/SMS authentication.
For the safety of your account, please re-bind at your earliest convenience!
How to Bind Google Authenticator
You may bind Google Authenticator as the following steps:Web
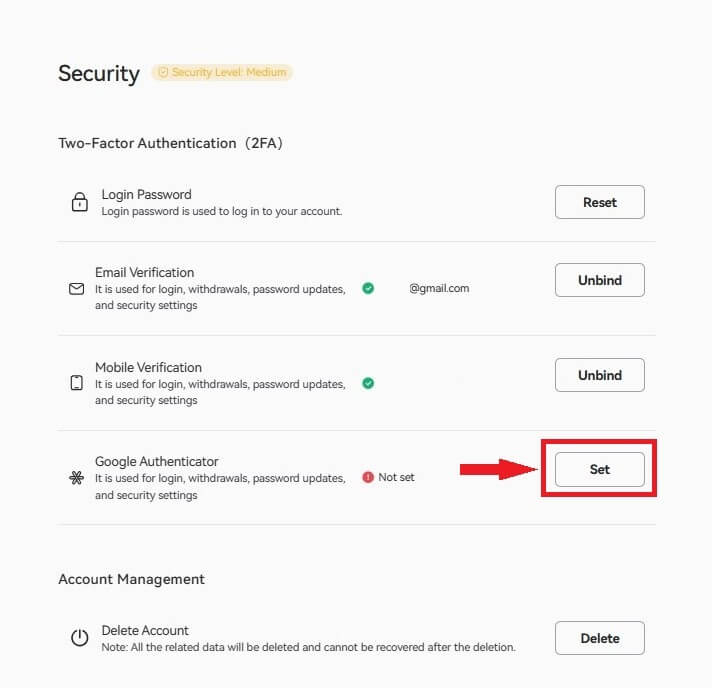
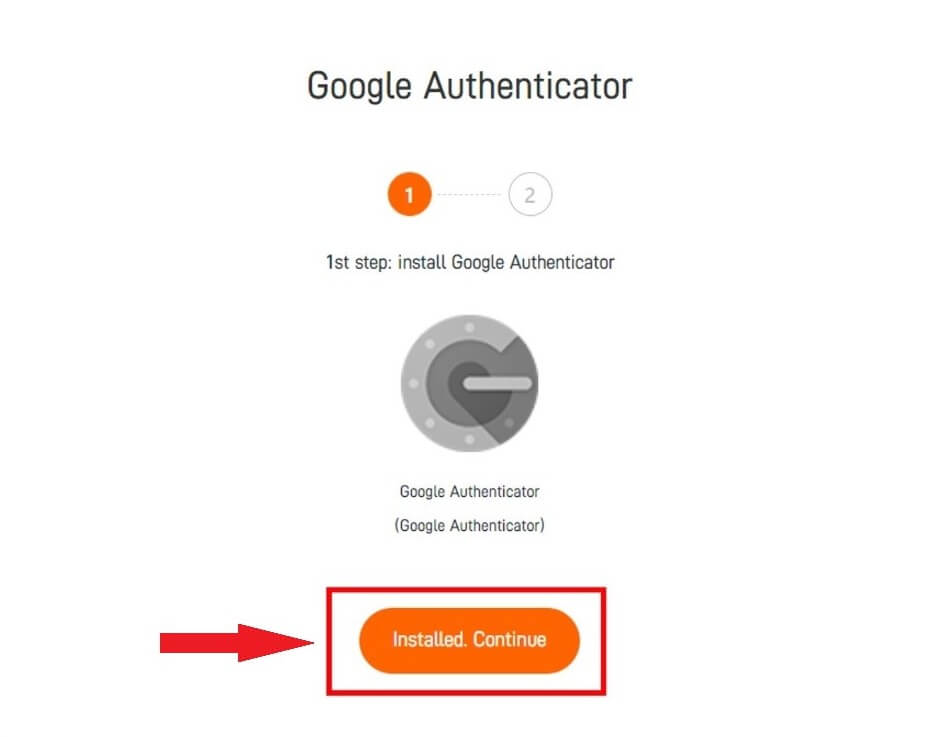
1. Navigate to your Avatar on Pionex.com, select "Security", then go to "Google Authenticator" and click "Set".
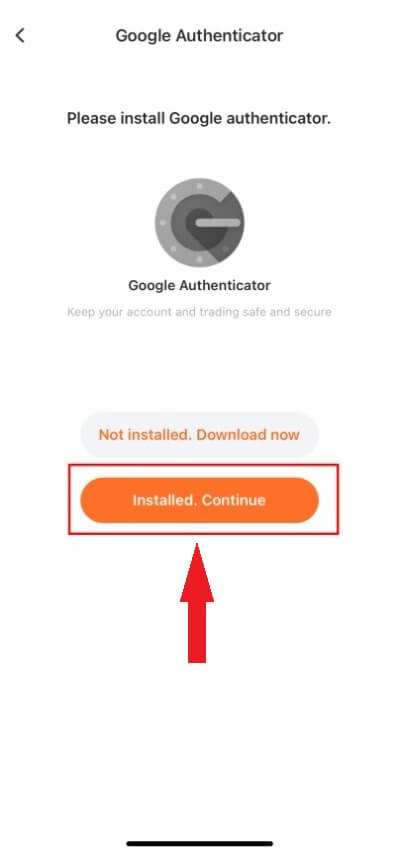
2. Install the [Google Authenticator] App on your mobile device.
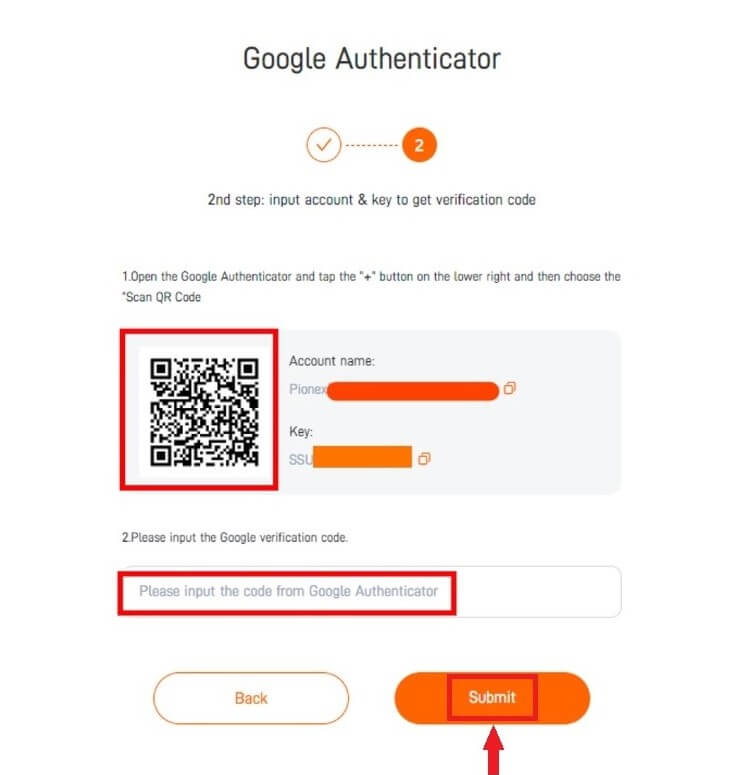
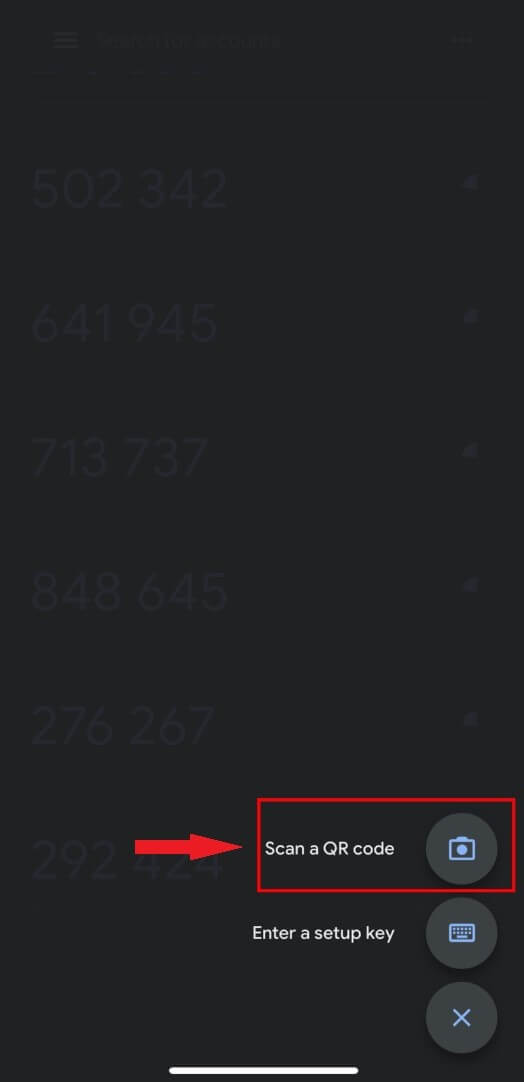
3. Open your Google Authenticator and select “Scan a QR code“.
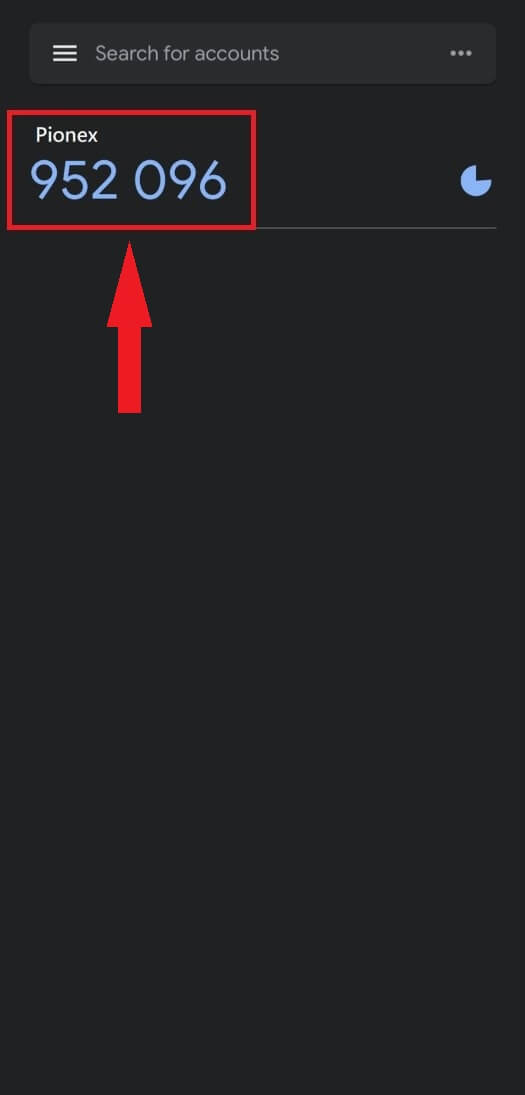
4. Obtain a 6-digit verification code (valid within every 30 seconds) for your Pionex account. Input this code on your website page.
5. Congratulations! You have successfully linked Google Authenticator to your account.
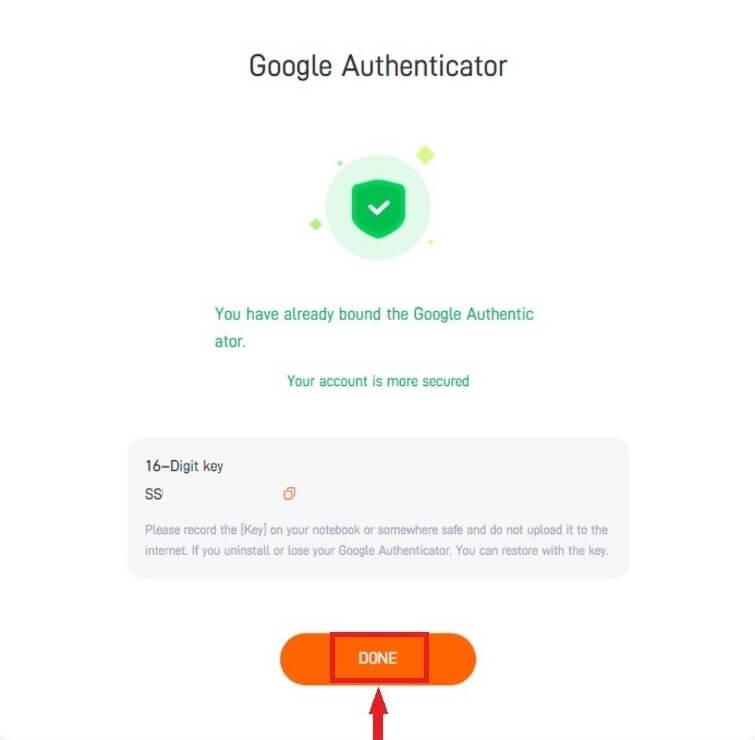
Remember to record the [Key] in a secure location, like a notebook, and avoid uploading it to the internet. In case of uninstallation or loss of Google Authenticator, you can reset it using the [Key].

App
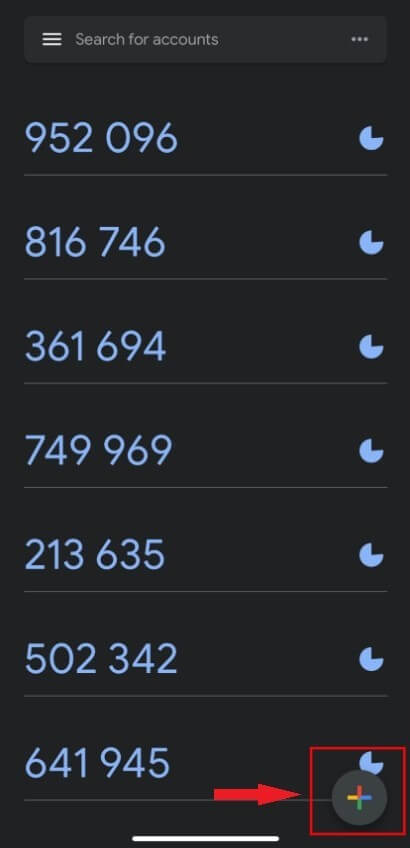
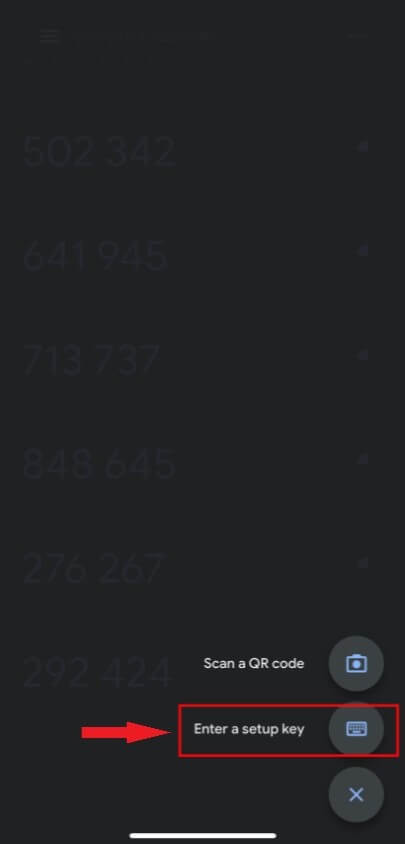
1. Launch the Pionex APP and go to “Account” -- “Settings” -- “Security” -- “2-Factor authenticator” -- “Google Authenticator” -- “Download”.
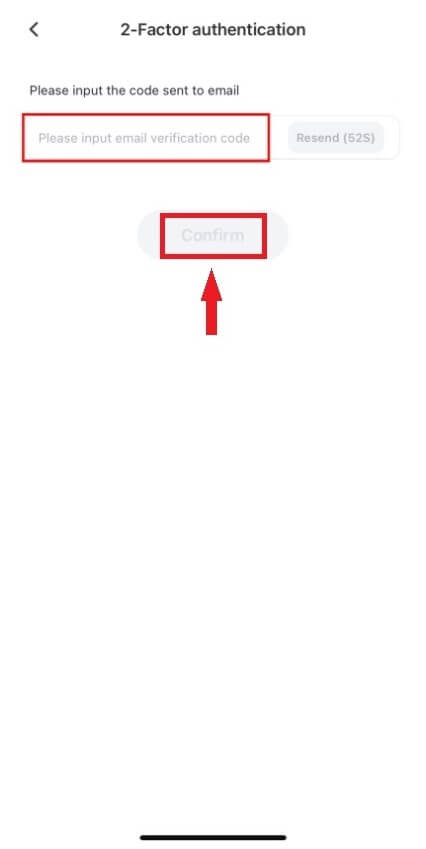
2. Enter your Email/SMS verification code.
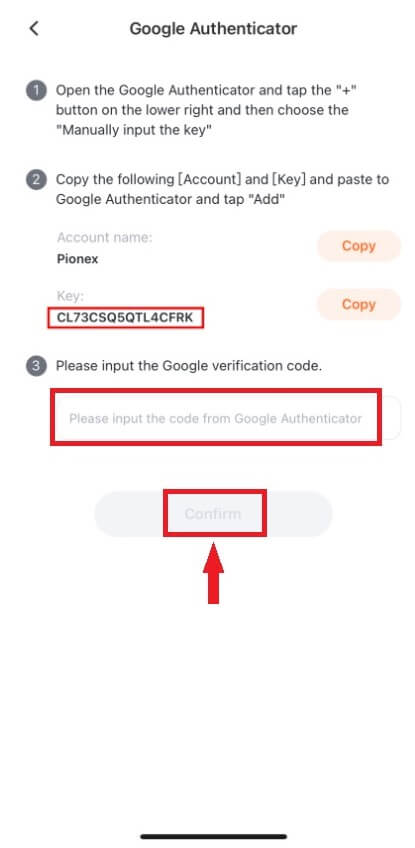
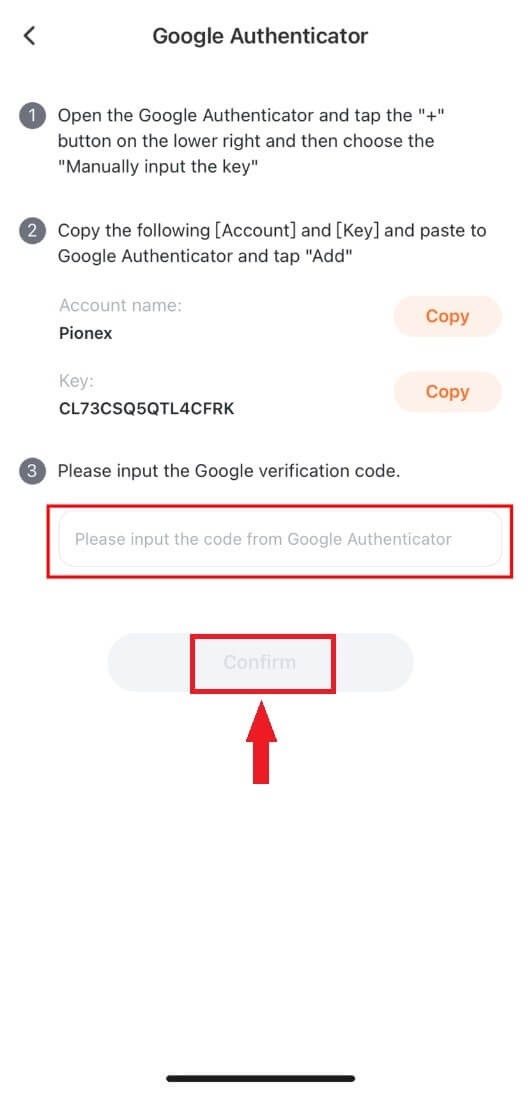
3. Follow the system prompts to copy and paste the Pionex account name and Key (secret key) into Google Authenticator.
4. Obtain a 6-digit verification code (valid only within every 30 seconds) for your Pionex account.
5. Return to the Pionex APP and input the received verification code.
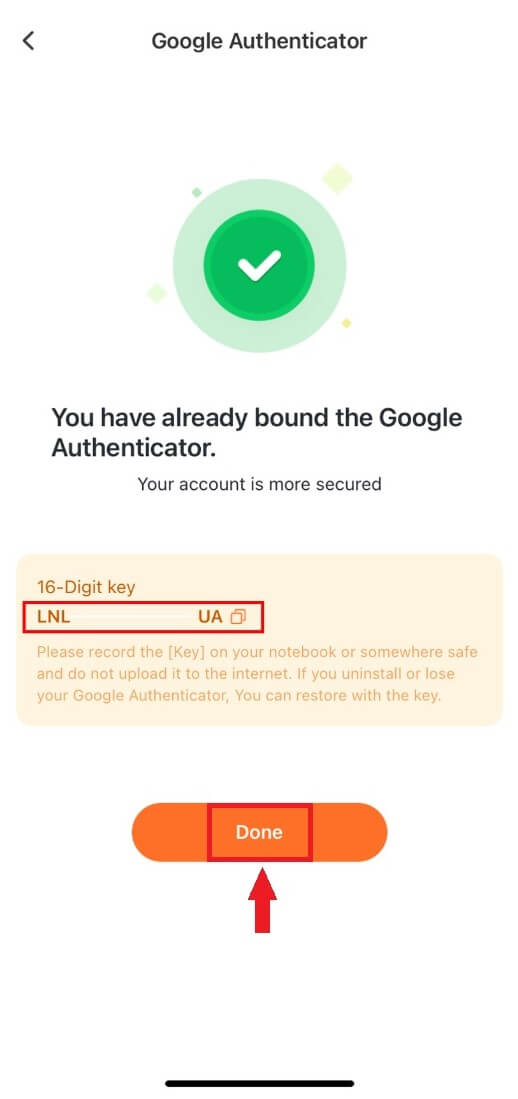
6. Congratulations! You have successfully linked Google Authenticator to your account.
Please record the [Key] in your notebook or somewhere safe and do not upload it to the internet. If you uninstall or lose your Google Authenticator. You can reset it with the [Key].

How to Verify Account in Pionex
What is identity verification? (KYC)
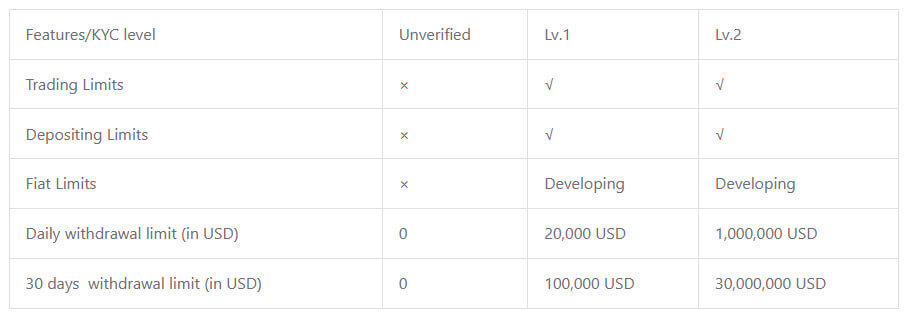
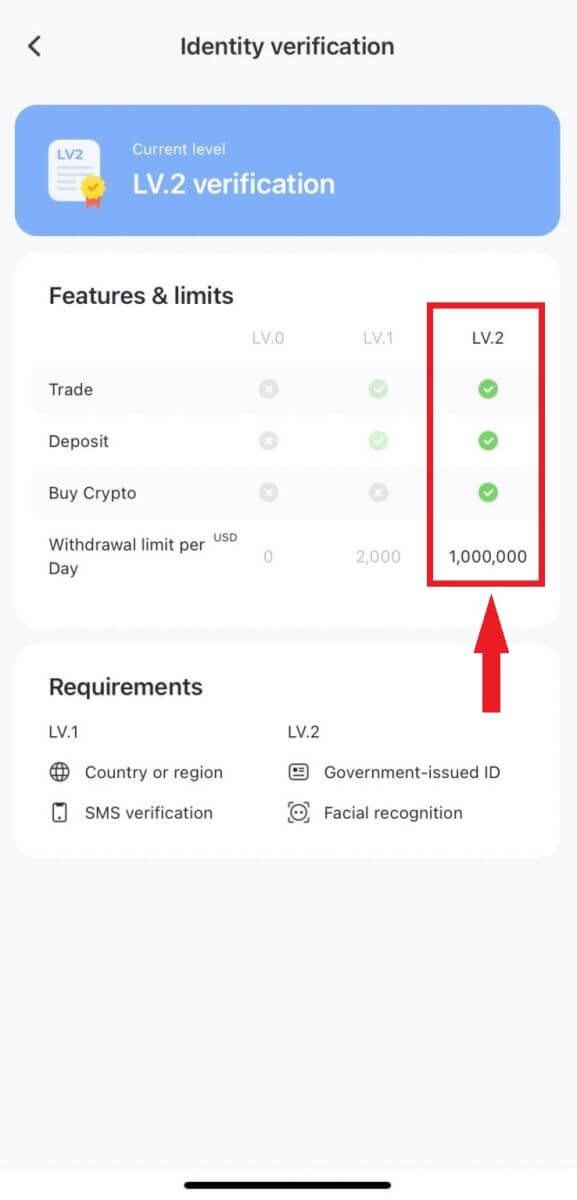
Completing KYC identity verification on Pionex enhances your account security level and raises the daily withdrawal limit. Simultaneously, you gain access to the service for purchasing crypto with a credit card.
There are two levels of verification, more details are as follows:
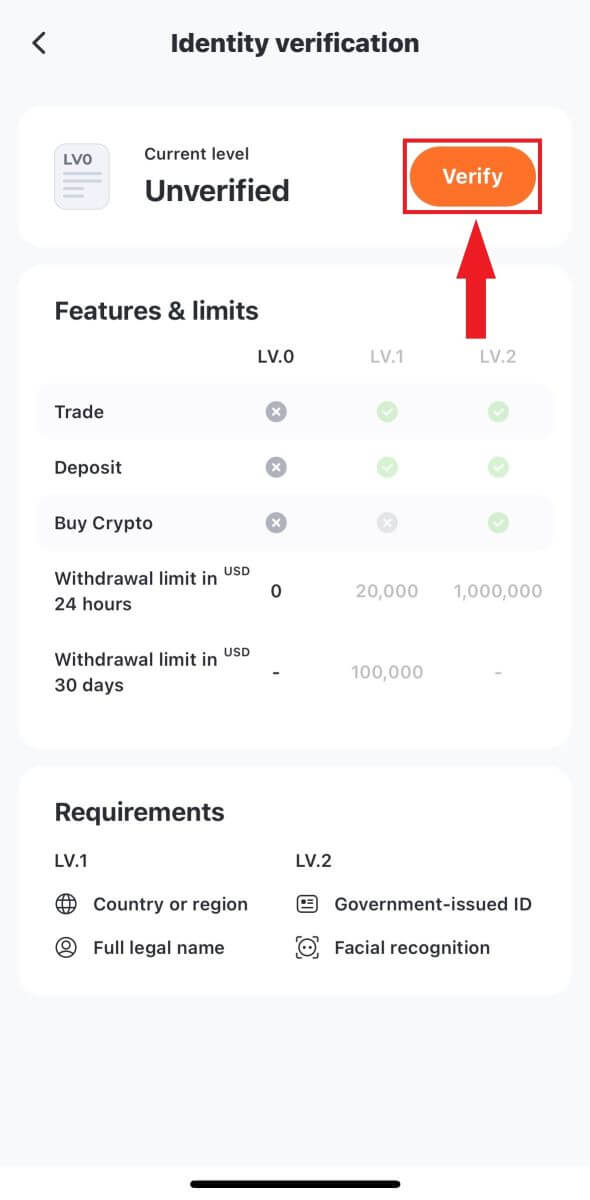
- Features and Limits:
- Requirements:
KYC Lv.1 verification: Country or region, Full legal name
KYC Lv.2 verification: Government-issued ID, Facial recognition
For additional information on KYC identity verification, please consult the announcement.
How to Complete Identity Verification
Where can I get my account verified?
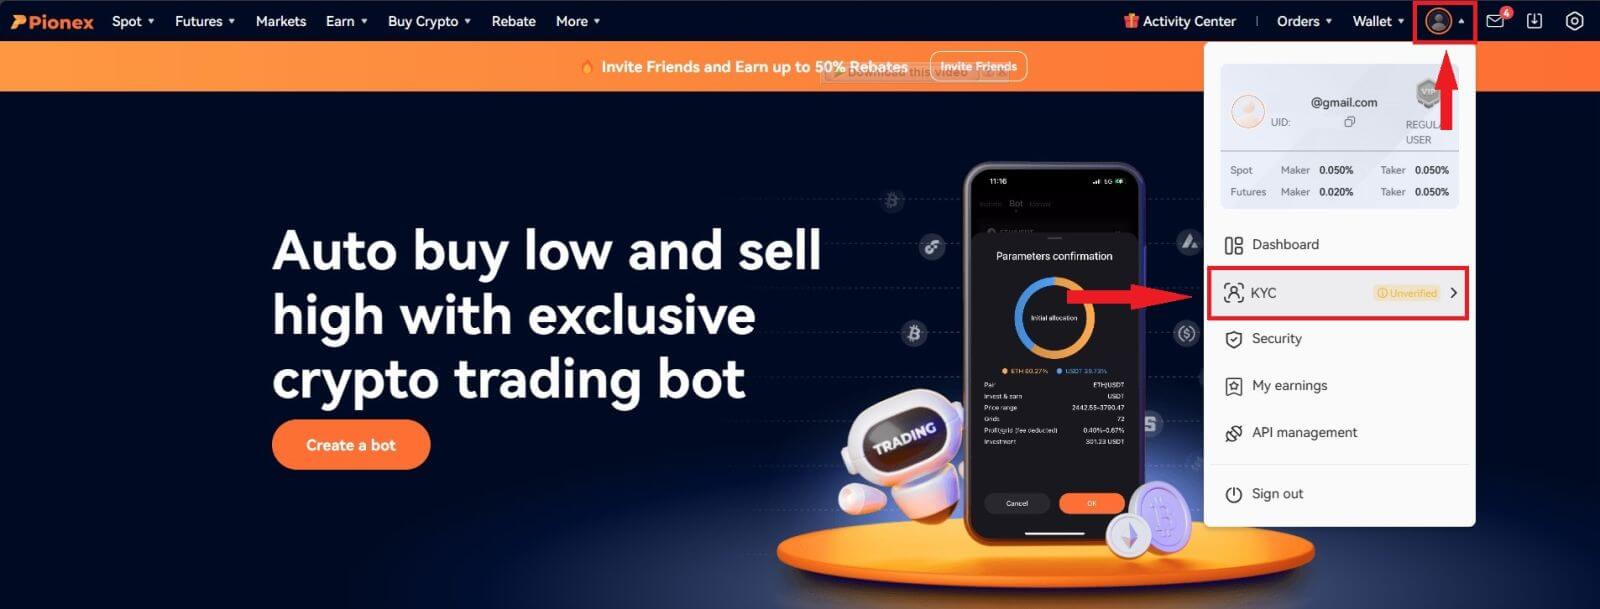
You can access Identity Verification by navigating to [Account] - [KYC]. On this page, you can review your existing verification level, which directly influences the trading limit for your Pionex account. If you wish to enhance your limit, kindly proceed to complete the corresponding Identity Verification level.
How to Complete Identity Verification on Pionex App? A step-by-step guide
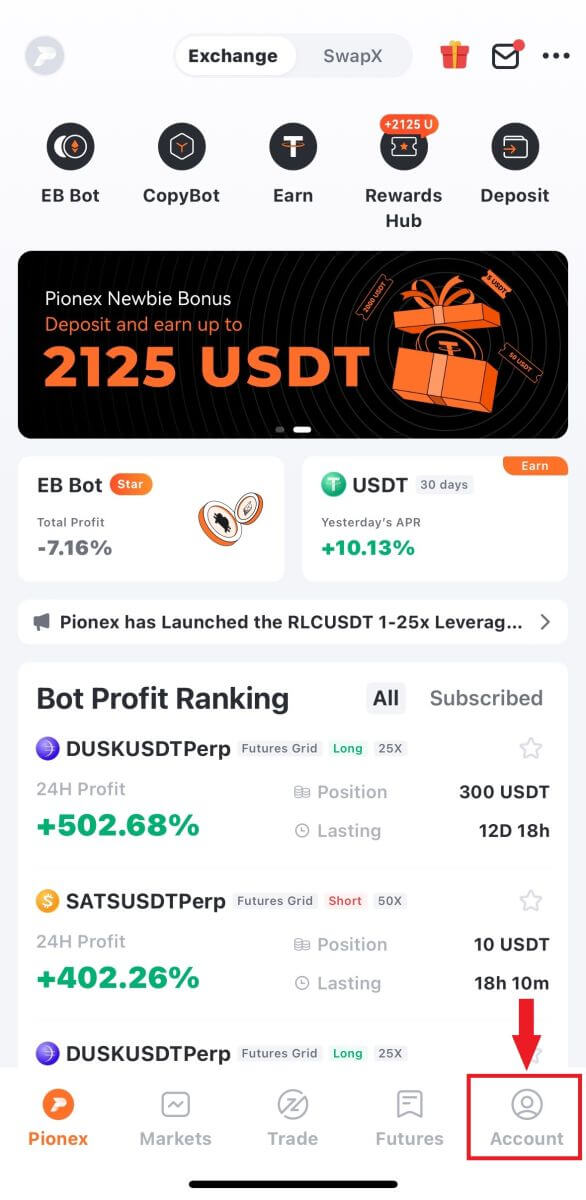
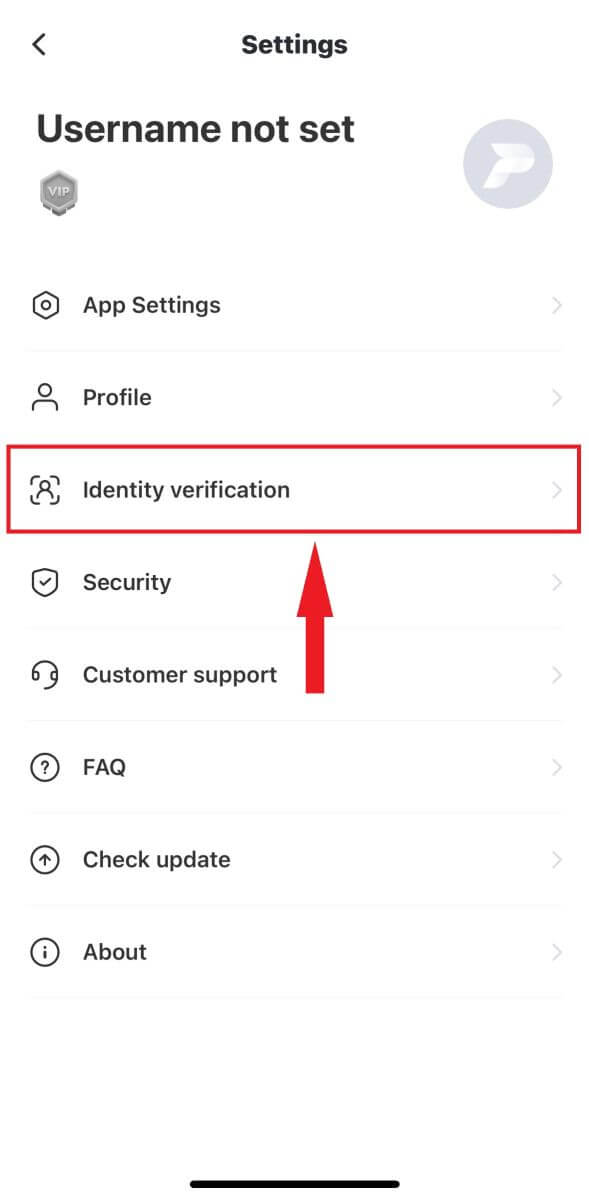
1. Login to your Pionex account on the App, Select “Account” -- “Settings” -- “Identity verification“.
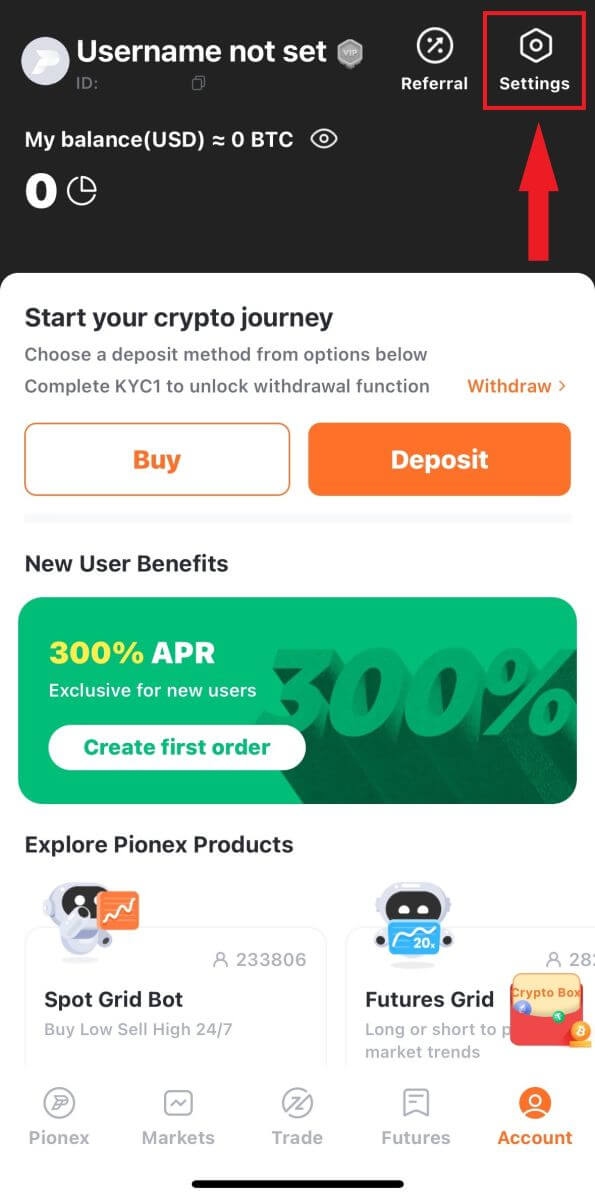
2. Select "Verify" on the page; LV.1 verification will authenticate your location country and full legal name.
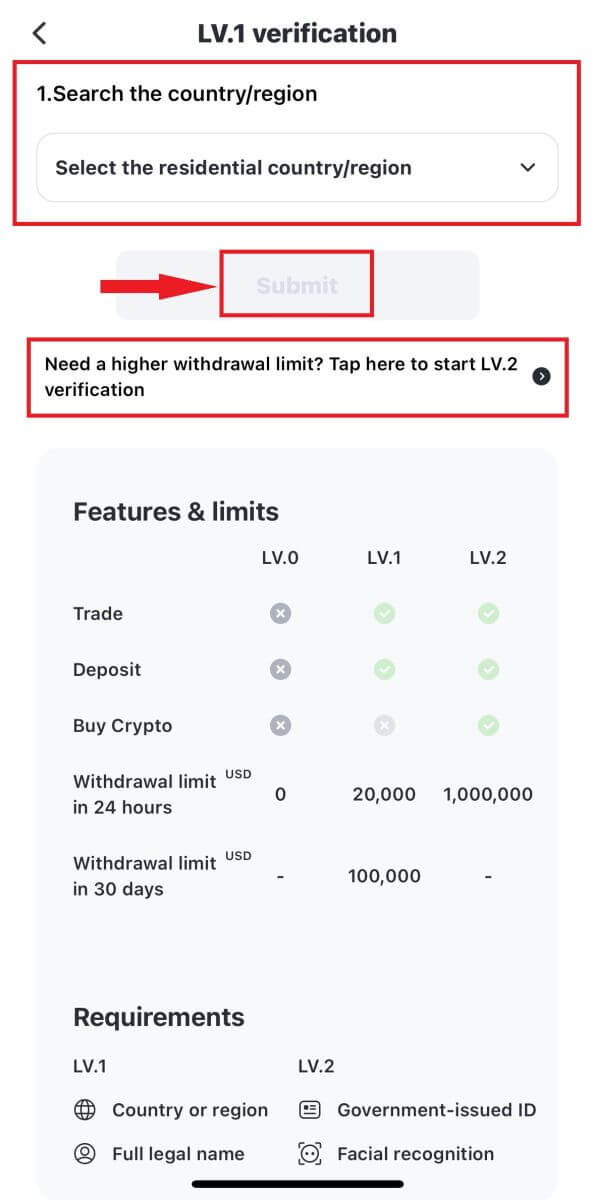
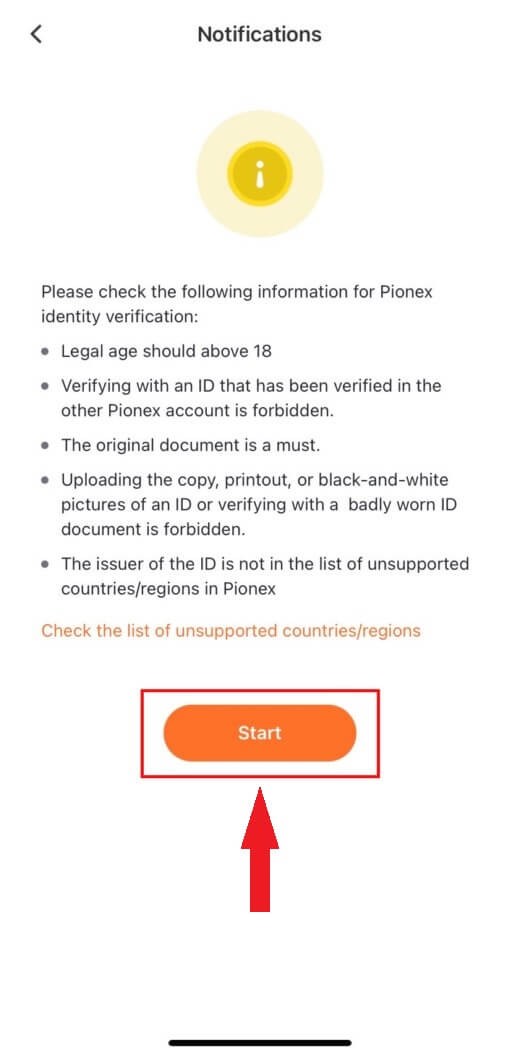
3. Follow the instructions and carefully review the notifications. Once all information is confirmed, click "Submit" to complete LV.1 Verification (KYC1).
4. For an elevated withdrawal limit, proceed with LV.2 verification.
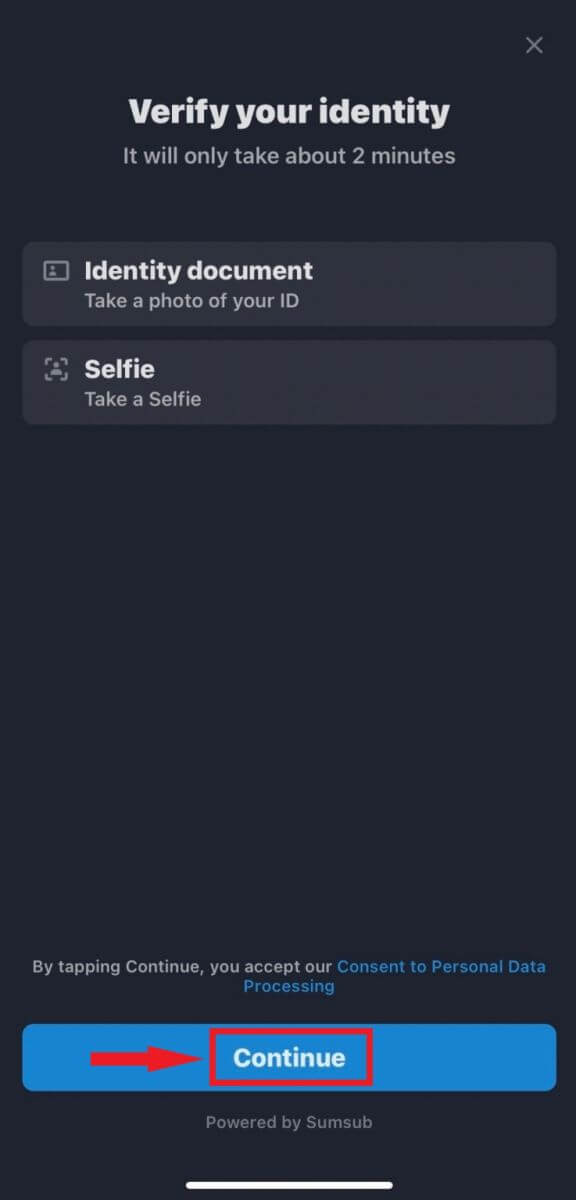
Choose your countries/regions and submit the required legal ID card for verification.
5. Upon capturing photos of your ID card and selfie, the system will initiate verification, typically completing the review within 15 – 60 minutes. Feel free to leave the page temporarily and check the status at a later time.
Once these steps are completed, LV.2 verification will be visible on your page. You can proceed to purchase Crypto with a credit card (USDT) and then create your first trading bot on Pionex!
Please Caution:
- Avoid attempting to use another person’s ID card or providing false information for verification, as Pionex may restrict your account services as a consequence.
- Each user is permitted to verify only their own personal information on an account, multiple accounts will not successfully pass KYC.
- Refrain from using watermarks when uploading documents or employing photo editing software to capture images of documents.
Frequently Asked Questions (FAQ)
Why should I provide supplementary certificate information?
In uncommon instances where your selfie does not align with the provided ID documents, you will be required to submit additional documents and await manual verification. Kindly be aware that the manual verification process may extend over several days. Pionex prioritizes a thorough identity verification service to safeguard users’ funds, and it is crucial to ensure that the materials submitted meet the specified requirements during the information completion process.
Identity Verification for Buying Crypto with Credit/Debit Card
To ensure a secure and compliant fiat gateway experience, users purchasing cryptocurrencies with credit or debit cards must undergo Identity Verification. Those who have already completed Identity Verification for their Pionex account can seamlessly proceed with crypto purchases without any additional information required. Users needing extra information will receive prompts when attempting to make a crypto purchase with a credit or debit card.
Completing each level of Identity Verification will result in increased transaction limits, as detailed below. All transaction limits are denominated in Euro (€), irrespective of the fiat currency used, and may slightly fluctuate in other fiat currencies based on exchange rates.
Basic Info Verification: This level entails verifying the user’s name, address, and date of birth.
Common failed reasons and the methods on Pionex
APP: Click “Account” -- “Security” -- “Identity verification”.Web: Click your profile avatar on the top-right of the page then into “Account” -- “KYC” -- “Check detail”.
If the verification fails, click "Check" and the system will display a prompt revealing the specific reasons for the failure.
Common reasons for verification failure and troubleshooting steps are as follows:
1. Incomplete Photo Upload:
Confirm that all photos have been successfully uploaded. The submit button will activate after all photos are uploaded.
2. Outdated Webpage:
If the webpage has been open for an extended period, simply refresh the page and re-upload all the photos.
3. Browser Issues:
If the problem persists, try using the Chrome browser for KYC submission. Alternatively, use the APP version.
4. Incomplete Document Photo:
Ensure that every edge of the document is captured in the photo.
If you are still unable to verify your KYC, please send an email to [email protected] with the subject "KYC failure" and provide your Pionex account Email/SMS in the content.
The KYC team will assist you in re-checking the status and respond via email. We appreciate your patience!


