How to Register and Verify Account on Pionex

How to Register on Pionex
Register on Pionex with Phone Number or Email
1. Go to Pionex and click [Sign up].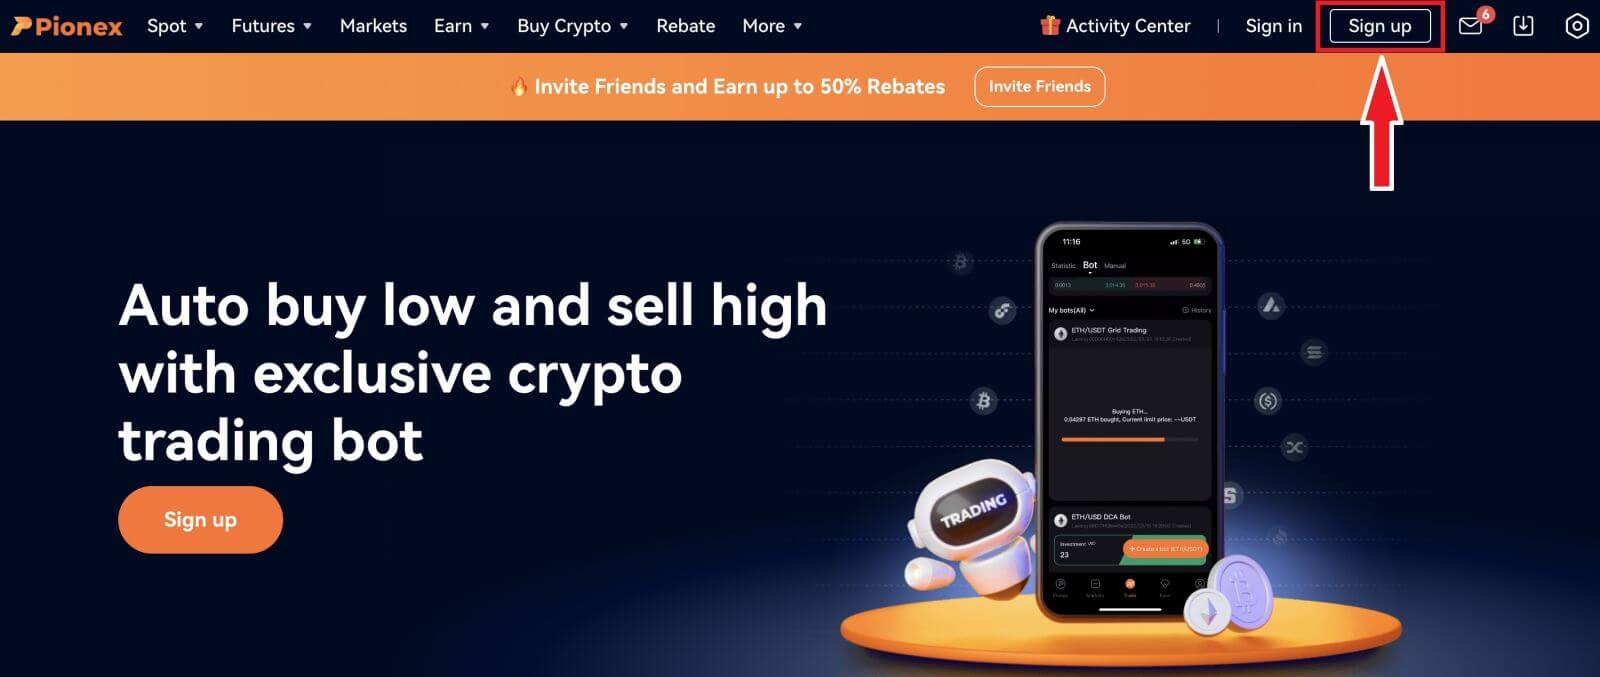
2. Select a registration method. You can sign up with your email address, phone number, Apple account or Google account.
Please select the type of account carefully. Once registered, you cannot change the account type.
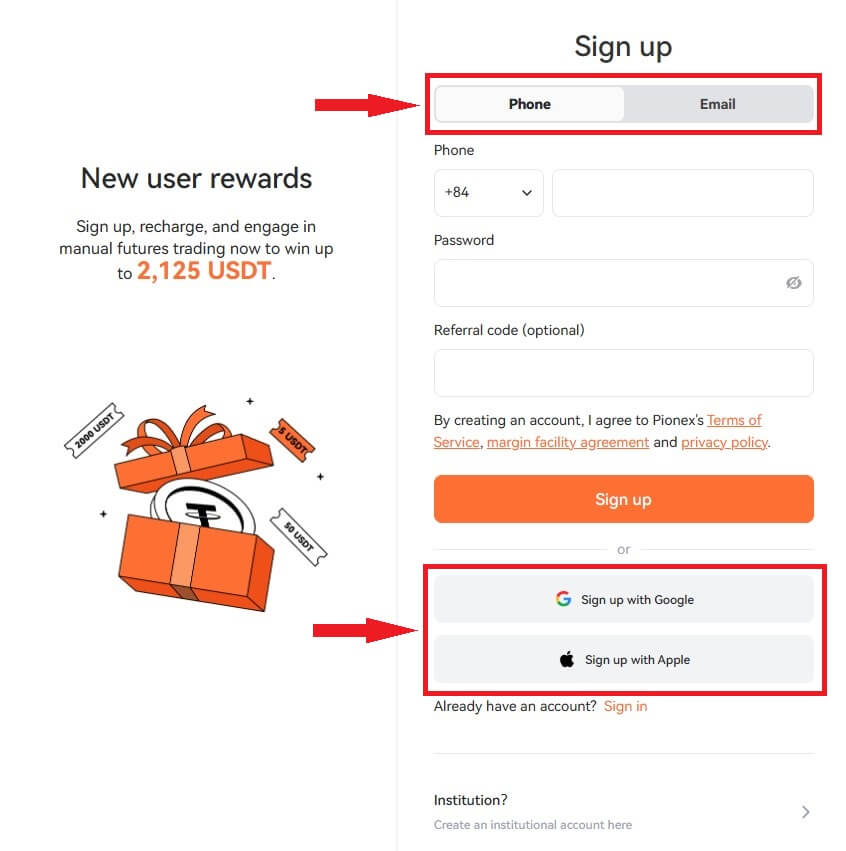
3. Select [Email] or [Phone Number] and enter your email address/phone number. Then, create a secure password for your account.
Note: Your password must contain at least 8 characters, including letters and numbers.
Read the Terms of Service, margin facility agreement and privacy policy, then click [Sign up].
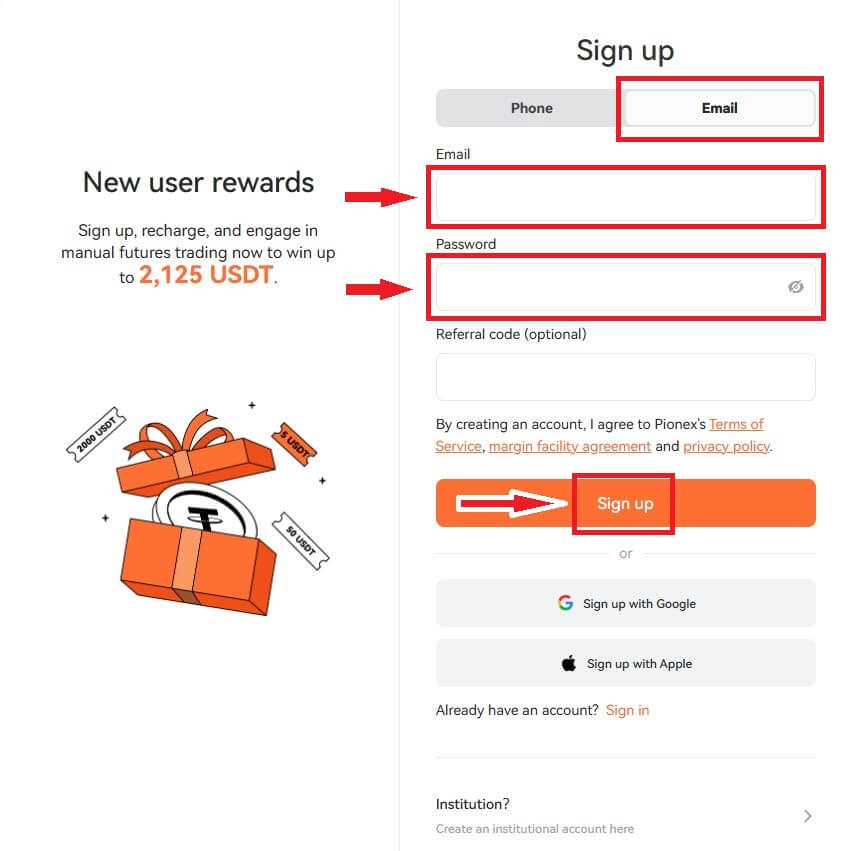
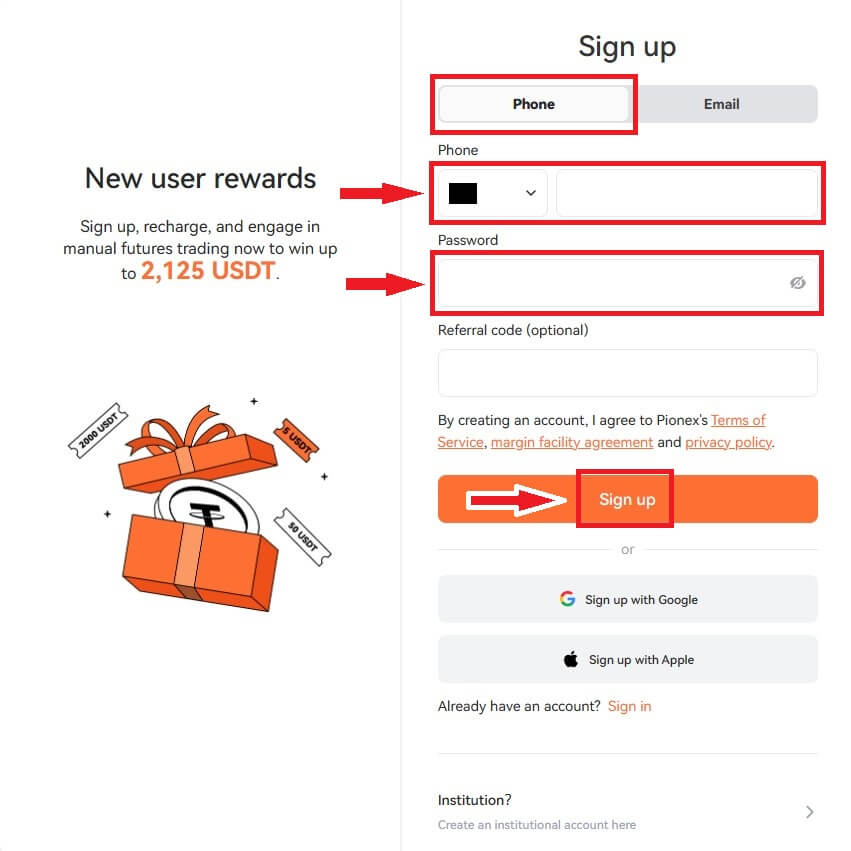
4. You will receive a 6-digit verification code in your email or phone. Enter the code within 60 seconds and click [Confirm].
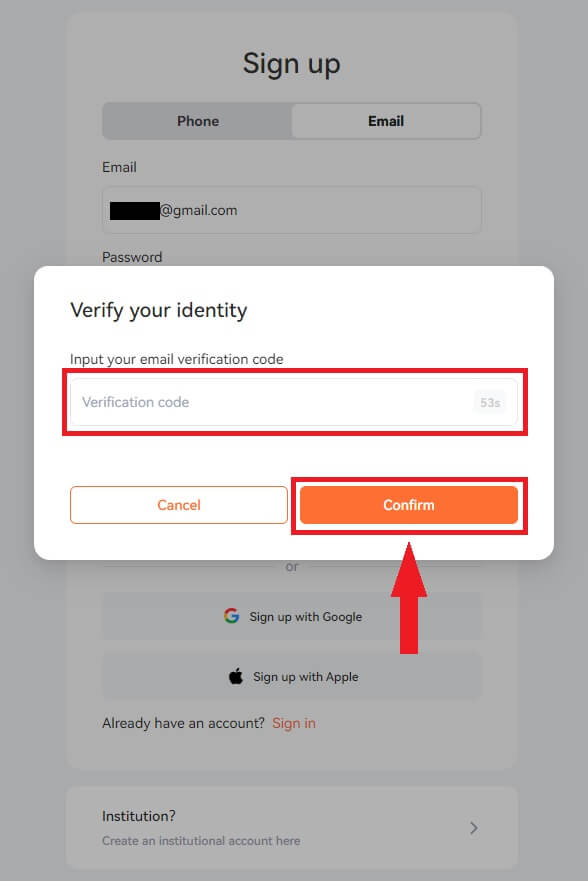
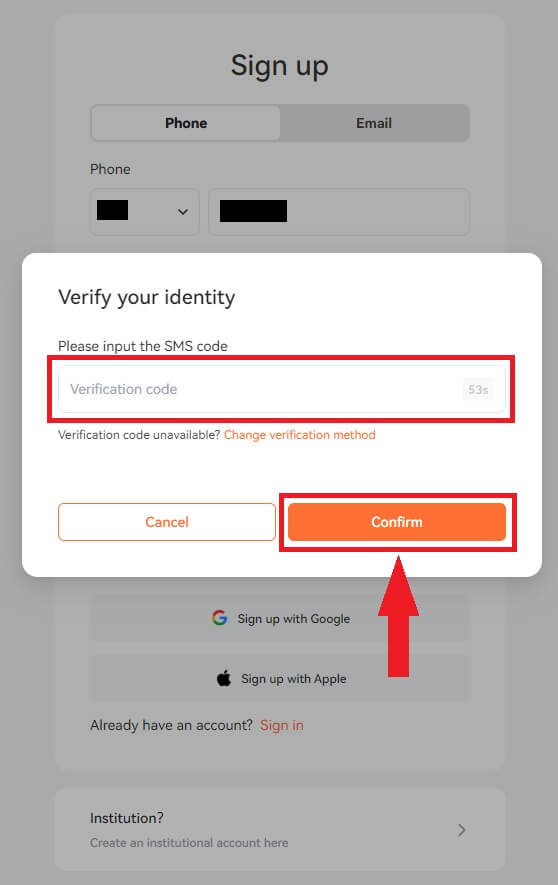
5. Congratulations, you have successfully registered on Pionex.
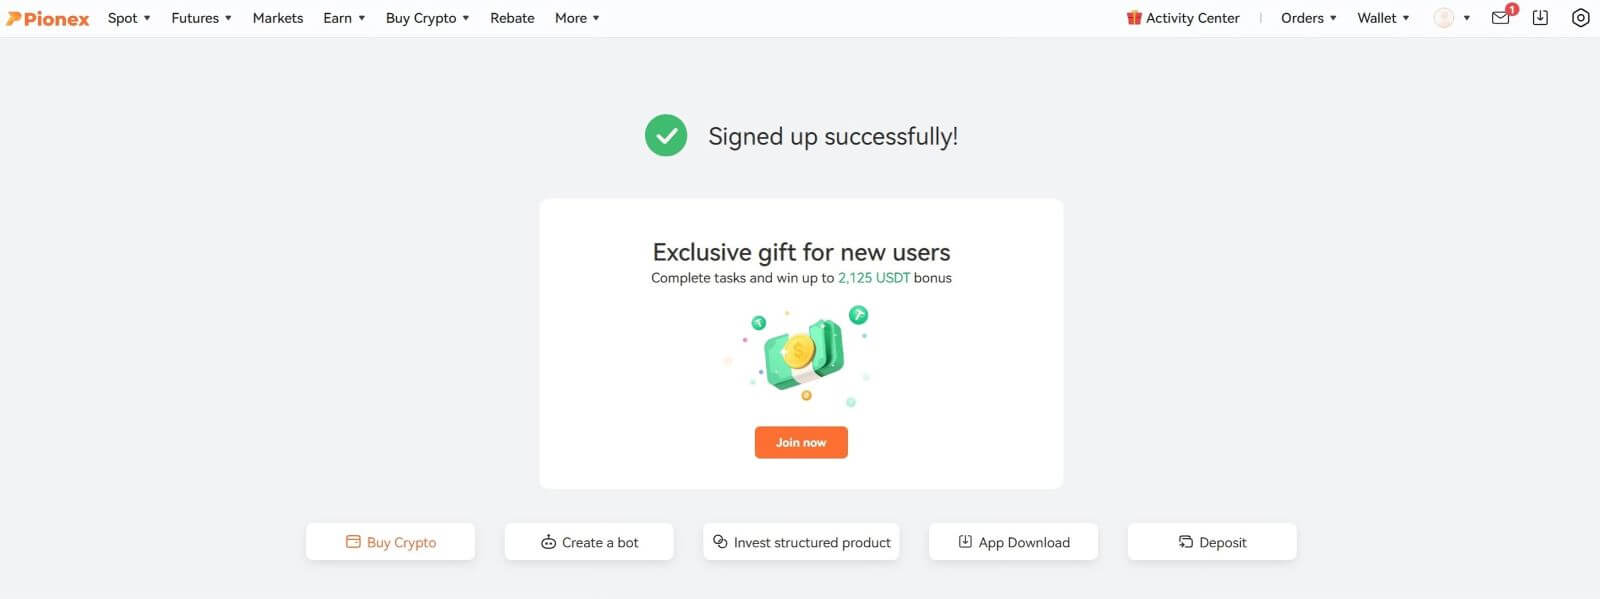
Register on Pionex with Apple
1. Alternatively, you can sign up using Single Sign-On with your Apple account by visiting Pionex and clicking [Sign up].
2. Select [Sign up with Apple], a pop-up window will appear, and you will be prompted to sign in to Pionex using your Apple account.
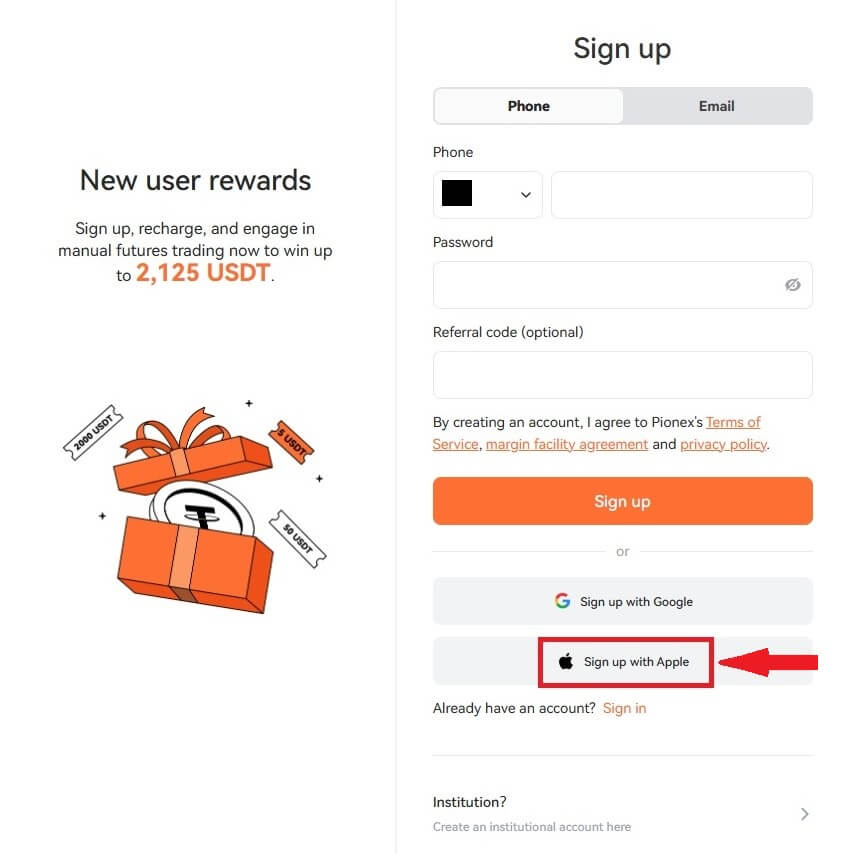
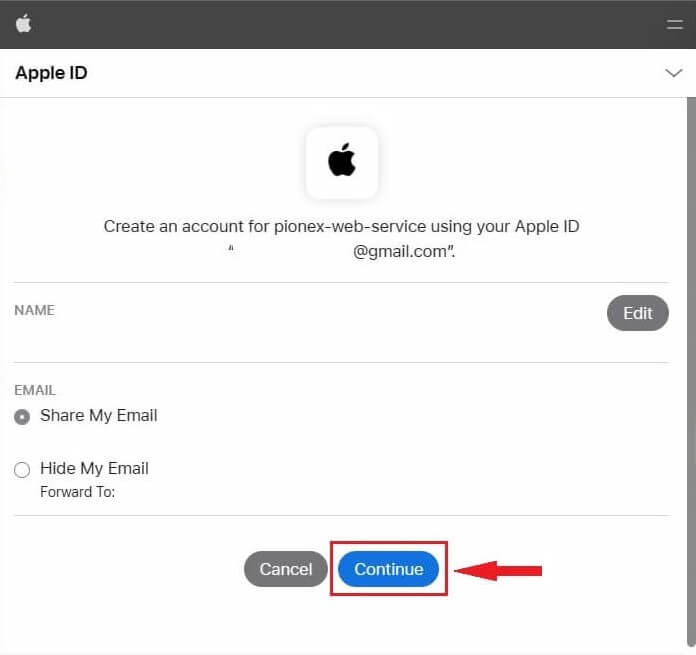
3. Enter your Apple ID and password to sign in to Pionex.
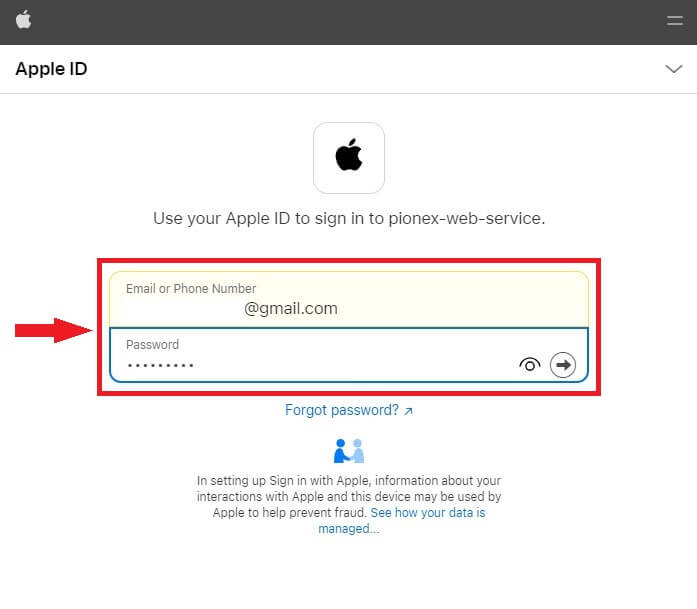
Click "Continue".
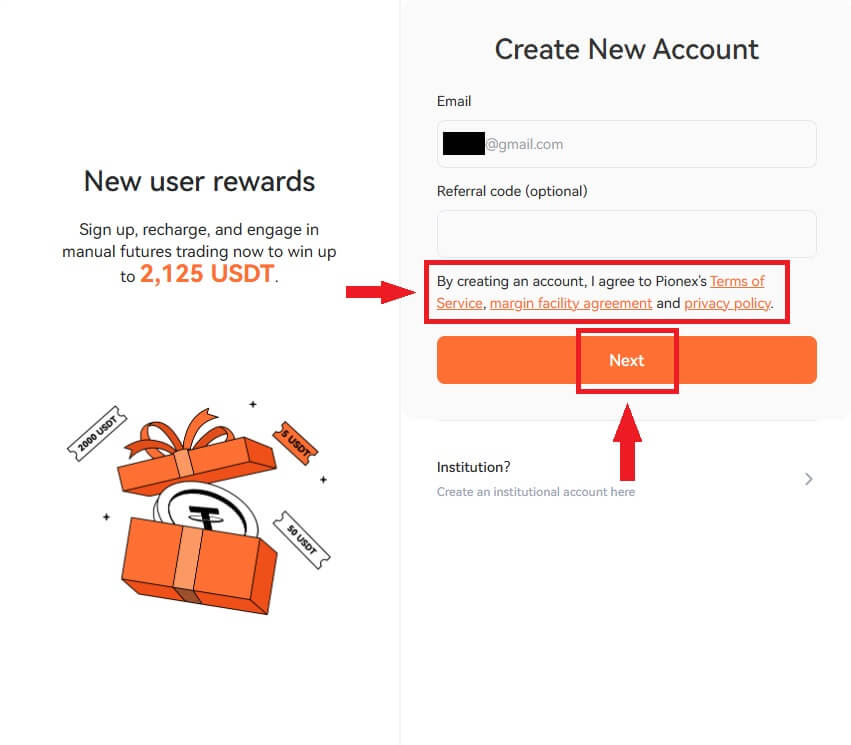
4. After signing in, you will be redirected to the Pionex website.
Read the Terms of Service, margin facility agreement and privacy policy, then click [Next].
5. Congratulations! You have successfully created a Pionex account.

Register on Pionex with Google
Moreover, you can create a Pionex account through Gmail. If you wish to do that, please follow these steps:1. Firstly, you’ll need to head over to the Pionex homepage and click [Sign up].

2. Click on the [Sign up with Google] button.
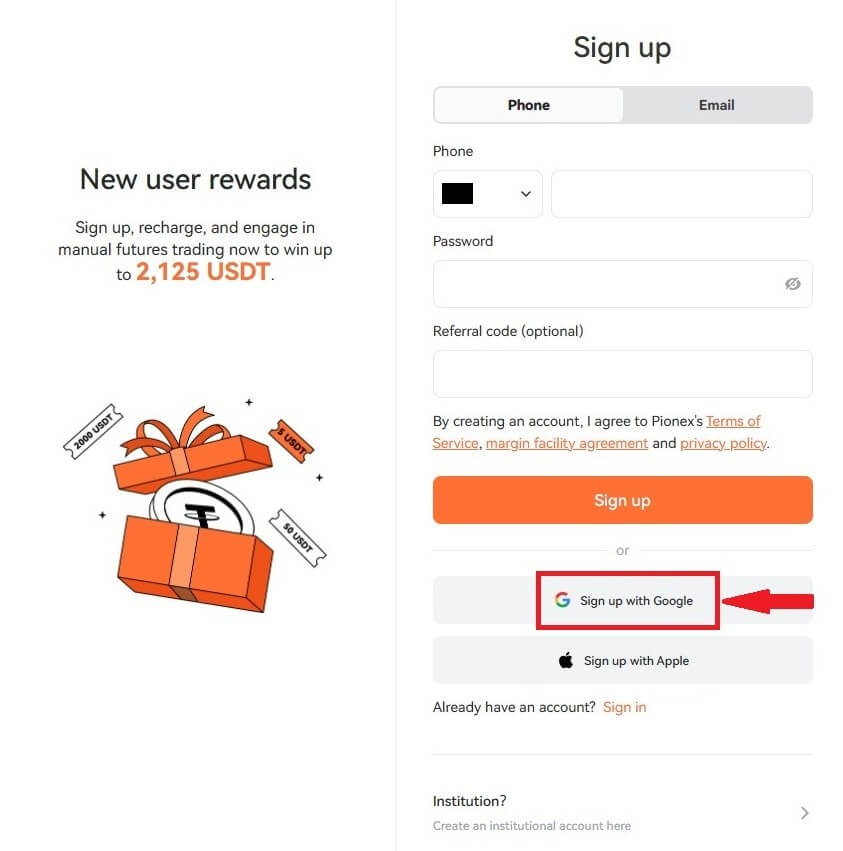
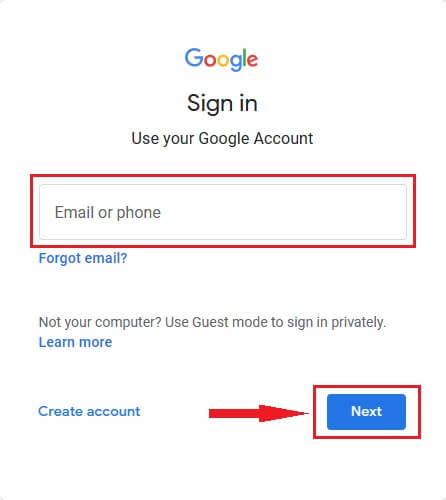
3. A sign-in window will be opened, where you will need to enter your Email address or Phone number and click on “Next”.
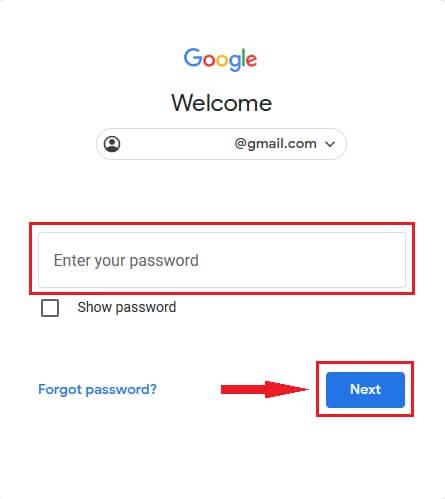
4. Then enter the password for your Gmail account and click “Next”.
5. After signing in, you will be redirected to the Pionex website.
Read the Terms of Service, margin facility agreement and privacy policy, then click [Next].

6. Congratulations! You have successfully created a Pionex account.

Register on the Pionex App
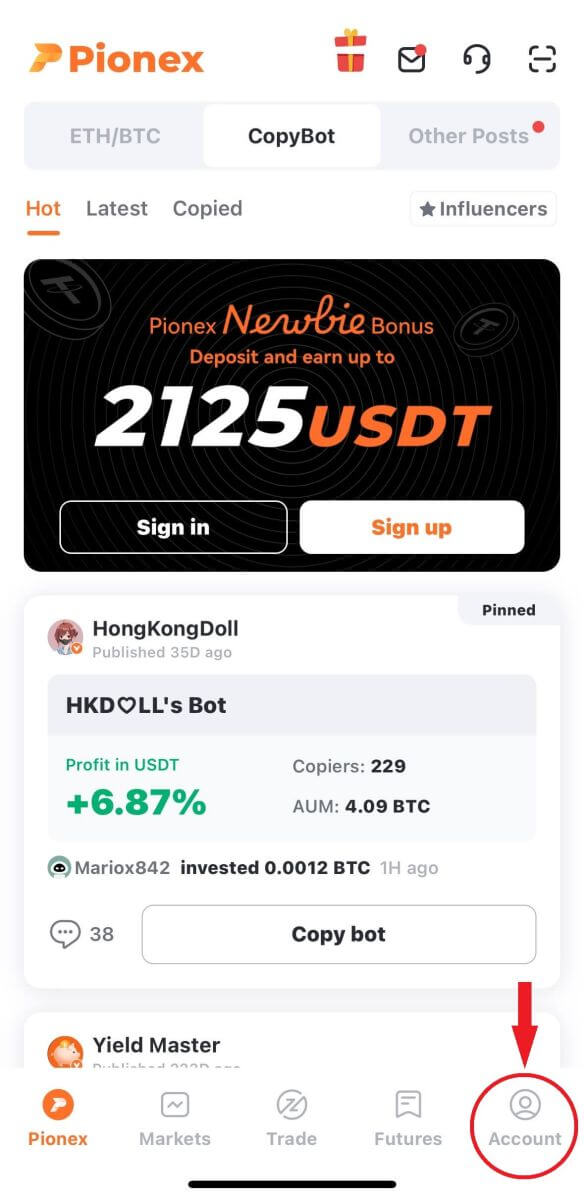
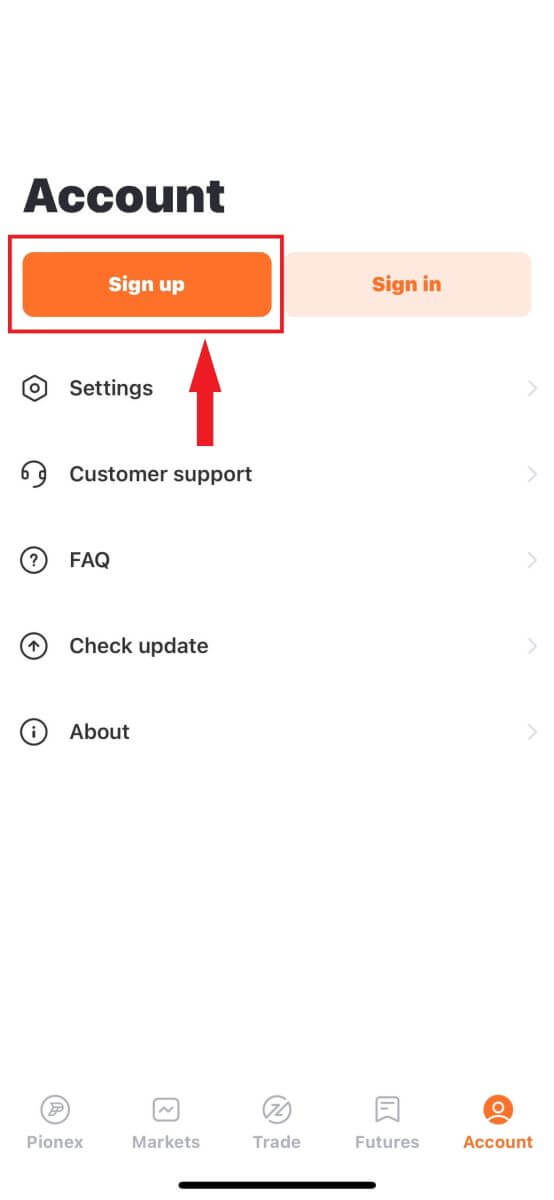
You can register for a Pionex account with your email address, phone number, or your Apple/Google account on the Pionex App easily with a few taps.1. Open the Pionex App, tap Account at the bottom corner then tap [Sign up].
2. Select a registration method.
Please select the type of account carefully. Once registered, you cannot change the account type.
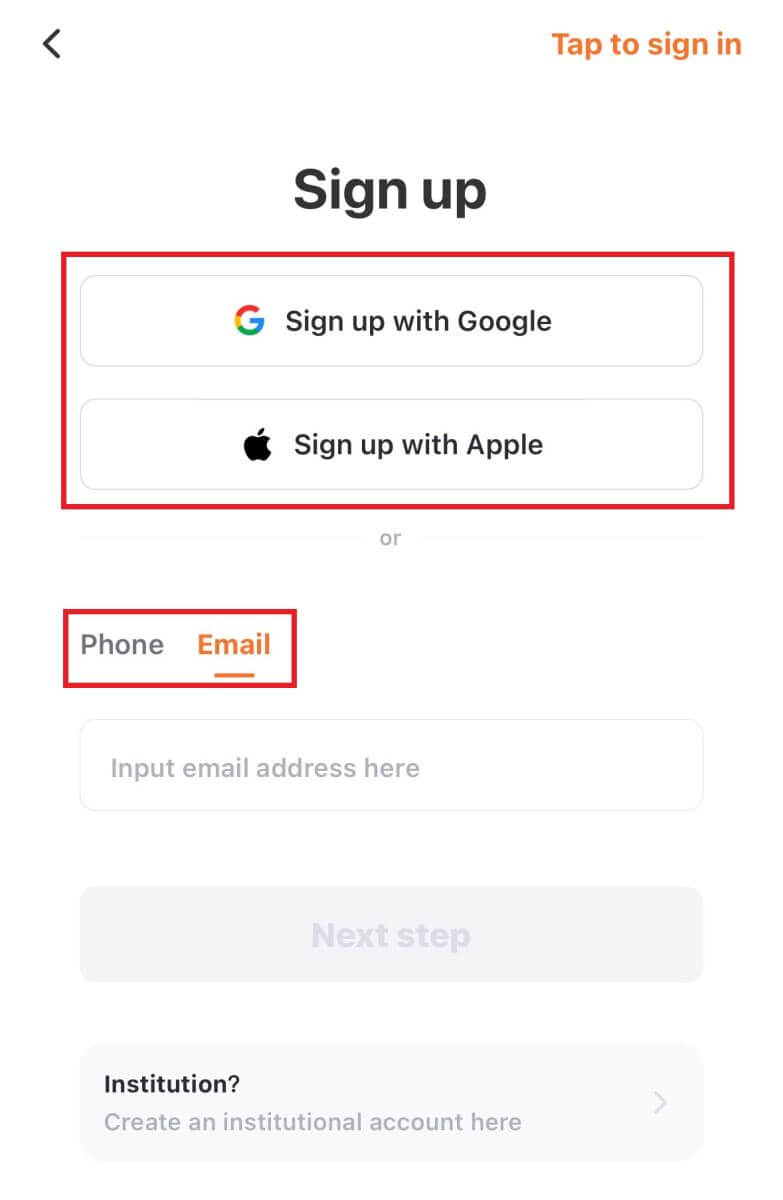
Sign up with your email/phone number:
3. Select [Email] or [Phone Number], enter your email address/phone number and tap [Next step].
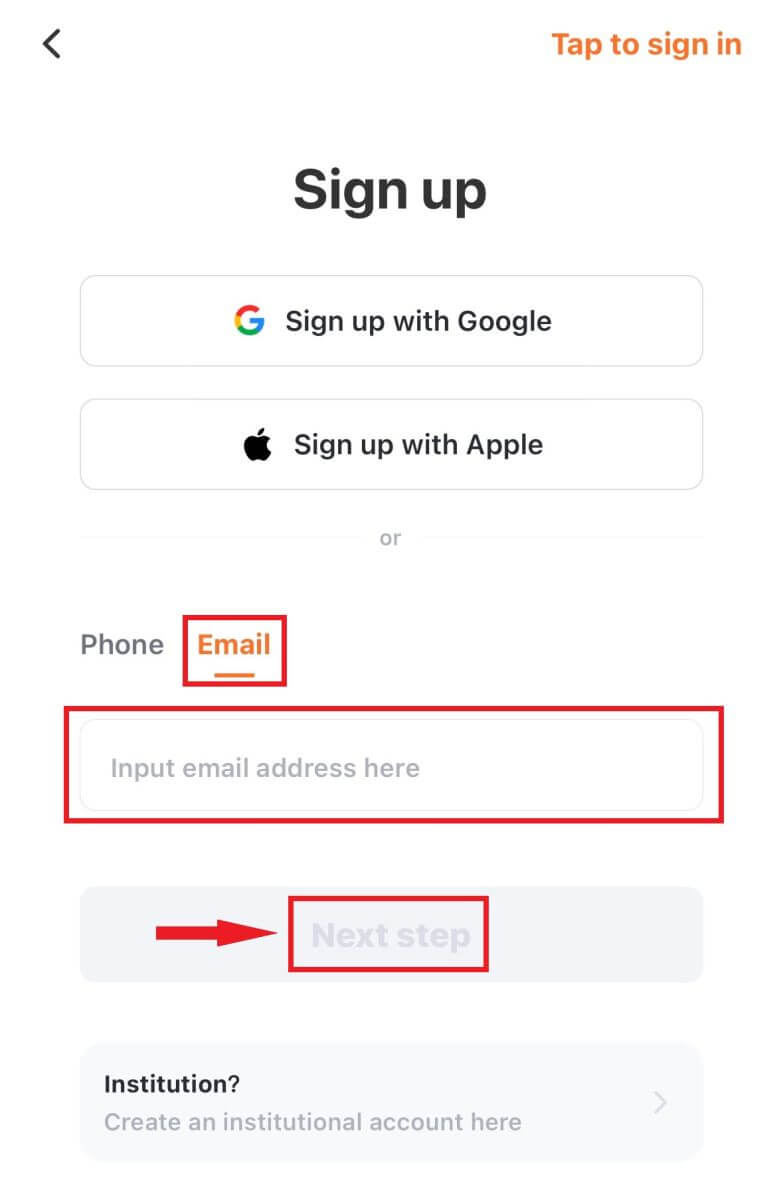
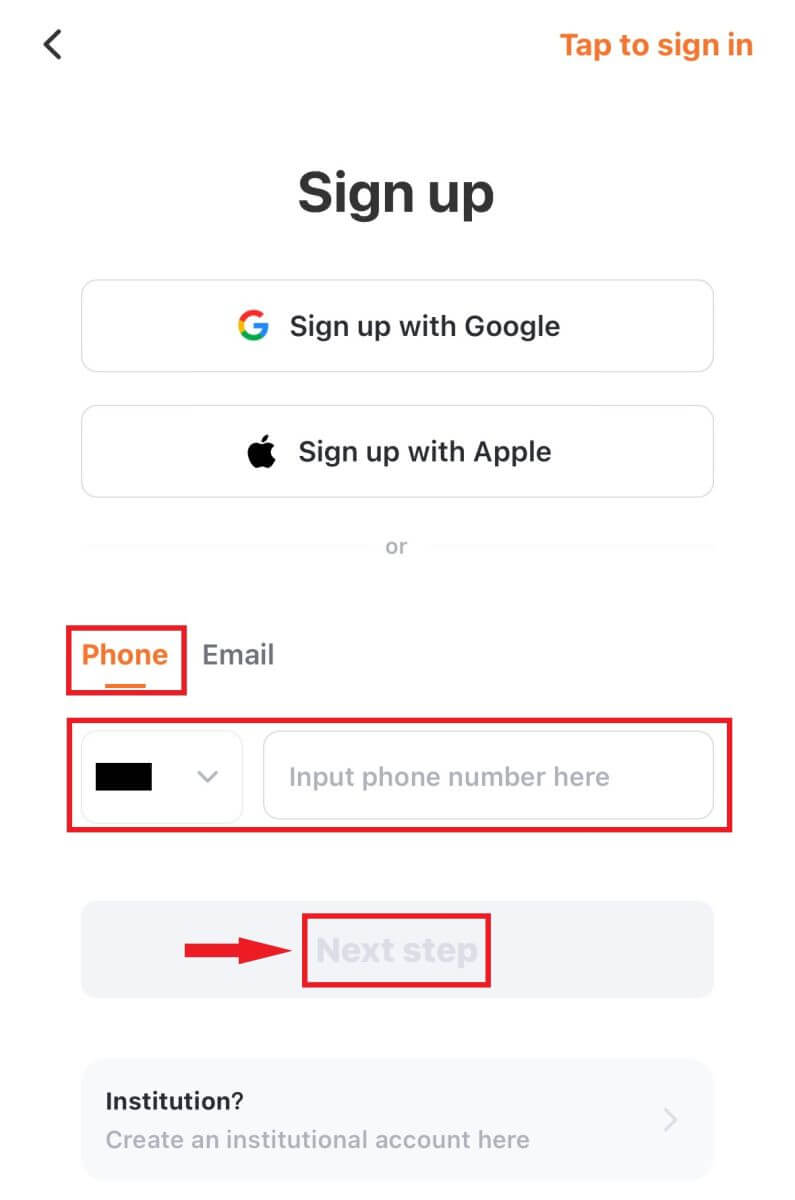
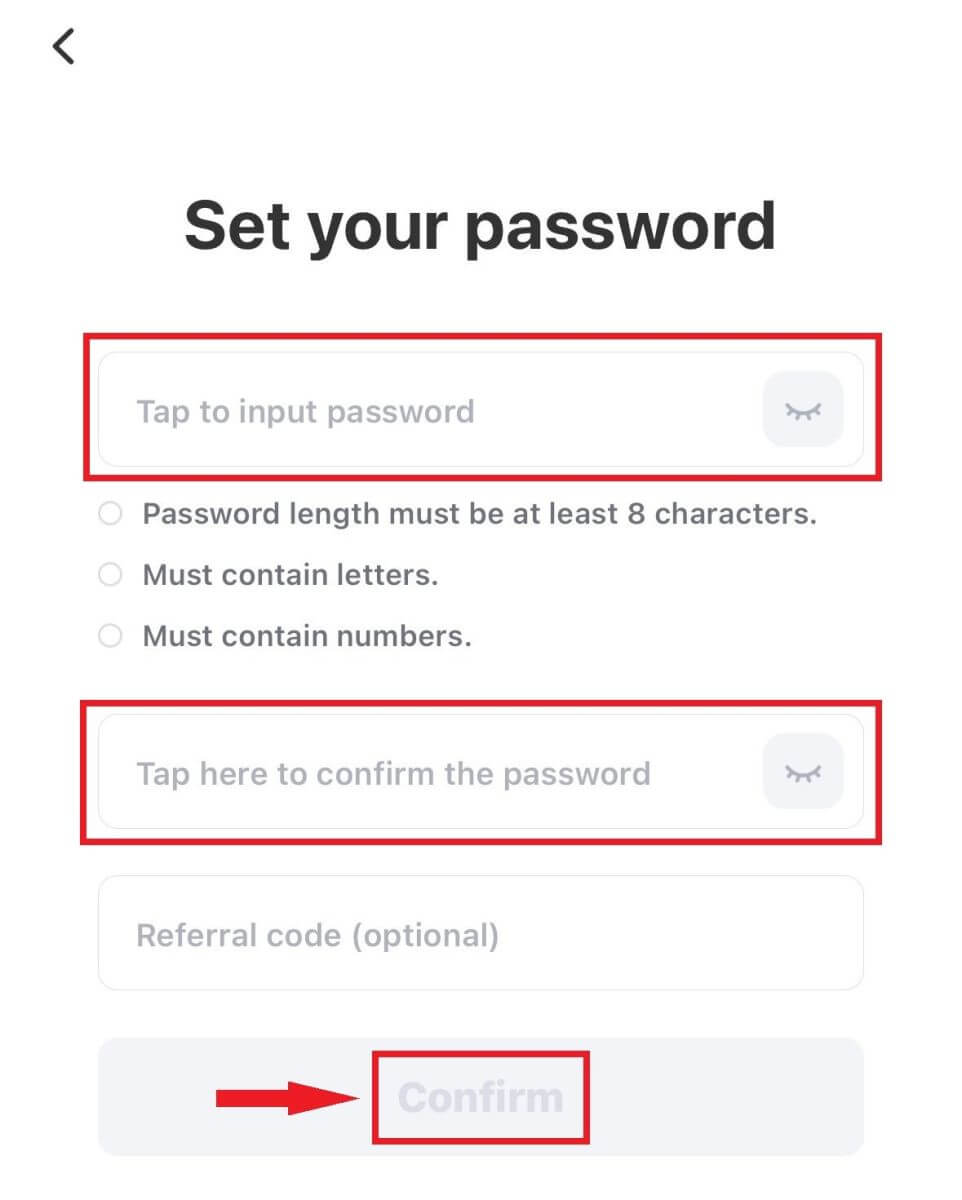
Then, set up a secure password for your account. Type your password again for the confirmation and tap [Confirm].
Note: Your password must contain at least 8 characters, including letters and numbers.
4. You will receive a 6-digit verification code in your email or phone. Enter the code within 60 seconds and click [Next step].
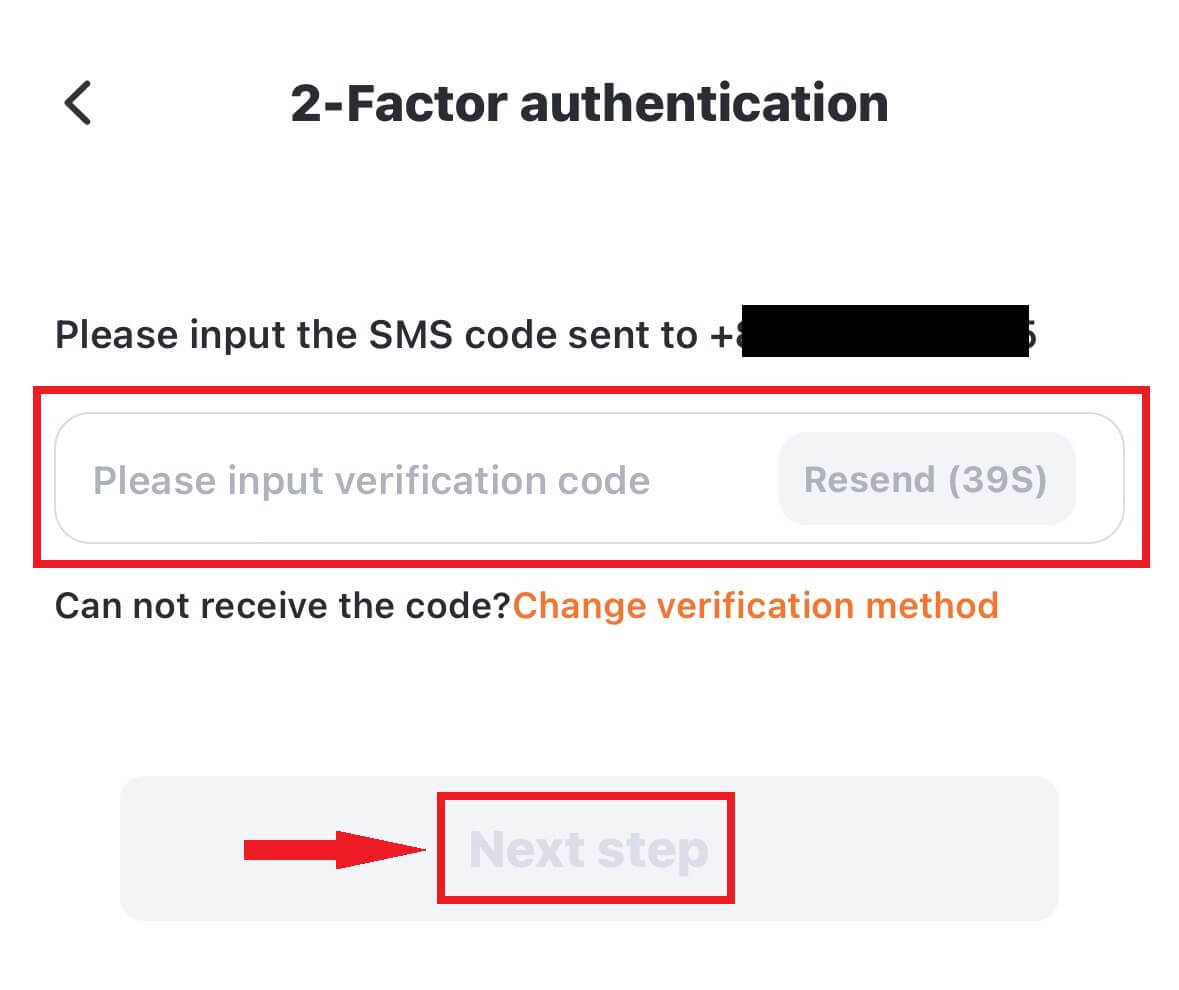
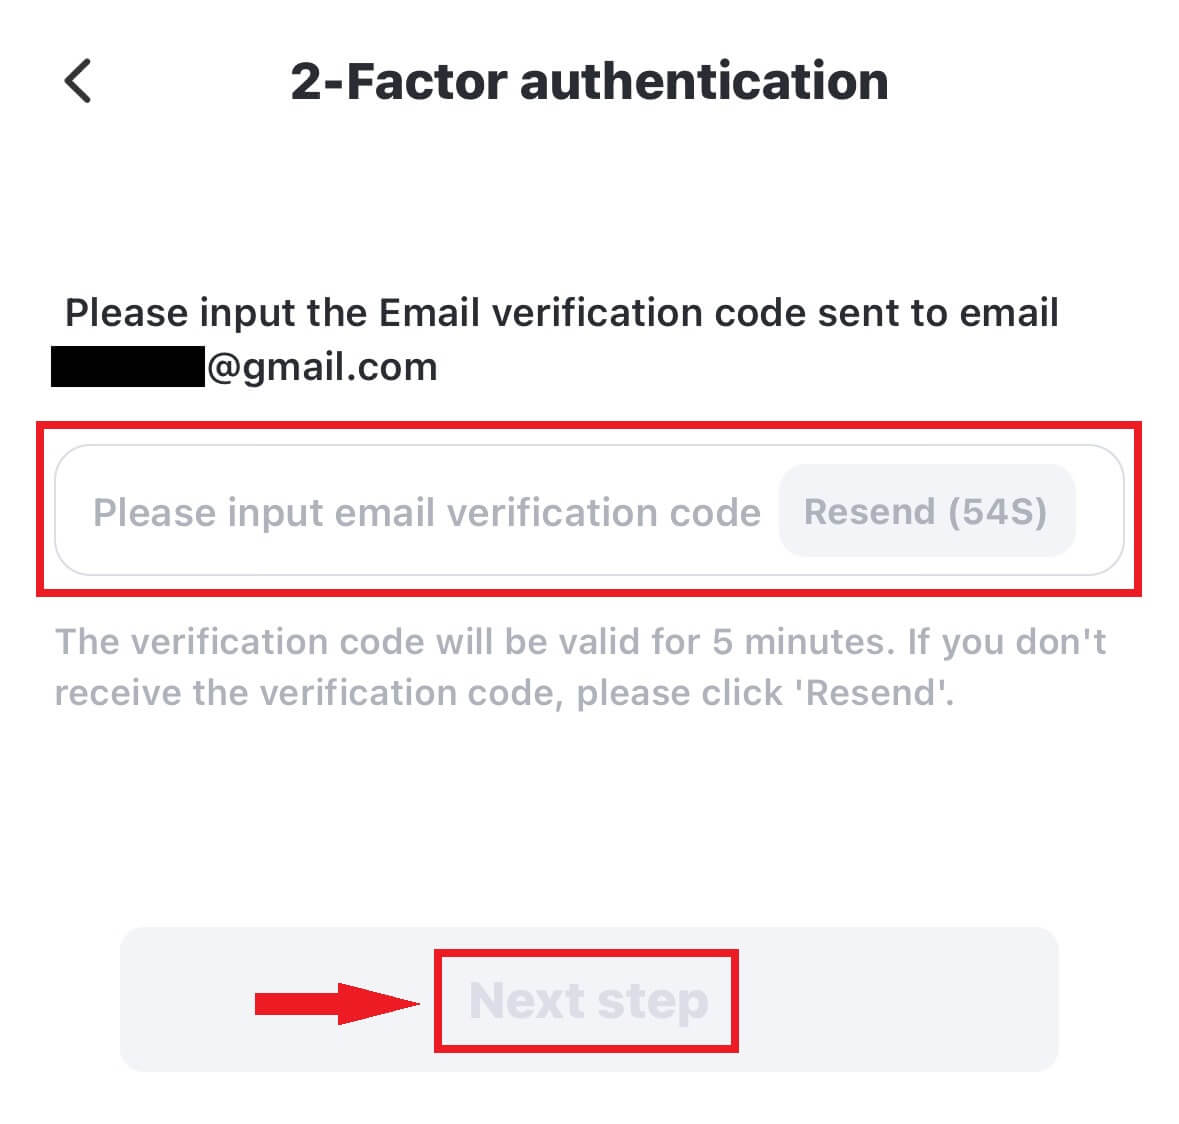
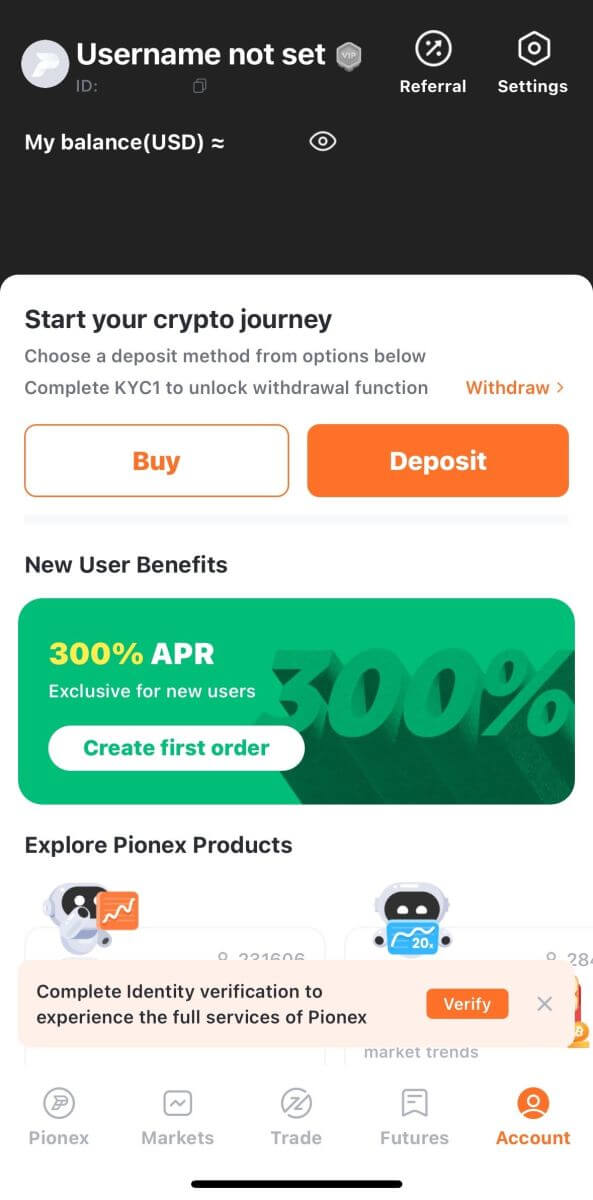
5. Congratulations! You have successfully created Pionex account.
Sign up with your Apple/Google account:
3. Select [Sign up with Apple] or [Sign up with Google]. You will be prompted to sign in to Pionex using your Apple or Google account.
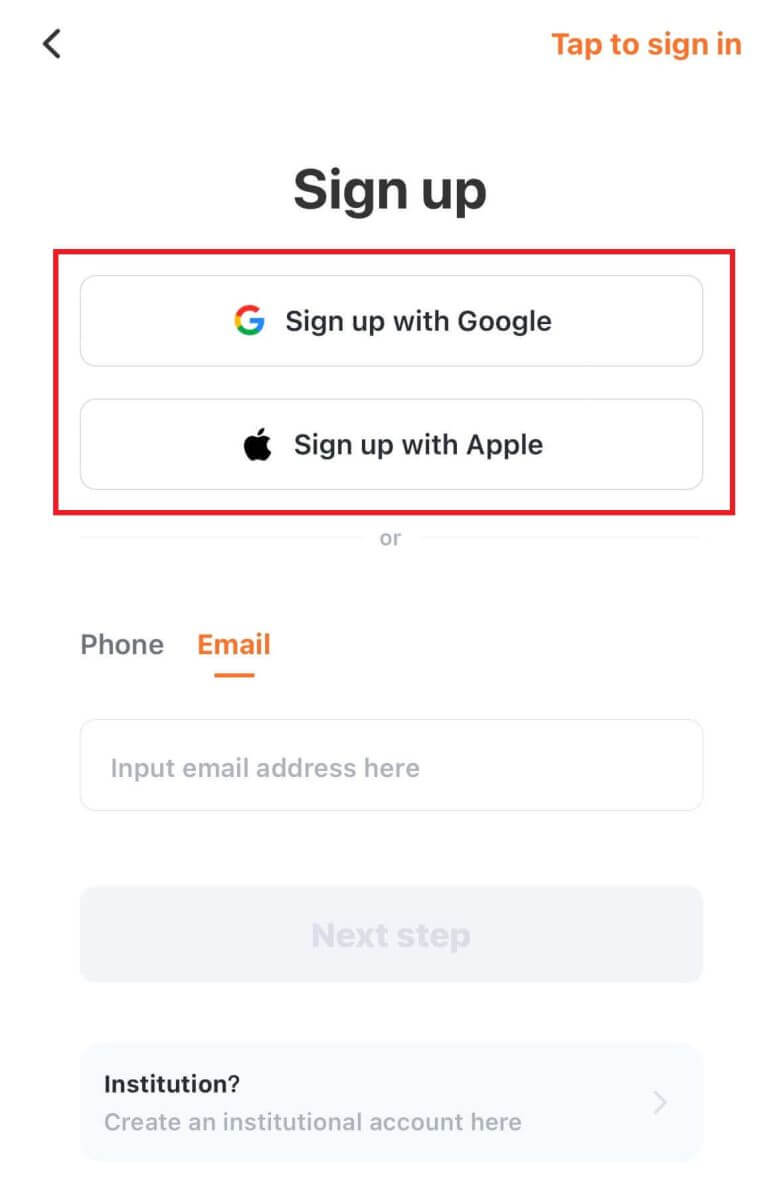
Tap [Continue].
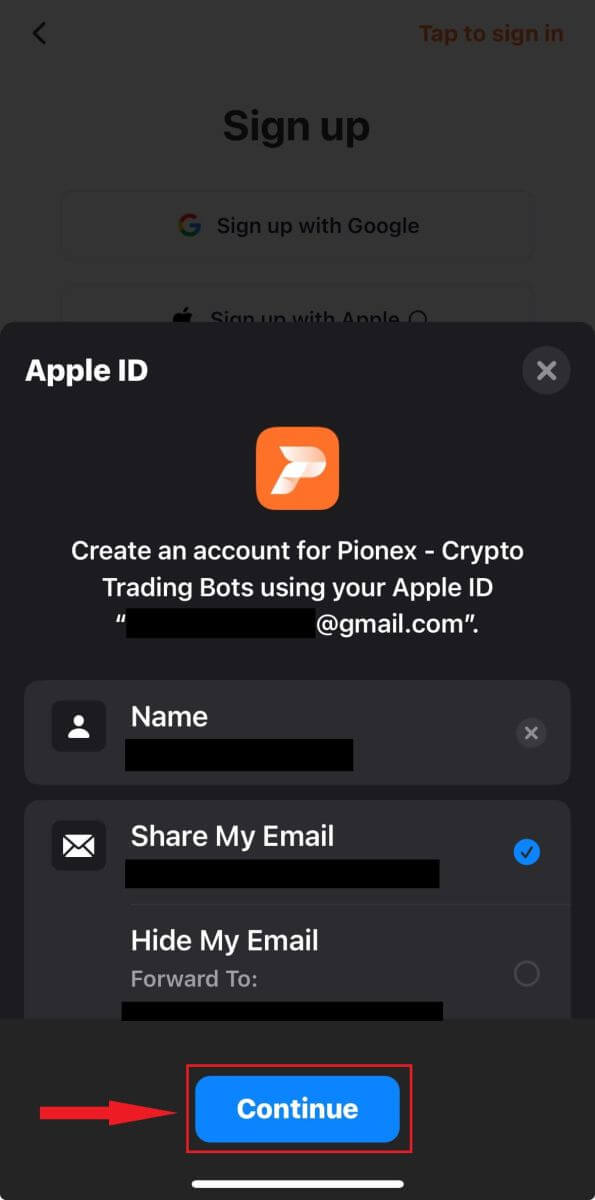
4. Congratulations! You have successfully created Pionex account.

Note:
- To protect your account, we highly recommend enabling at least 1 two-factor authentication (2FA).
- Please note that you must complete Identity Verification to experience the full services of Pionex.
Frequently Asked Questions (FAQ)
Why Can’t I Receive Emails from Pionex
If you are not receiving emails sent from Pionex, please follow the instructions below to check your email’s settings:1. Are you logged in to the email address registered to your Pionex account? Sometimes you might be logged out of your email on your devices and hence can’t see Pionex’s emails. Please log in and refresh.
2. Have you checked the spam folder of your email? If you find that your email service provider is pushing Pionex emails into your spam folder, you can mark them as “safe” by whitelisting Pionex’s email addresses. You can refer to How to Whitelist Pionex Emails to set it up.
Addresses to whitelist:
- [email protected]
- [email protected]
- [email protected]
- [email protected]
- [email protected]
- [email protected]
- [email protected]
- [email protected]
- [email protected]
- [email protected]
- [email protected]
- [email protected]
- [email protected]
- [email protected]
- [email protected]
4. Is your email inbox full? If you have reached the limit, you won’t be able to send or receive emails. You can delete some of the old emails to free up some space for more emails.
5. If possible, register from common email domains, such as Gmail, Outlook, etc.
Why Can’t I Receive SMS Verification Codes
Pionex continuously improves our SMS Authentication coverage to enhance user experience. However, there are some countries and areas currently not supported.If you cannot enable SMS Authentication, please refer to our Global SMS coverage list to check if your area is covered. If your area is not covered on the list, please use Google Authentication as your primary two-factor authentication instead.
If you have enabled SMS Authentication or you are currently residing in a country or area that’s in our Global SMS coverage list, but you still cannot receive SMS codes, please take the following steps:
- Ensure that your mobile phone has a good network signal.
- Disable your anti-virus and/or firewall and/or call blocker apps on your mobile phone that might potentially block our SMS Code number.
- Restart your mobile phone.
- Try voice verification instead.
- Reset SMS Authentication.
How to Verify Account in Pionex
What is identity verification? (KYC)
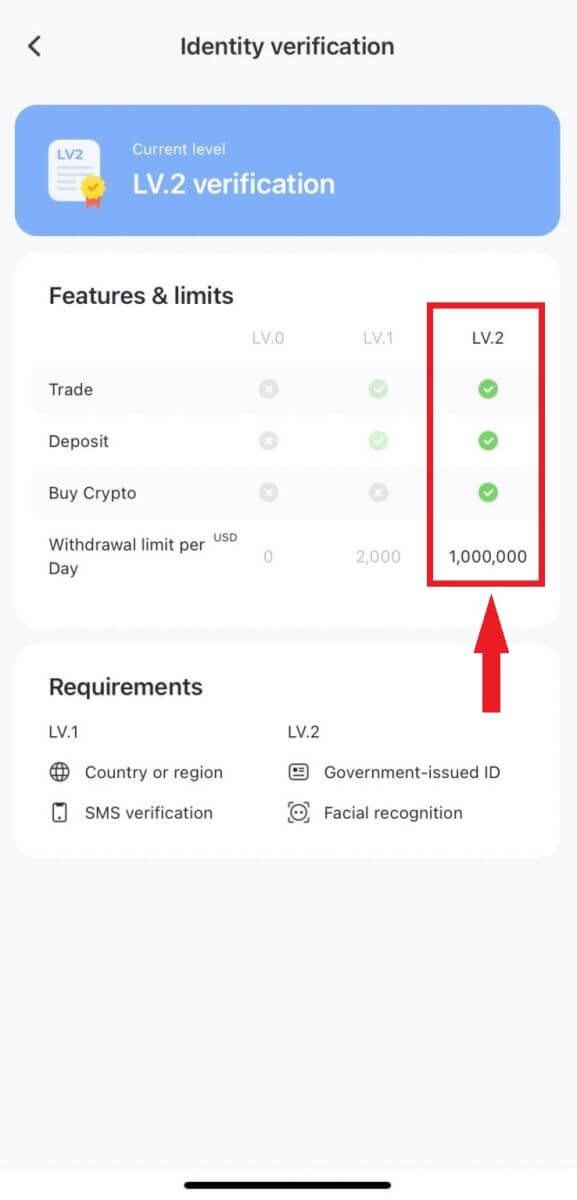
Completing KYC identity verification on Pionex enhances your account security level and raises the daily withdrawal limit. Simultaneously, you gain access to the service for purchasing crypto with a credit card.
There are two levels of verification, more details are as follows:
- Features and Limits:
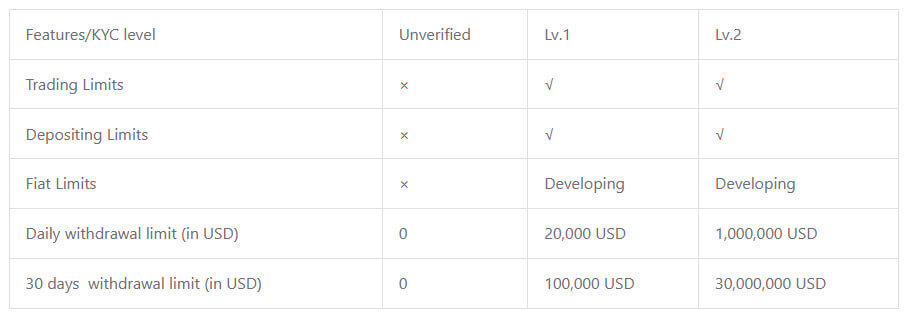
- Requirements:
KYC Lv.1 verification: Country or region, Full legal name
KYC Lv.2 verification: Government-issued ID, Facial recognition
For additional information on KYC identity verification, please consult the announcement.
How to Complete Identity Verification on Pionex
Where can I get my account verified?
You can access Identity Verification by navigating to [Account] - [KYC]. On this page, you can review your existing verification level, which directly influences the trading limit for your Pionex account. If you wish to enhance your limit, kindly proceed to complete the corresponding Identity Verification level.
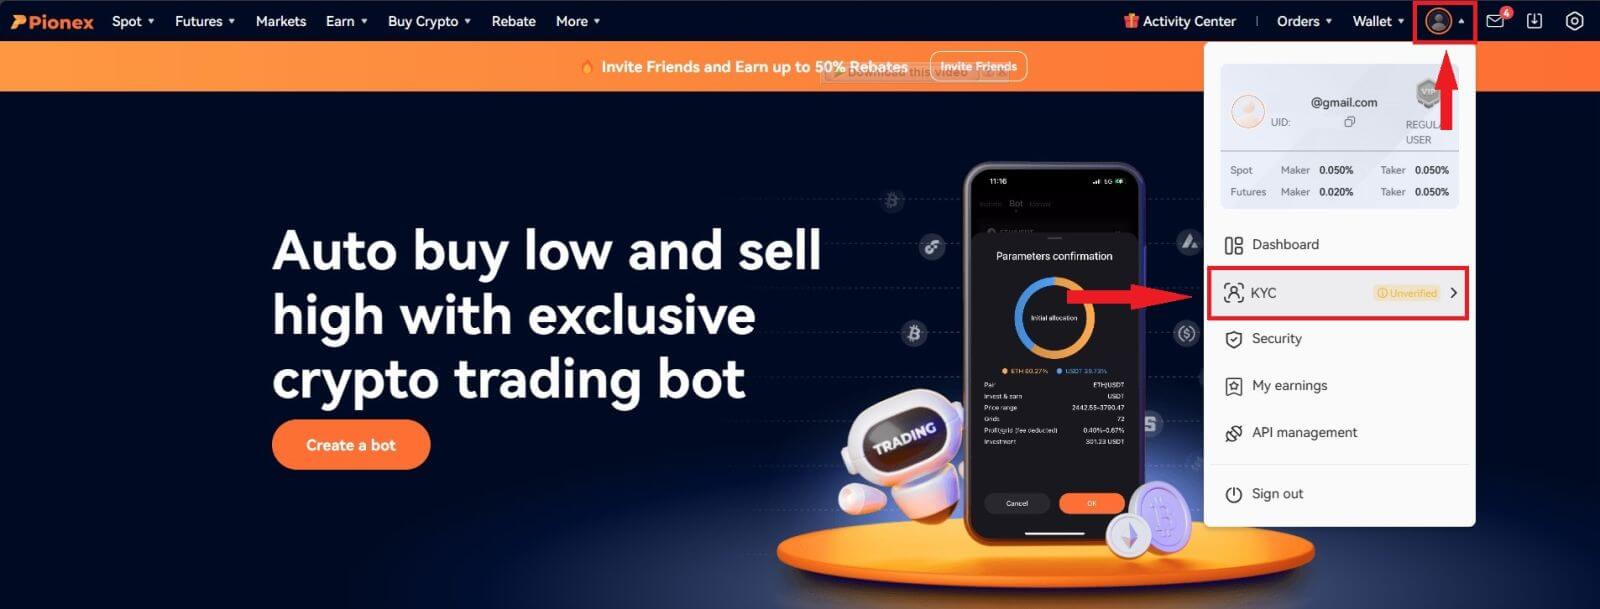
How to Complete Identity Verification on Pionex App? A step-by-step guide
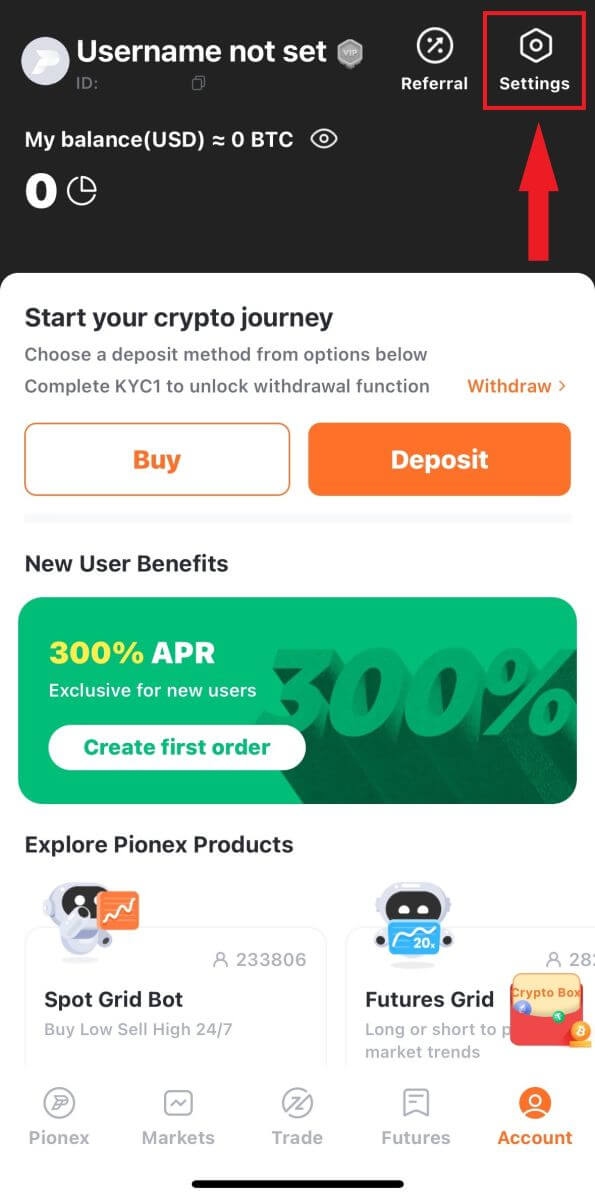
1. Login to your Pionex account on the App, Select “Account” -- “Settings” -- “Identity verification“.
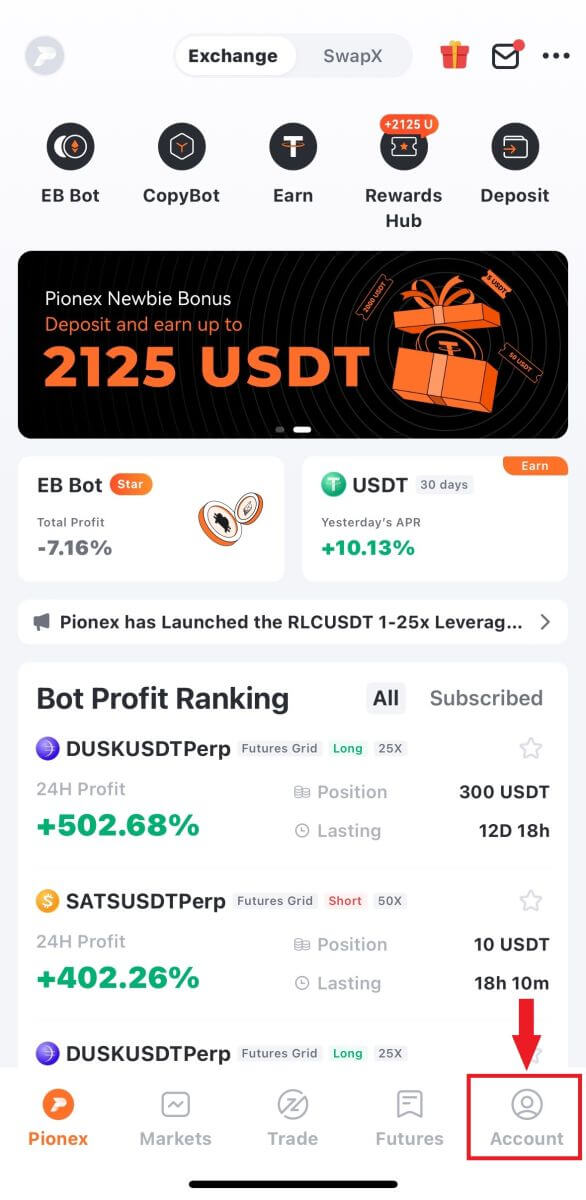
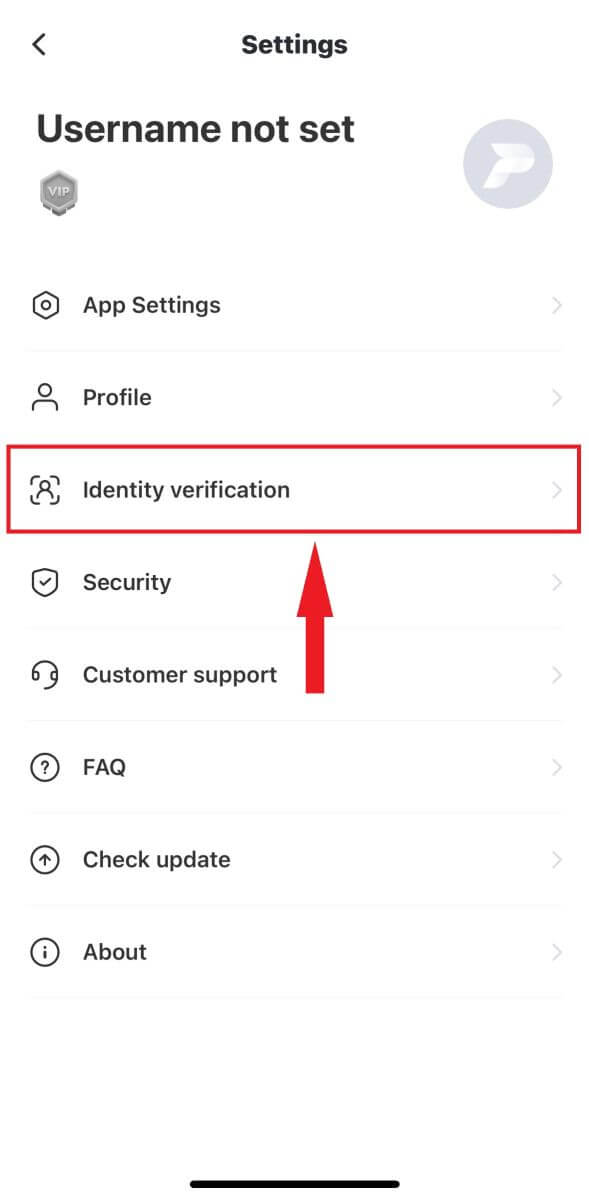
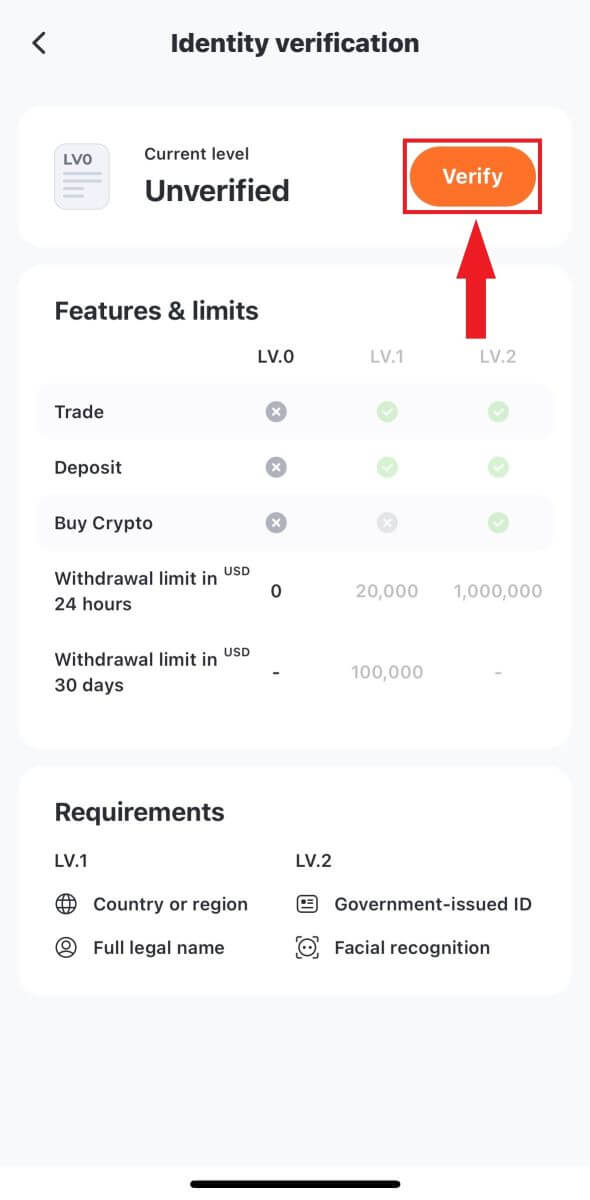
2. Select "Verify" on the page; LV.1 verification will authenticate your location country and full legal name.
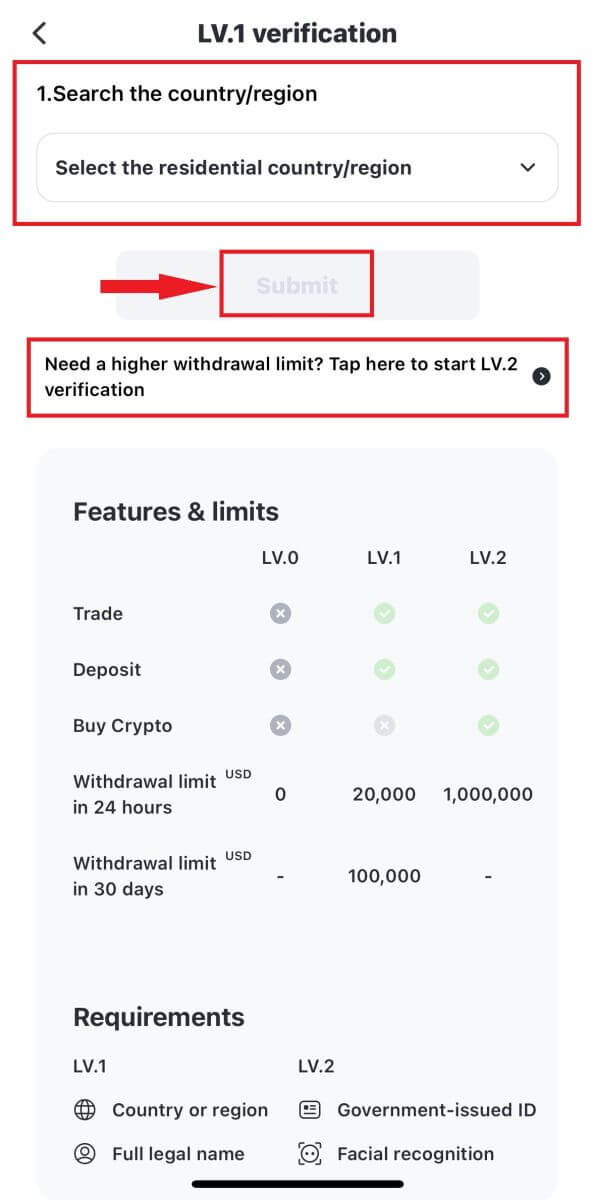
3. Follow the instructions and carefully review the notifications. Once all information is confirmed, click "Submit" to complete LV.1 Verification (KYC1).
4. For an elevated withdrawal limit, proceed with LV.2 verification.
Choose your countries/regions and submit the required legal ID card for verification.
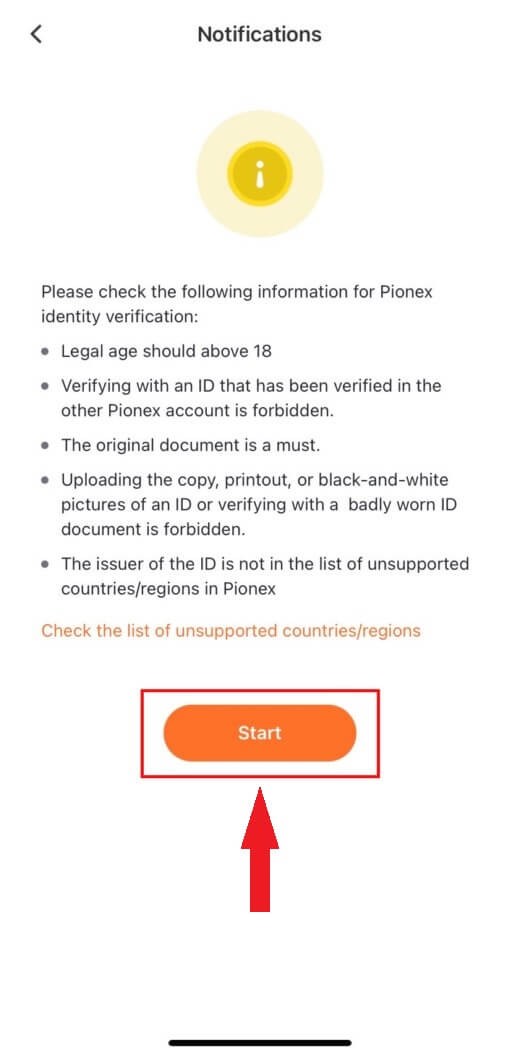
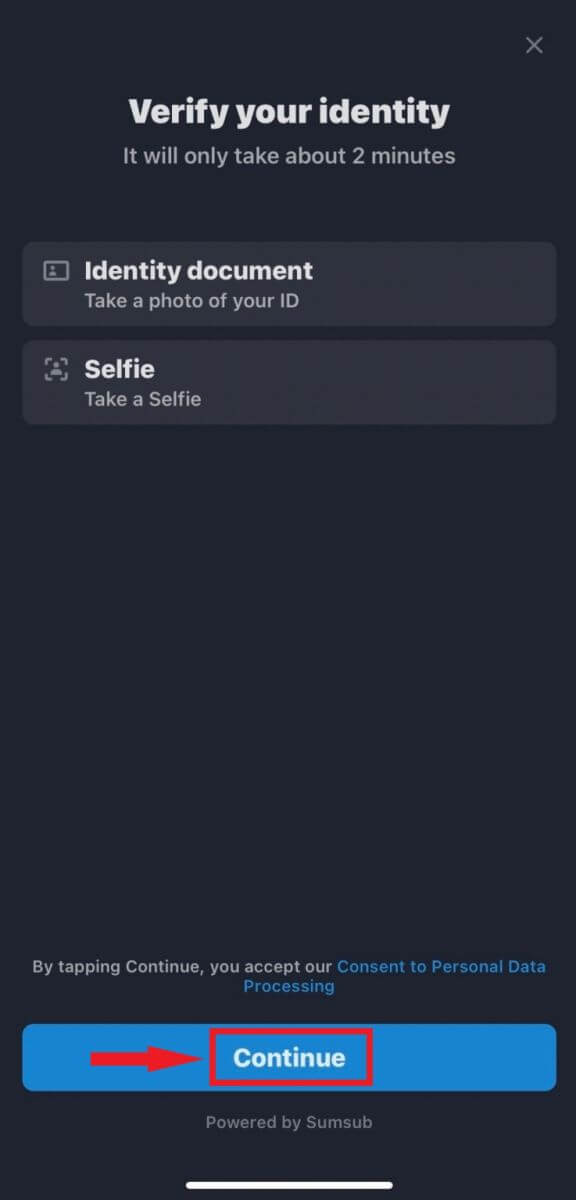
5. Upon capturing photos of your ID card and selfie, the system will initiate verification, typically completing the review within 15 – 60 minutes. Feel free to leave the page temporarily and check the status at a later time.
Once these steps are completed, LV.2 verification will be visible on your page. You can proceed to purchase Crypto with a credit card (USDT) and then create your first trading bot on Pionex!
Please Caution:
- Avoid attempting to use another person’s ID card or providing false information for verification, as Pionex may restrict your account services as a consequence.
- Each user is permitted to verify only their own personal information on an account, multiple accounts will not successfully pass KYC.
- Refrain from using watermarks when uploading documents or employing photo editing software to capture images of documents.
Frequently Asked Questions (FAQ)
Why should I provide supplementary certificate information?
In uncommon instances where your selfie does not align with the provided ID documents, you will be required to submit additional documents and await manual verification. Kindly be aware that the manual verification process may extend over several days. Pionex prioritizes a thorough identity verification service to safeguard users’ funds, and it is crucial to ensure that the materials submitted meet the specified requirements during the information completion process.
Identity Verification for Buying Crypto with Credit/Debit Card
To ensure a secure and compliant fiat gateway experience, users purchasing cryptocurrencies with credit or debit cards must undergo Identity Verification. Those who have already completed Identity Verification for their Pionex account can seamlessly proceed with crypto purchases without any additional information required. Users needing extra information will receive prompts when attempting to make a crypto purchase with a credit or debit card.
Completing each level of Identity Verification will result in increased transaction limits, as detailed below. All transaction limits are denominated in Euro (€), irrespective of the fiat currency used, and may slightly fluctuate in other fiat currencies based on exchange rates.
Basic Info Verification: This level entails verifying the user’s name, address, and date of birth.
Common failed reasons and the methods on Pionex
APP: Click “Account” -- “Security” -- “Identity verification”.Web: Click your profile avatar on the top-right of the page then into “Account” -- “KYC” -- “Check detail”.
If the verification fails, click "Check" and the system will display a prompt revealing the specific reasons for the failure.
Common reasons for verification failure and troubleshooting steps are as follows:
1. Incomplete Photo Upload:
Confirm that all photos have been successfully uploaded. The submit button will activate after all photos are uploaded.
2. Outdated Webpage:
If the webpage has been open for an extended period, simply refresh the page and re-upload all the photos.
3. Browser Issues:
If the problem persists, try using the Chrome browser for KYC submission. Alternatively, use the APP version.
4. Incomplete Document Photo:
Ensure that every edge of the document is captured in the photo.
If you are still unable to verify your KYC, please send an email to [email protected] with the subject "KYC failure" and provide your Pionex account Email/SMS in the content.
The KYC team will assist you in re-checking the status and respond via email. We appreciate your patience!


