How to Sign Up and Login to a Pionex account

How to Sign Up in Pionex
Sign Up in Pionex with a Phone Number or Email
1. Go to Pionex and click [Sign up].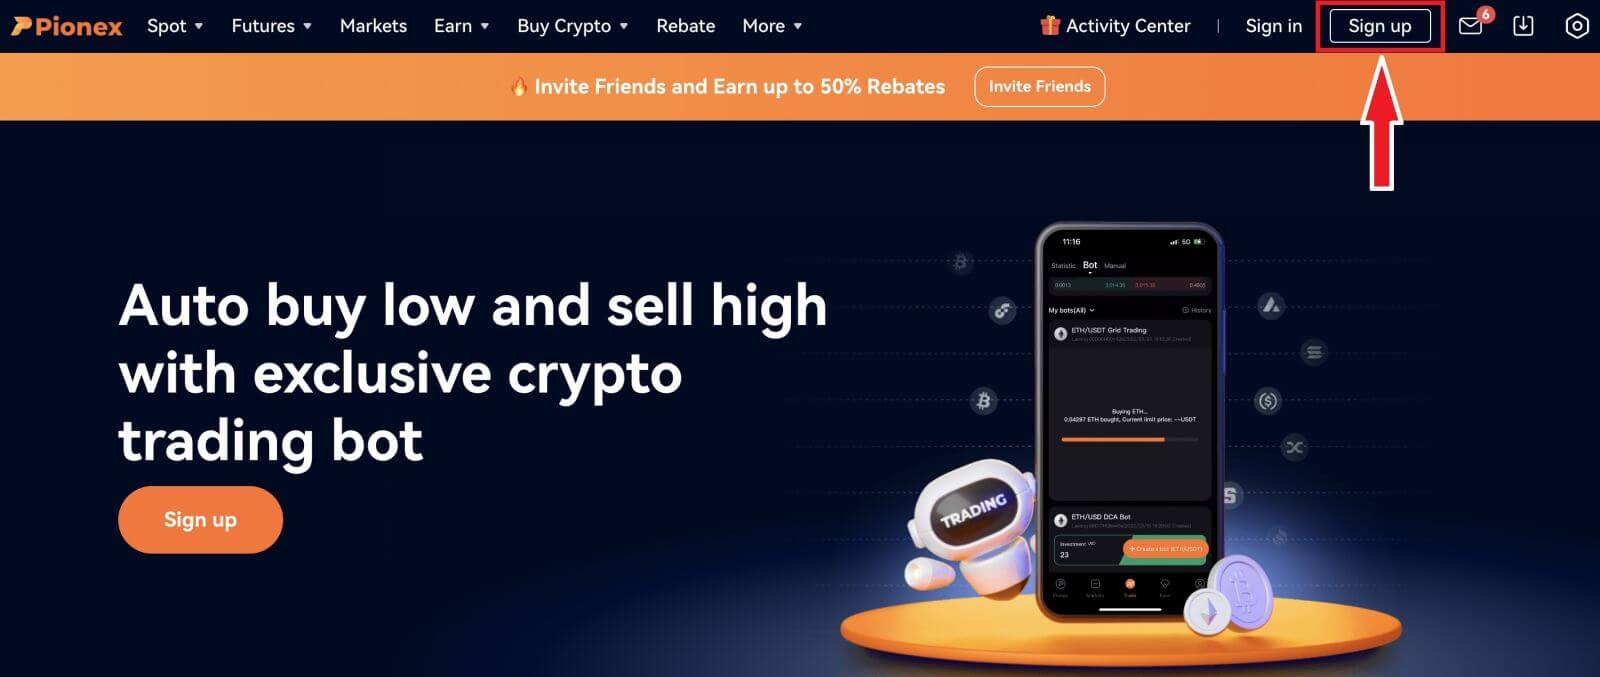
2. Select a registration method. You can sign up with your email address, phone number, Apple account or Google account.
Please select the type of account carefully. Once registered, you cannot change the account type.
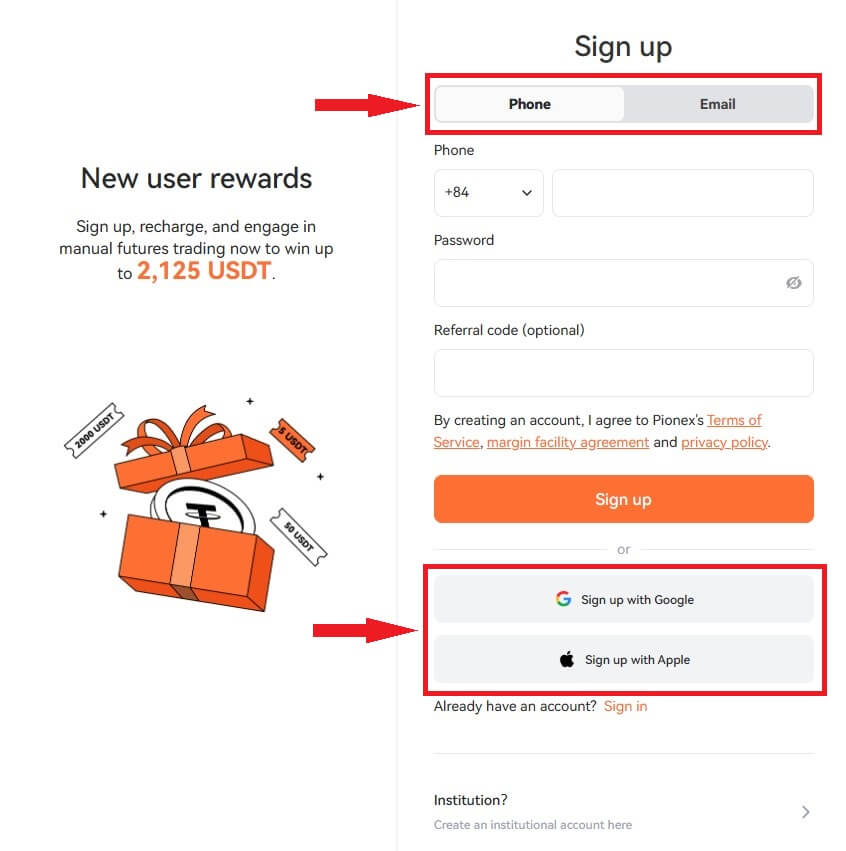
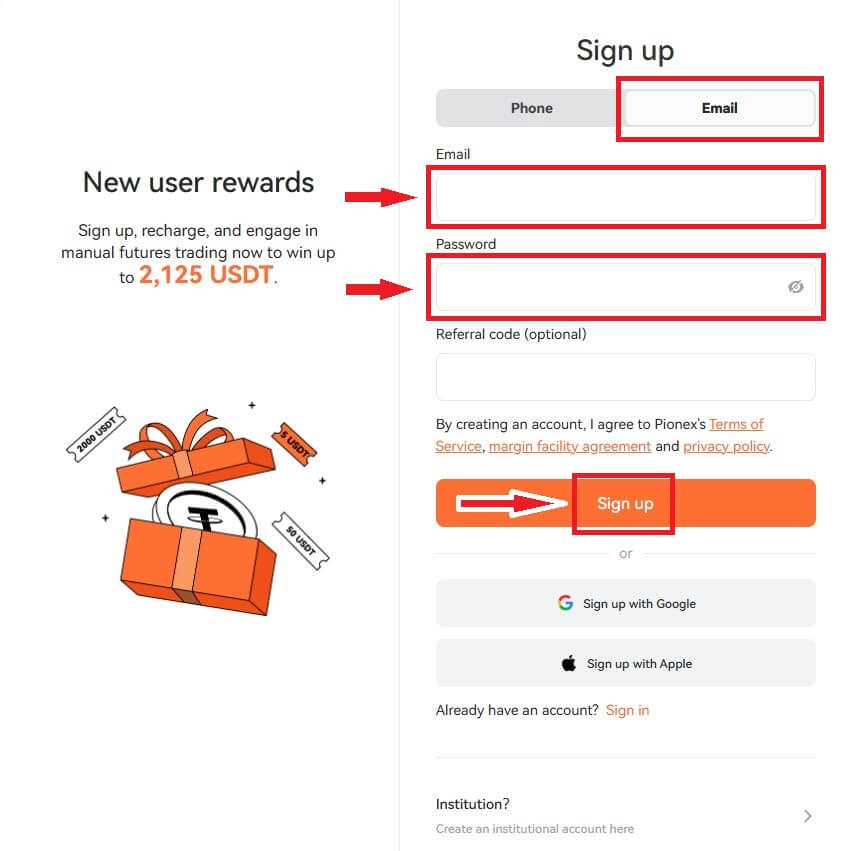
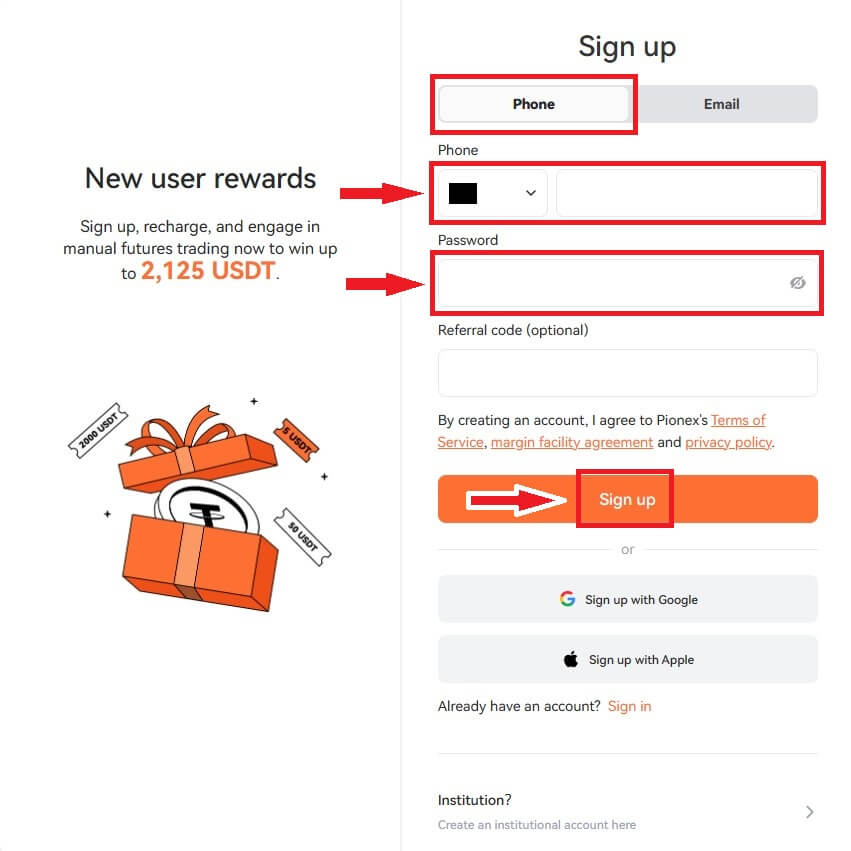
3. Select [Email] or [Phone Number] and enter your email address/phone number. Then, create a secure password for your account.
Note: Your password must contain at least 8 characters, including letters and numbers.
Read the Terms of Service, margin facility agreement and privacy policy, then click [Sign up].
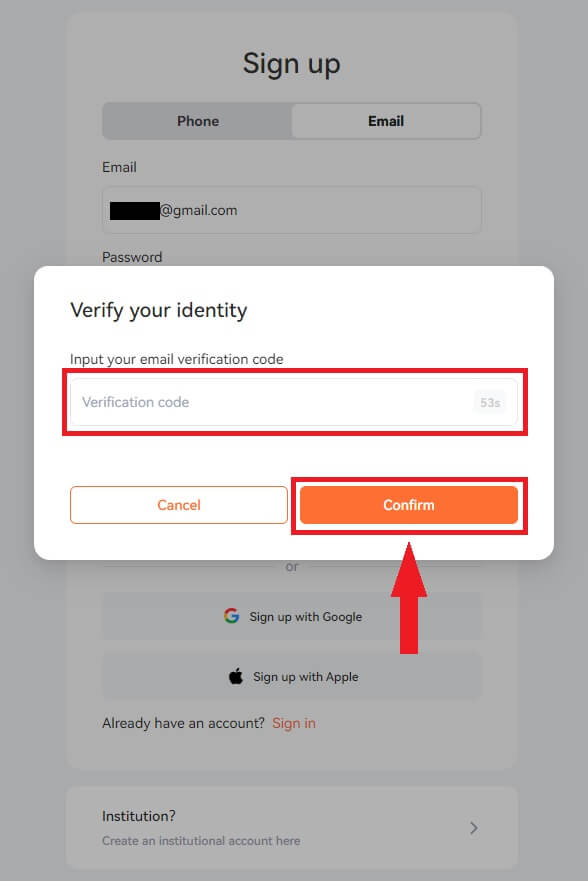
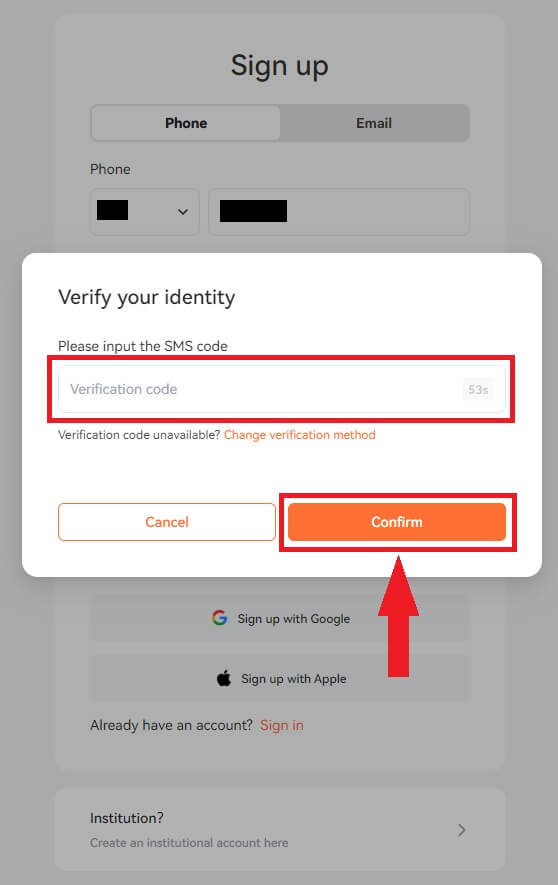
4. You will receive a 6-digit verification code in your email or phone. Enter the code within 60 seconds and click [Confirm].
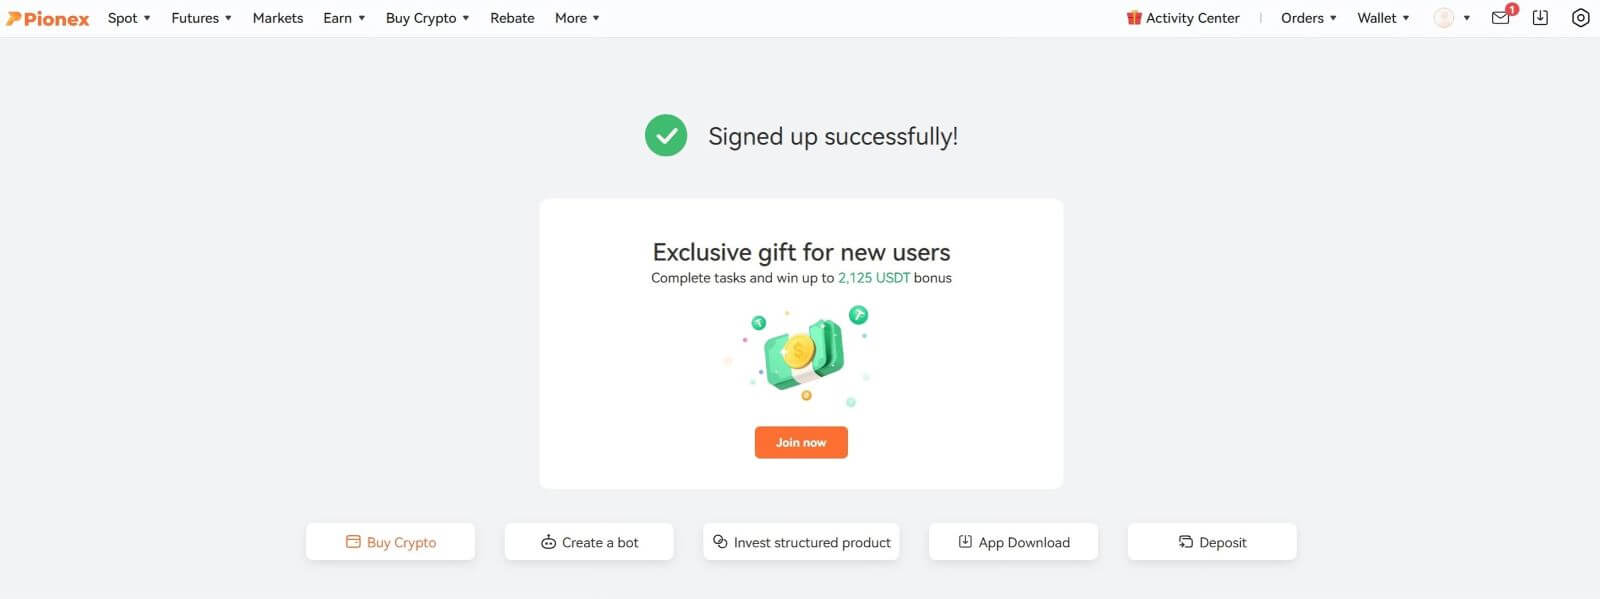
5. Congratulations, you have successfully registered on Pionex.
Sign Up in Pionex with Apple
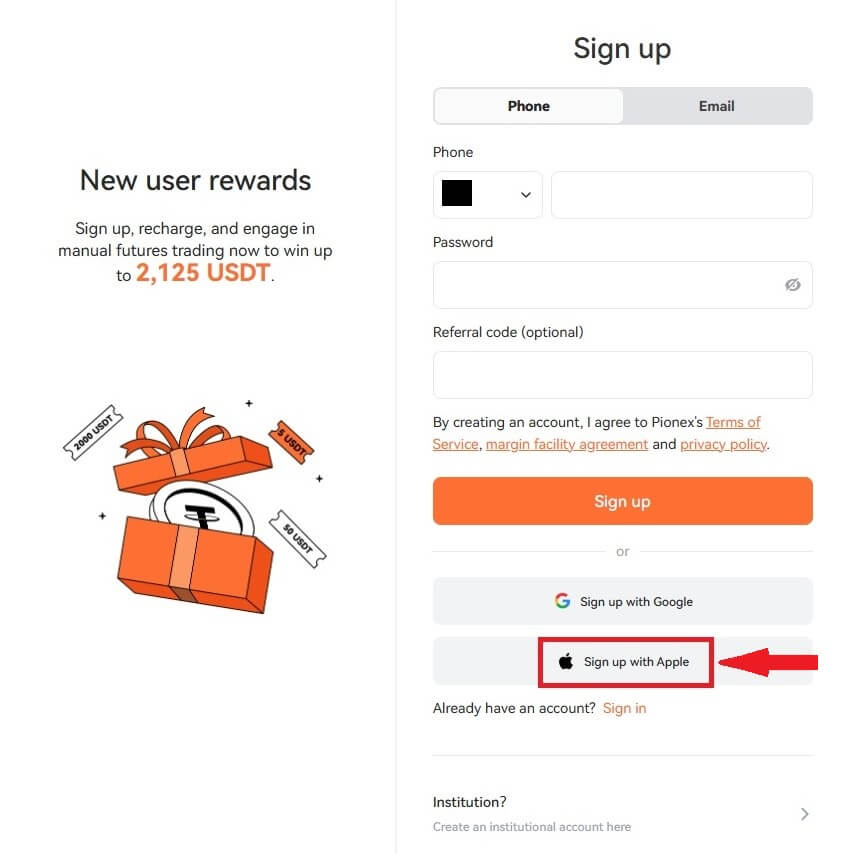
1. Alternatively, you can sign up using Single Sign-On with your Apple account by visiting Pionex and clicking [Sign up].
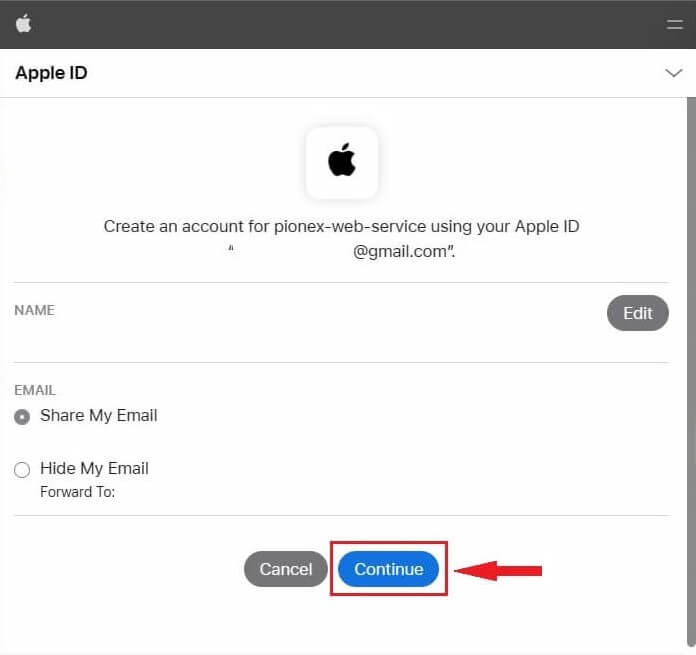
2. Select [Sign up with Apple], a pop-up window will appear, and you will be prompted to sign in to Pionex using your Apple account.
3. Enter your Apple ID and password to sign in to Pionex.
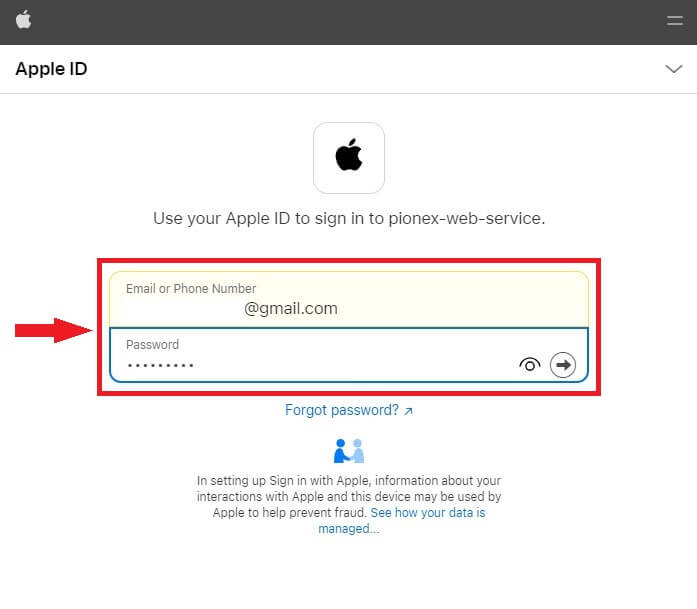
Click "Continue".
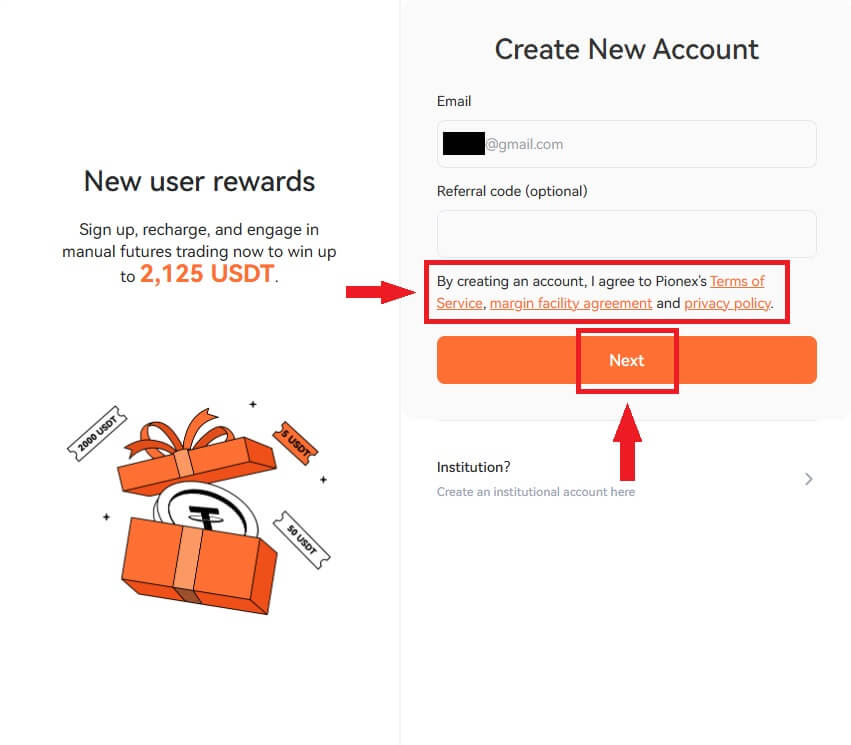
4. After signing in, you will be redirected to the Pionex website.
Read the Terms of Service, margin facility agreement and privacy policy, then click [Next].
5. Congratulations! You have successfully created a Pionex account.

Sign Up in Pionex with Google
Moreover, you can create a Pionex account through Gmail. If you wish to do that, please follow these steps:1. Firstly, you’ll need to head over to the Pionex homepage and click [Sign up].

2. Click on the [Sign up with Google] button.
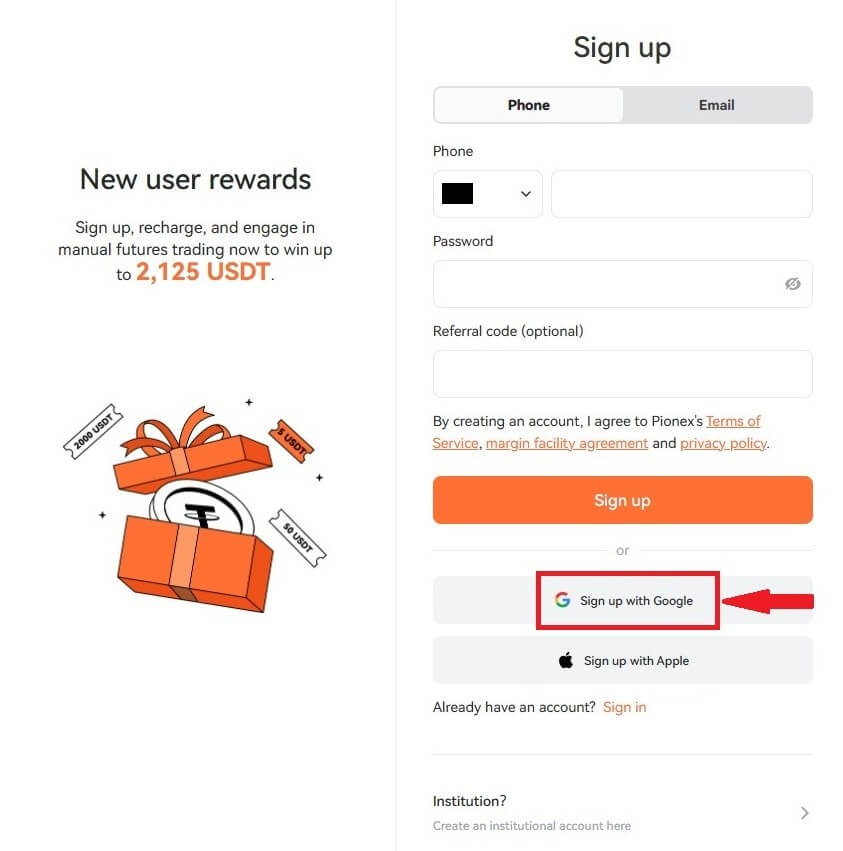
3. A sign-in window will be opened, where you will need to enter your Email address or Phone number and click on “Next”.
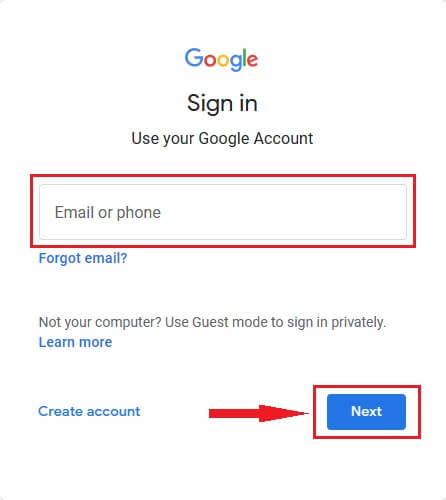
4. Then enter the password for your Gmail account and click “Next”.
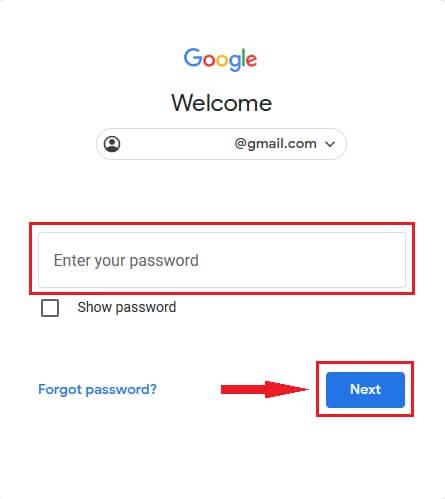
5. After signing in, you will be redirected to the Pionex website.
Read the Terms of Service, margin facility agreement and privacy policy, then click [Next].

6. Congratulations! You have successfully created a Pionex account.

Sign Up for an Account in the Pionex App
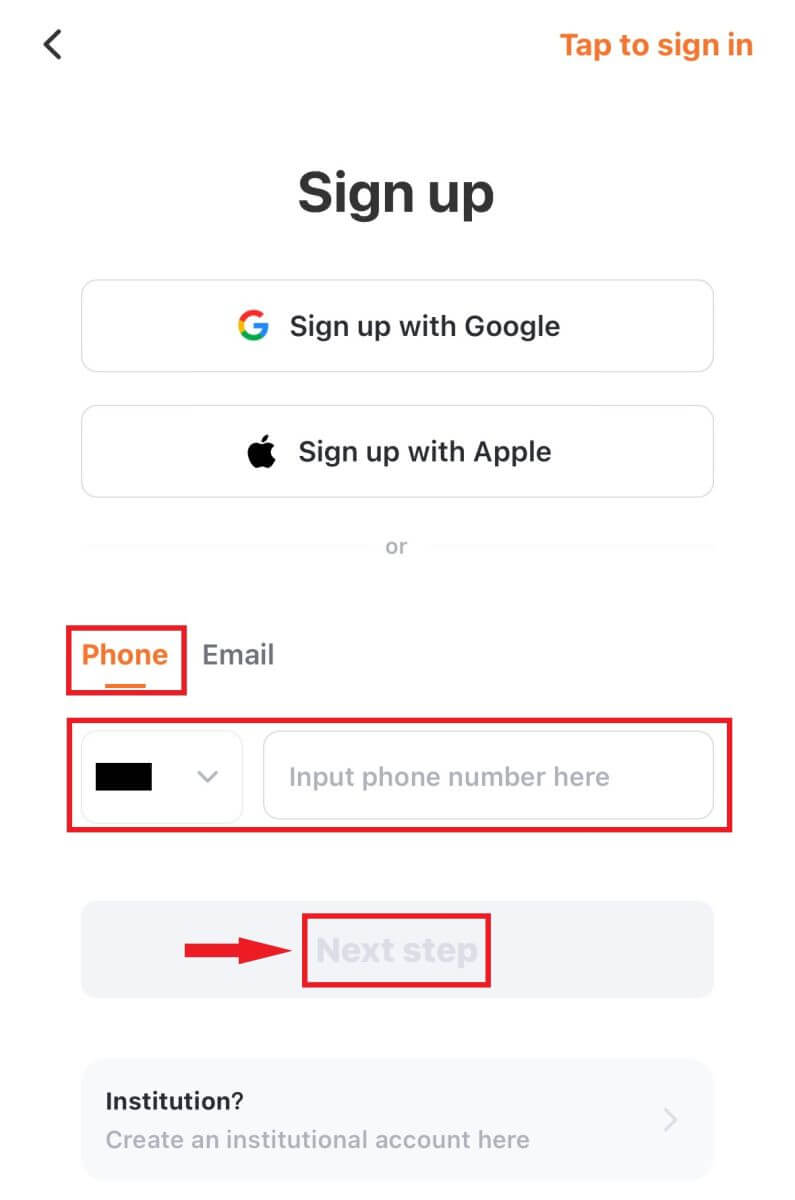
You can register for a Pionex account with your email address, phone number, or your Apple/Google account on the Pionex App easily with a few taps.1. Open the Pionex App, tap Account at the bottom corner then tap [Sign up].

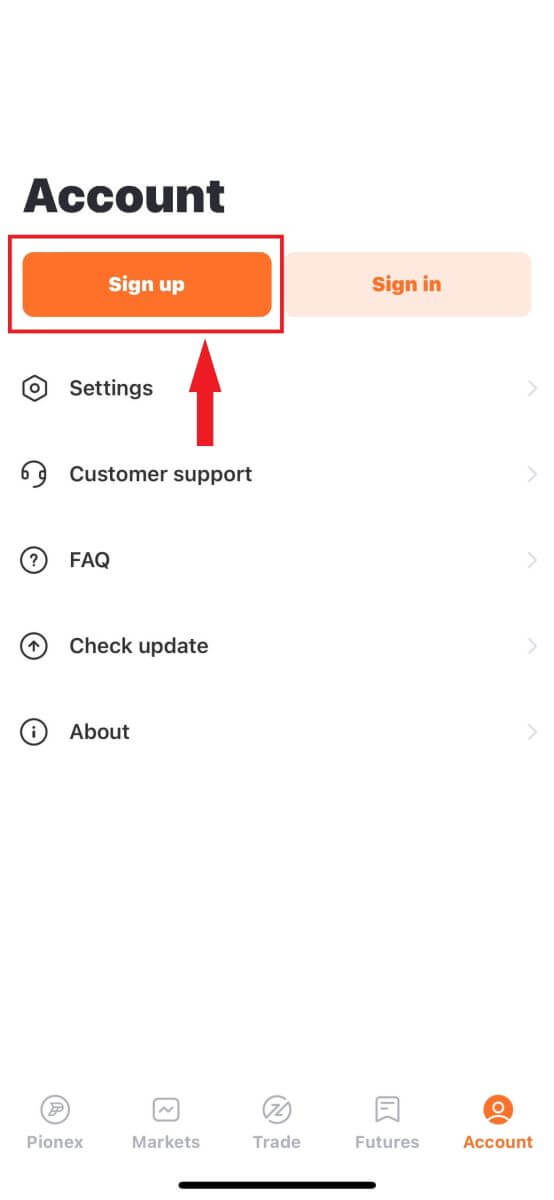
2. Select a registration method.
Please select the type of account carefully. Once registered, you cannot change the account type.
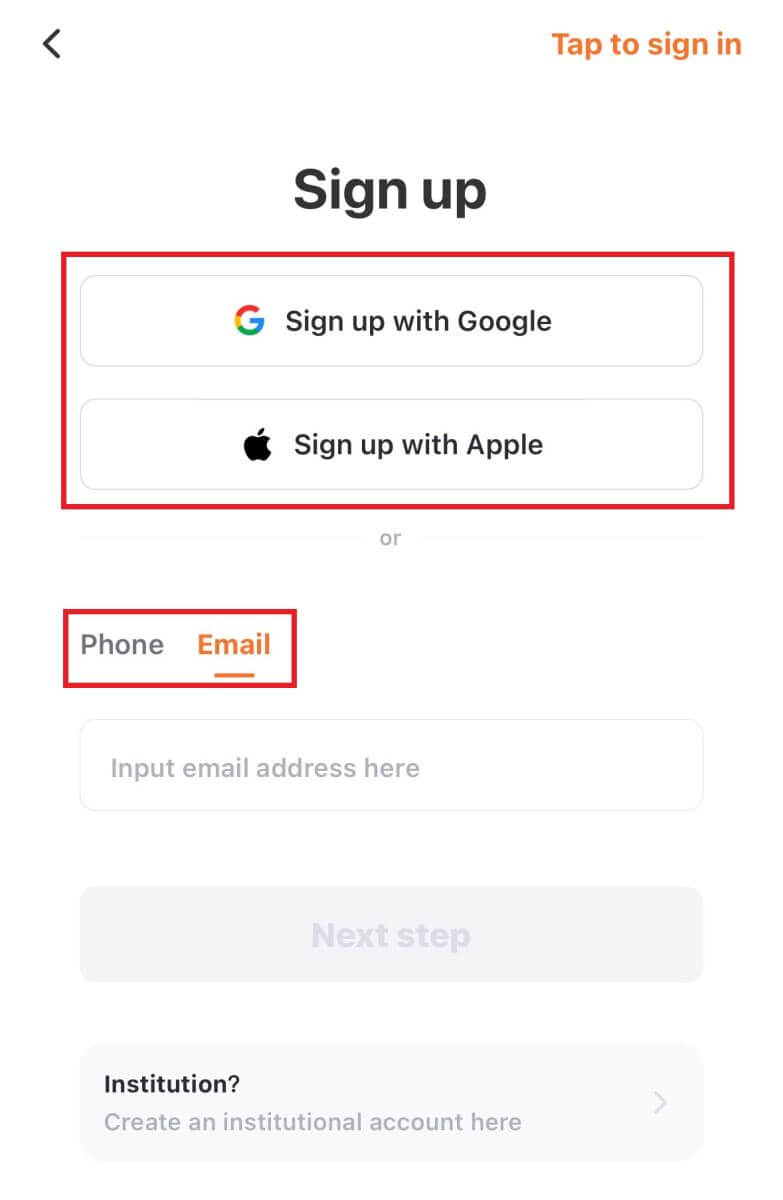
Sign up with your email/phone number:
3. Select [Email] or [Phone Number], enter your email address/phone number and tap [Next step].
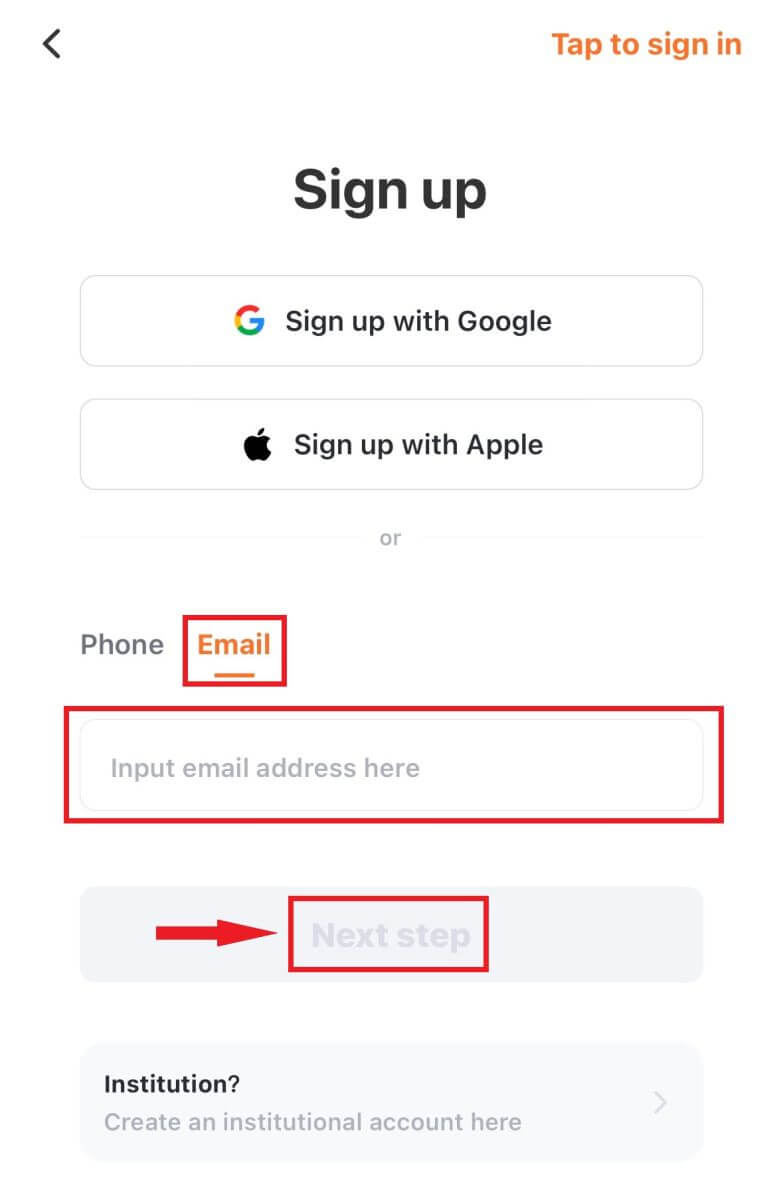
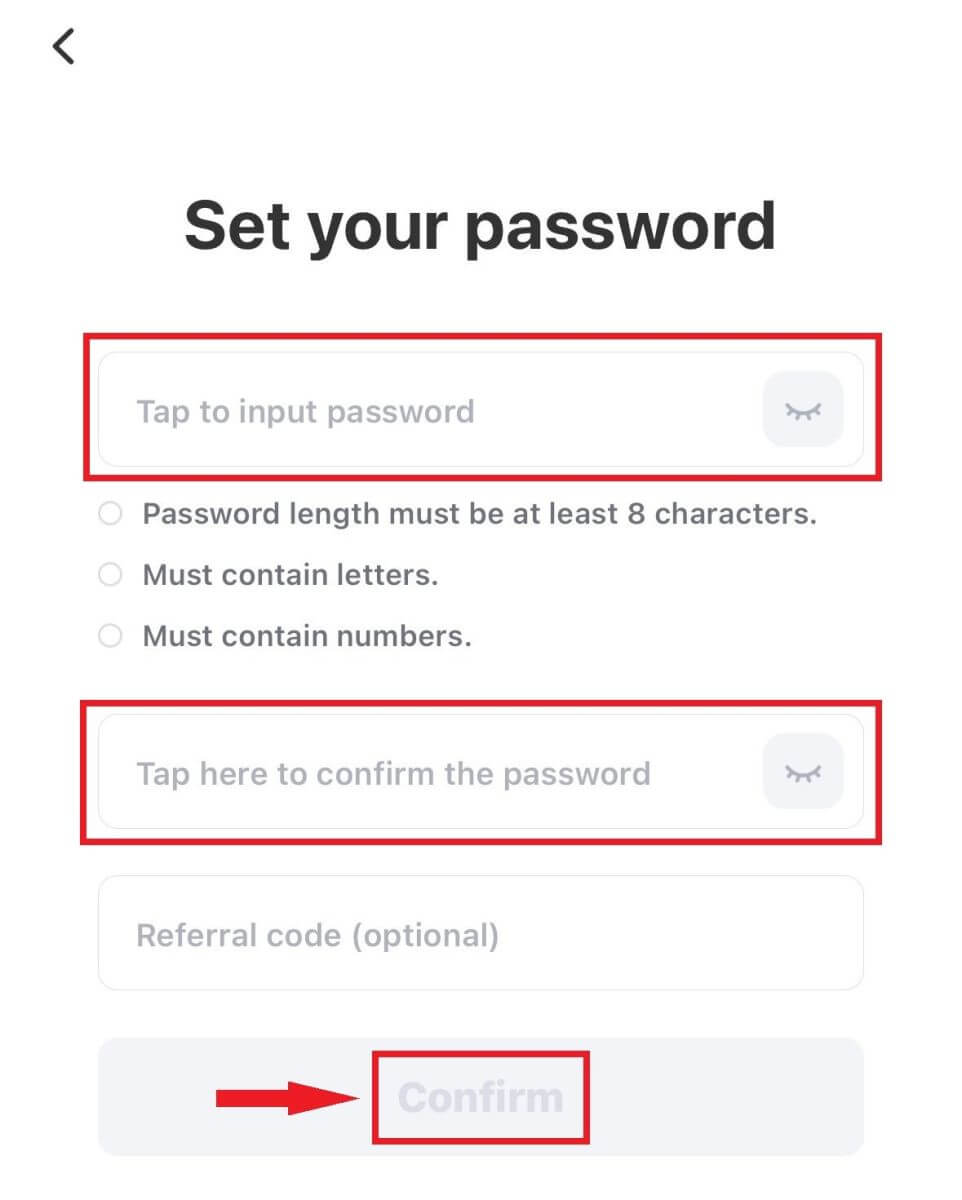
Then, set up a secure password for your account. Type your password again for the confirmation and tap [Confirm].
Note: Your password must contain at least 8 characters, including letters and numbers.
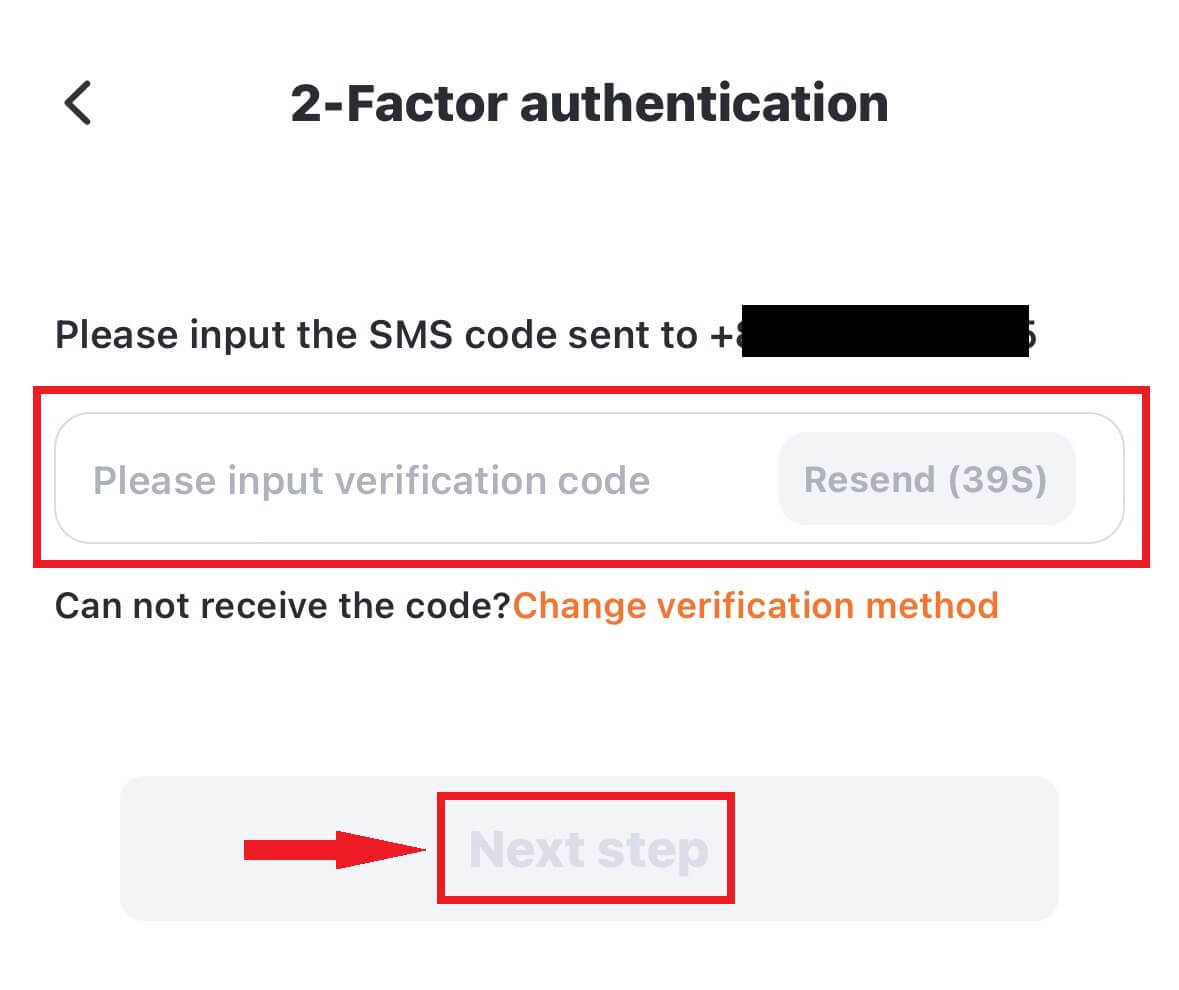
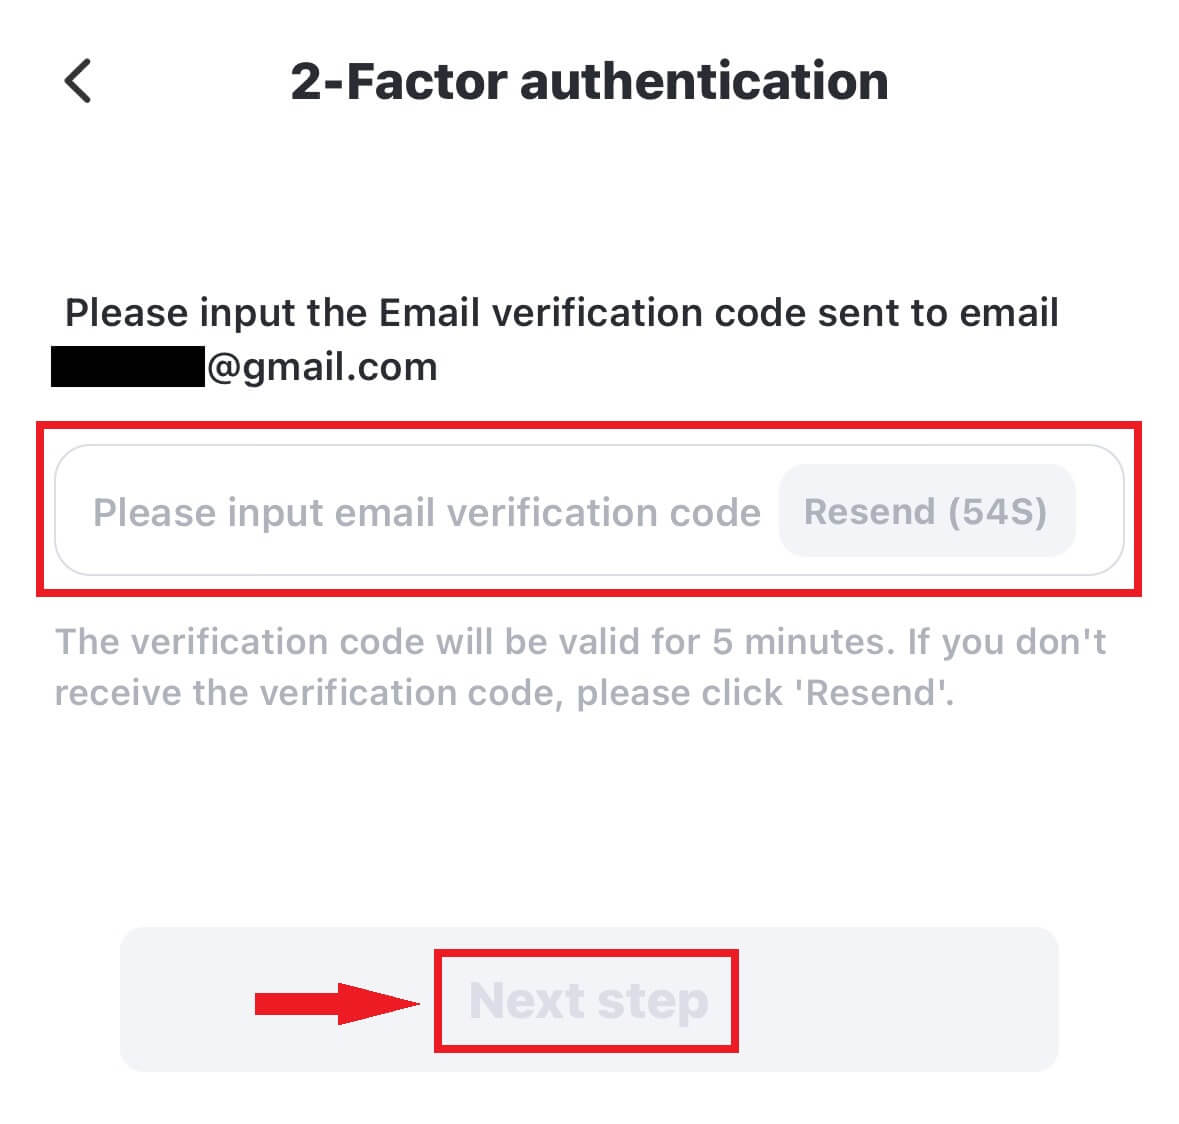
4. You will receive a 6-digit verification code in your email or phone. Enter the code within 60 seconds and click [Next step].
5. Congratulations! You have successfully created Pionex account.
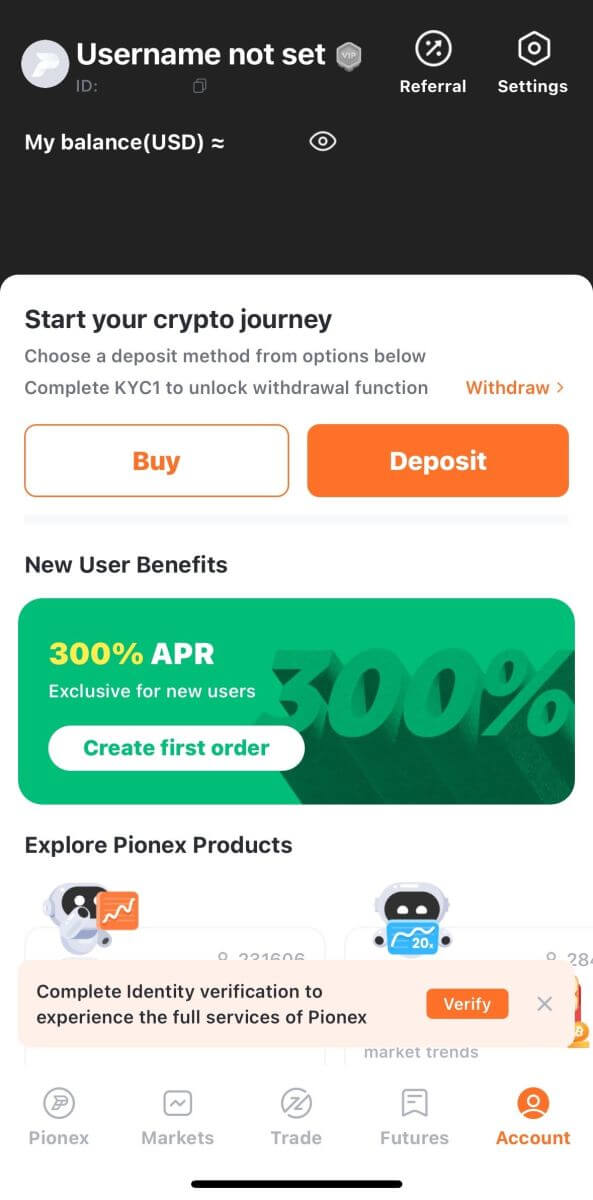
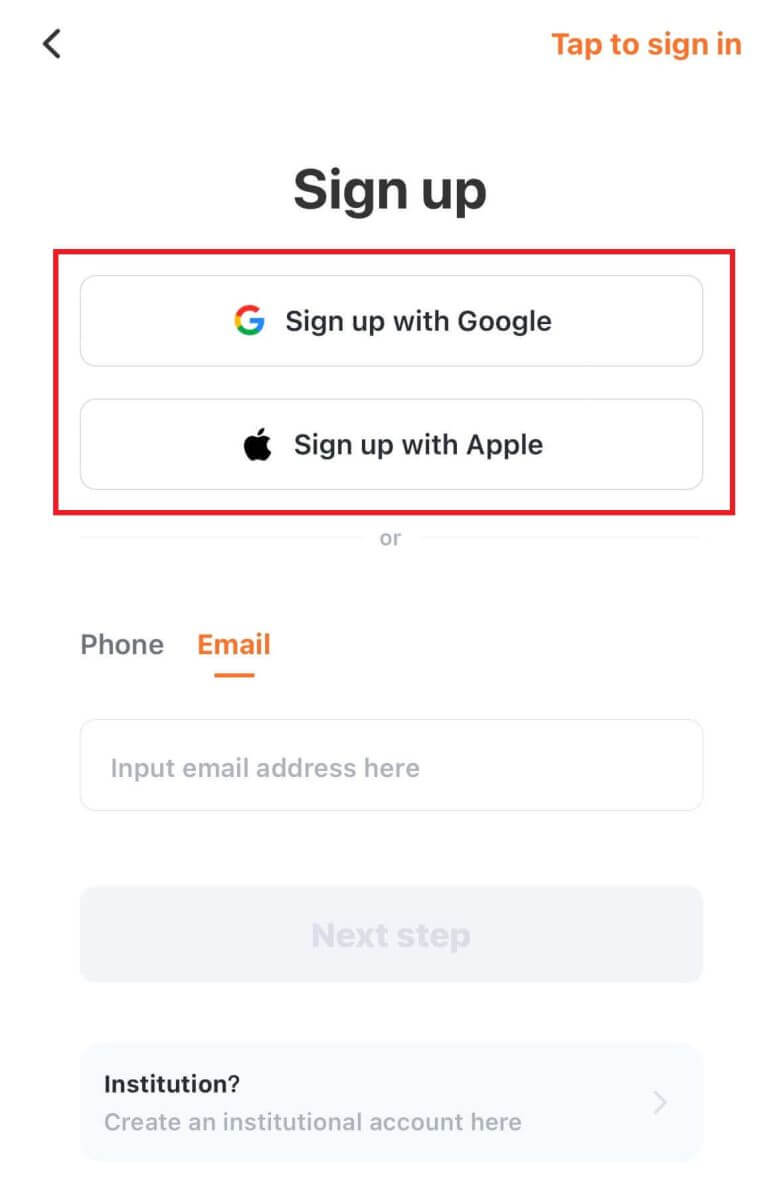
Sign up with your Apple/Google account:
3. Select [Sign up with Apple] or [Sign up with Google]. You will be prompted to sign in to Pionex using your Apple or Google account.
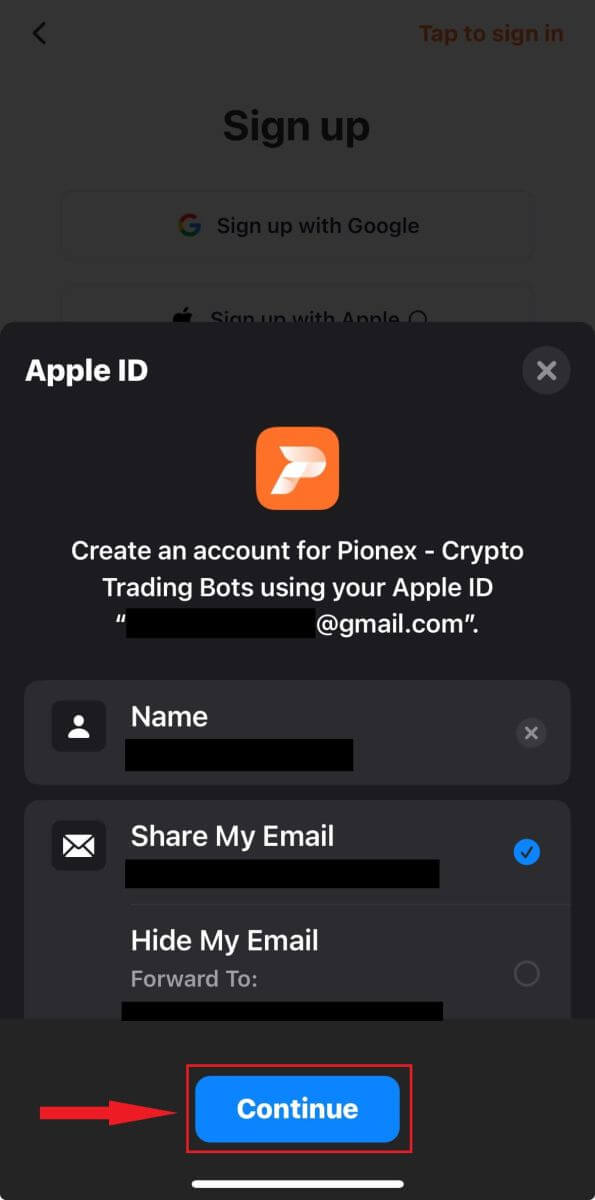
Tap [Continue].
4. Congratulations! You have successfully created Pionex account.

Note:
- To protect your account, we highly recommend enabling at least 1 two-factor authentication (2FA).
- Please note that you must complete Identity Verification to experience the full services of Pionex.
Frequently Asked Questions (FAQ)
Why Can’t I Receive Emails from Pionex
If you are not receiving emails sent from Pionex, please follow the instructions below to check your email’s settings:1. Are you logged in to the email address registered to your Pionex account? Sometimes you might be logged out of your email on your devices and hence can’t see Pionex’s emails. Please log in and refresh.
2. Have you checked the spam folder of your email? If you find that your email service provider is pushing Pionex emails into your spam folder, you can mark them as “safe” by whitelisting Pionex’s email addresses. You can refer to How to Whitelist Pionex Emails to set it up.
Addresses to whitelist:
- [email protected]
- [email protected]
- [email protected]
- [email protected]
- [email protected]
- [email protected]
- [email protected]
- [email protected]
- [email protected]
- [email protected]
- [email protected]
- [email protected]
- [email protected]
- [email protected]
- [email protected]
4. Is your email inbox full? If you have reached the limit, you won’t be able to send or receive emails. You can delete some of the old emails to free up some space for more emails.
5. If possible, register from common email domains, such as Gmail, Outlook, etc.
Why Can’t I Receive SMS Verification Codes
Pionex continuously improves our SMS Authentication coverage to enhance user experience. However, there are some countries and areas currently not supported.If you cannot enable SMS Authentication, please refer to our Global SMS coverage list to check if your area is covered. If your area is not covered on the list, please use Google Authentication as your primary two-factor authentication instead.
If you have enabled SMS Authentication or you are currently residing in a country or area that’s in our Global SMS coverage list, but you still cannot receive SMS codes, please take the following steps:
- Ensure that your mobile phone has a good network signal.
- Disable your anti-virus and/or firewall and/or call blocker apps on your mobile phone that might potentially block our SMS Code number.
- Restart your mobile phone.
- Try voice verification instead.
- Reset SMS Authentication.
How to Login Account in Pionex
How to Login your Pionex account
1. Go to Pionex Website and click on "Sign in".
2. Enter your Email / Phone Number and the Password.
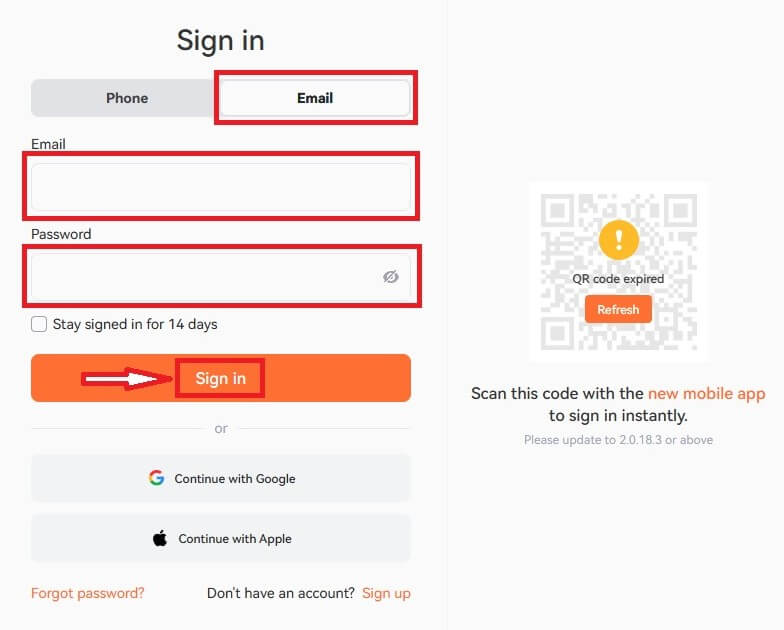
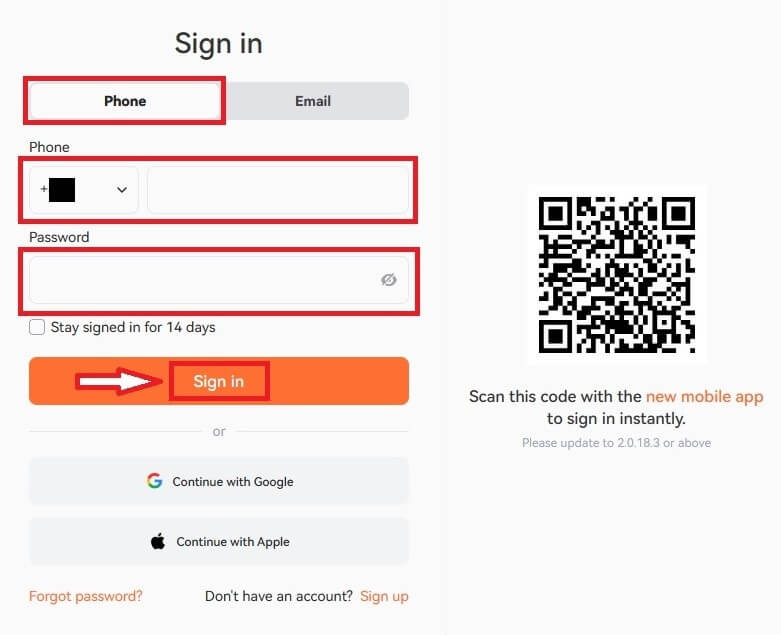
3. If you’ve set SMS verification or 2FA verification, you will be directed to the Verification Page to enter SMS verification code or 2FA verification code.
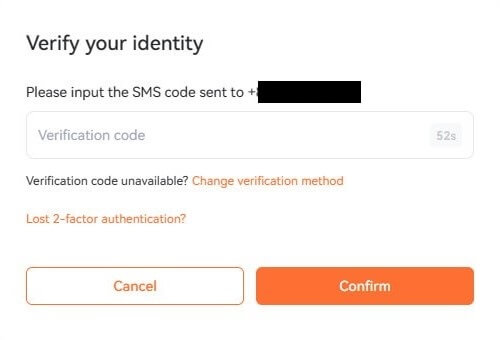
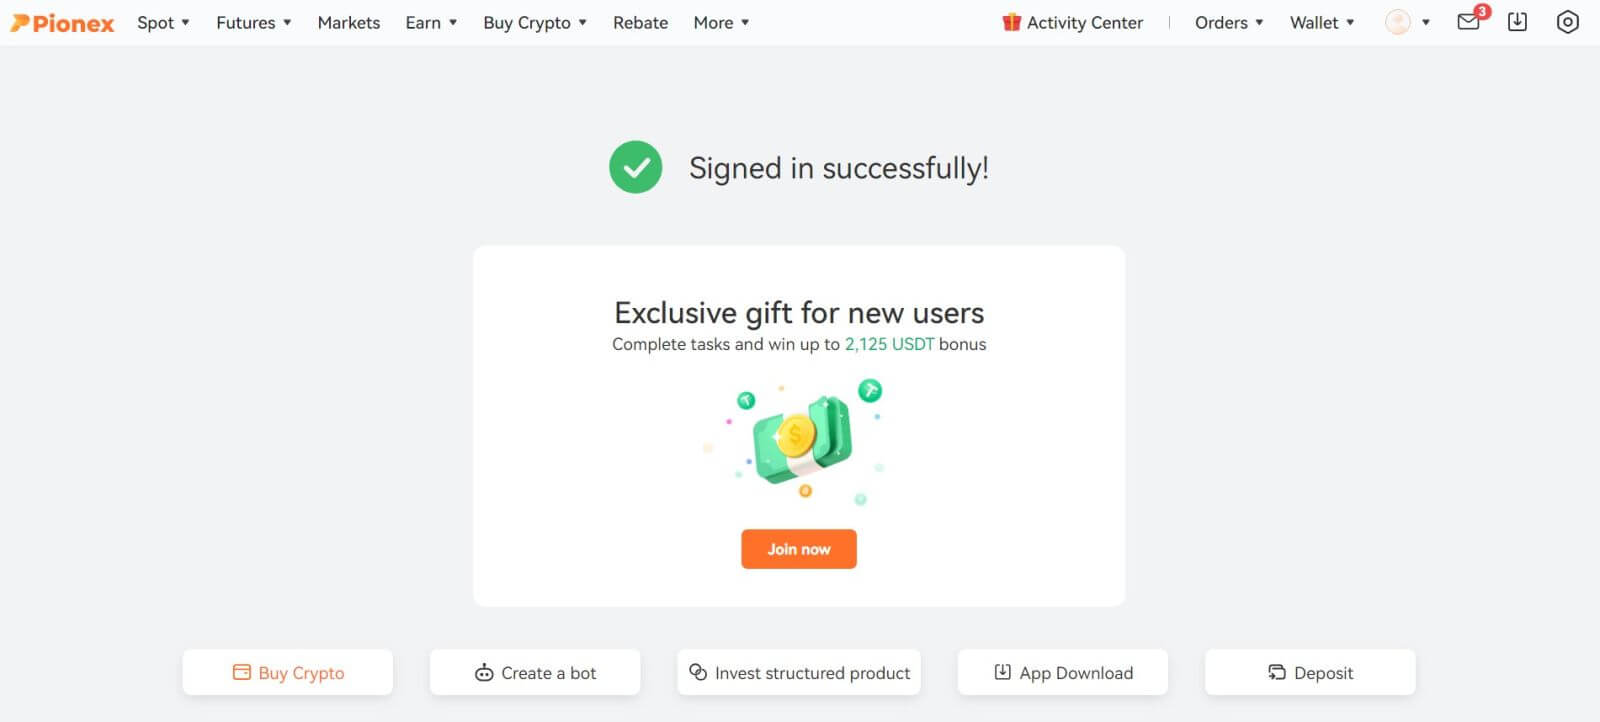
4. After entering the correct verification code, you can successfully use your Pionex account to trade.
Login to Pionex with your Google account
1. Go to Pionex Website and click [Sign in].
2. Select a Login method. Select [Continue with Google].
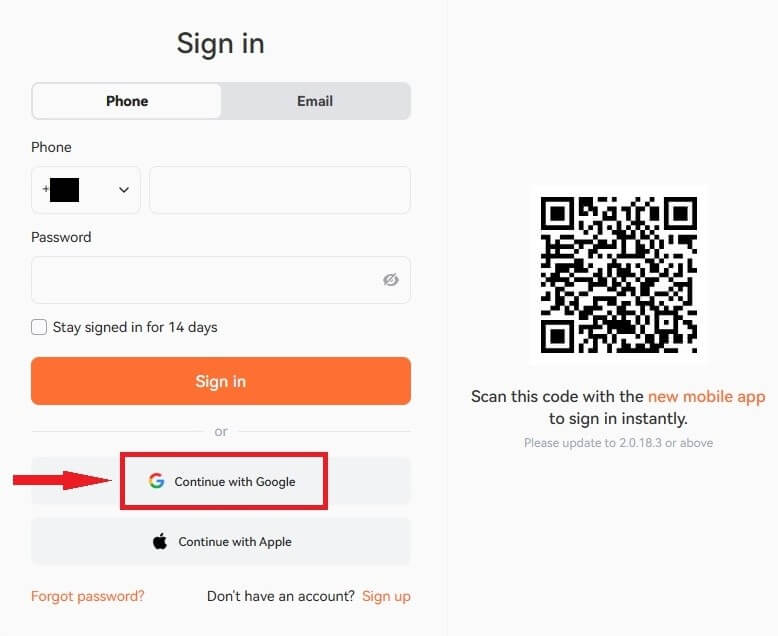
3. Choose your Google account to sign in to Pionex.
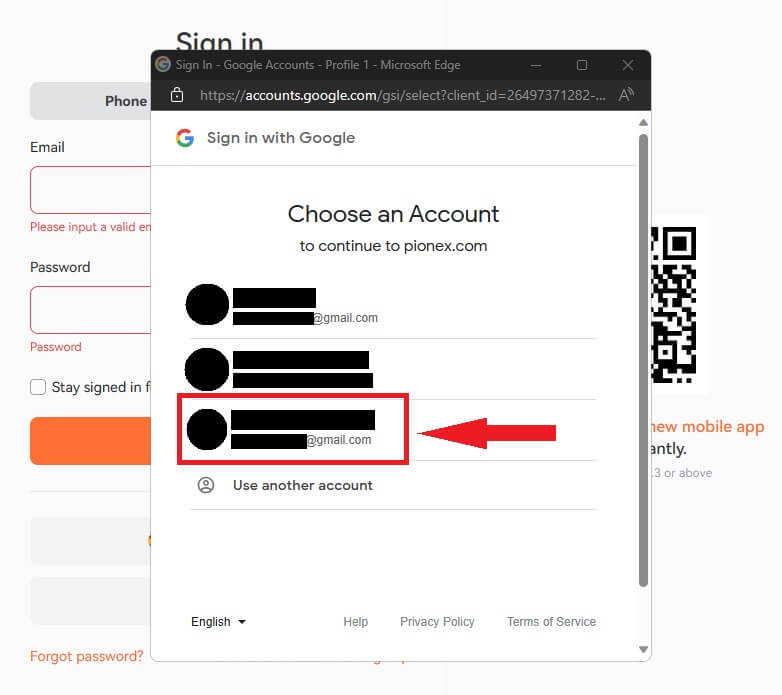
4. Congratulations, you have successfully signed in to Pionex.

Login to Pionex with your Apple account
With Pionex, you also have an option to log into your account through Apple. To do that, you just need to:1. On your computer, visit Pionex and click "Sign in".

2. Click "Continue with Apple" button.
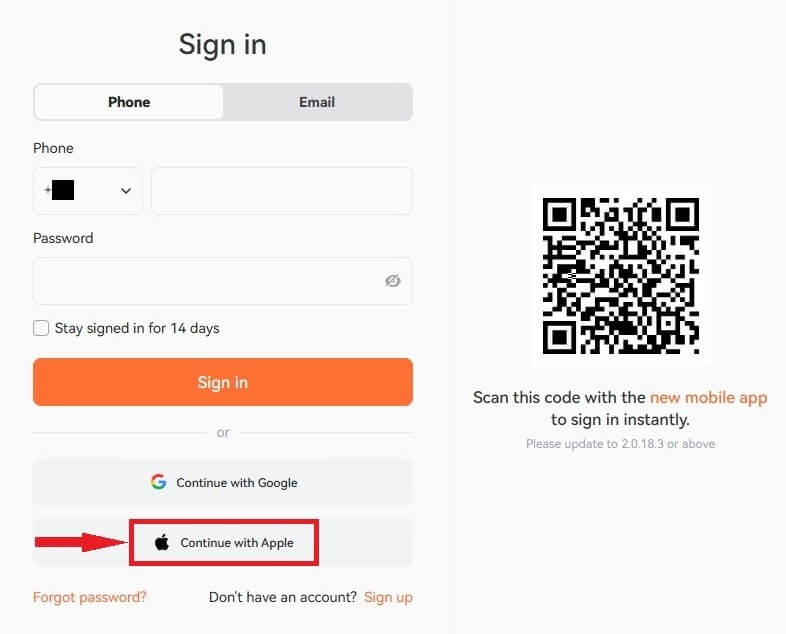
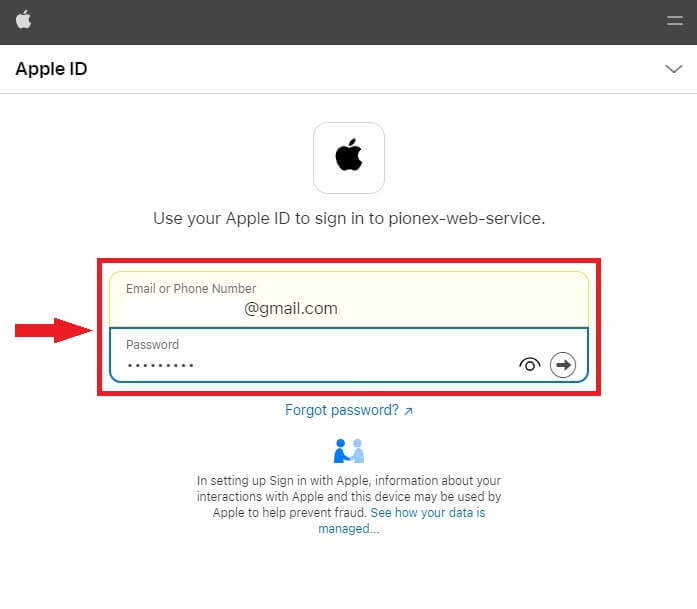
3. Enter your Apple ID and password to sign in to Pionex.
4. Click "Continue".
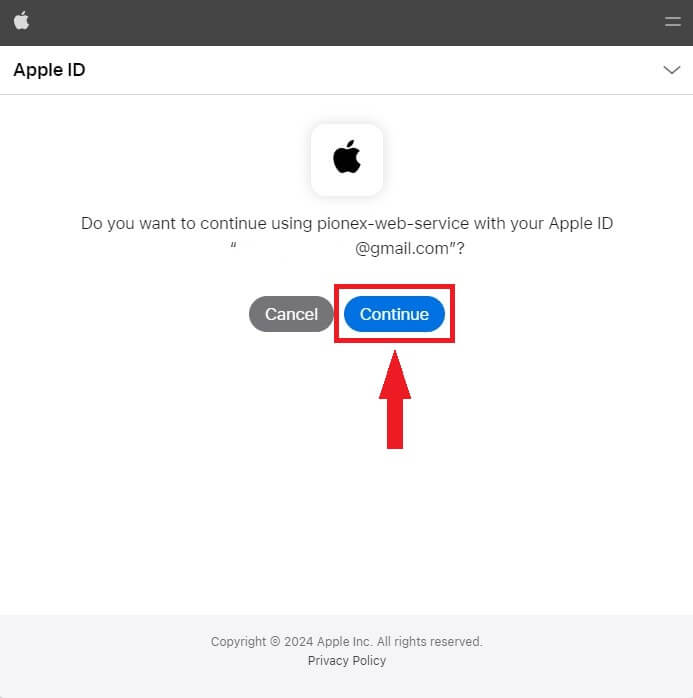
5. Congratulations, you have successfully signed in to Pionex.

How to Login to the Pionex Android app
Authorization on the Android mobile platform is carried out similarly to authorization on the Pionex website. The application can be downloaded through the Google Play on your device. In the search window, just enter Pionex and click "Install".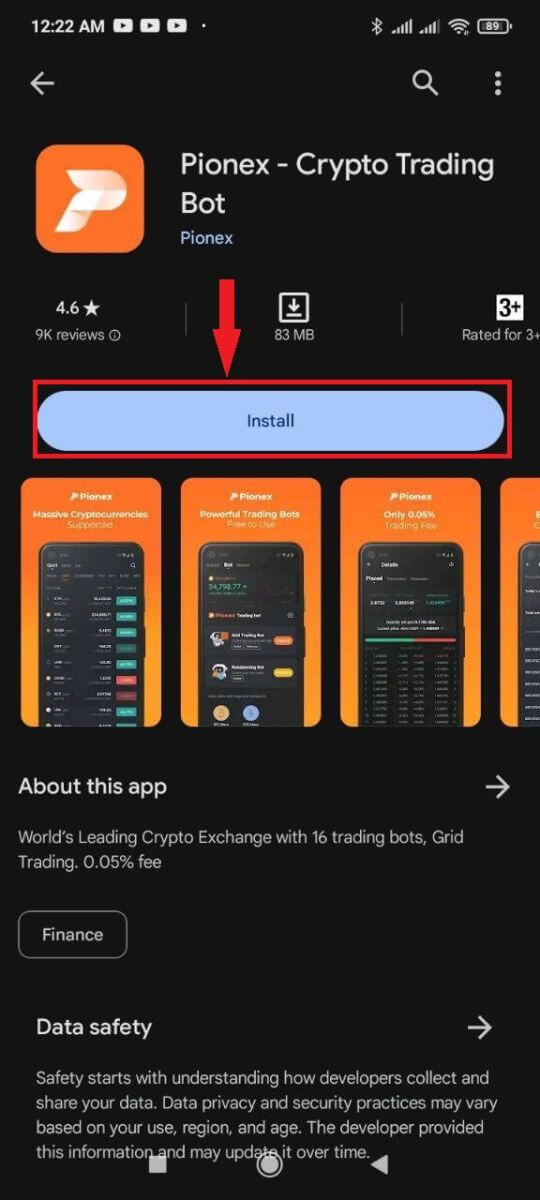
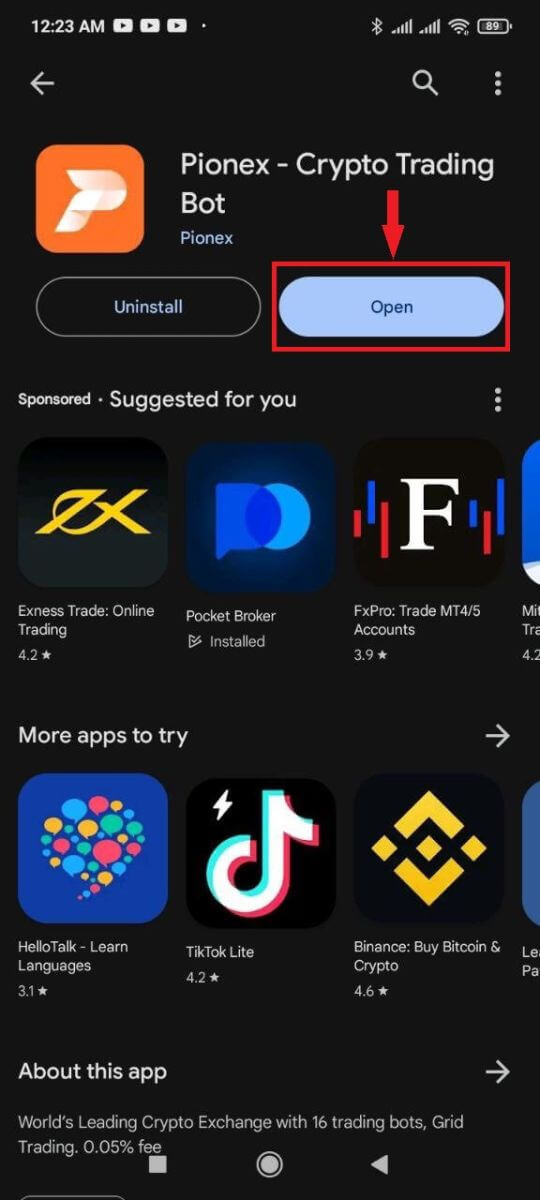
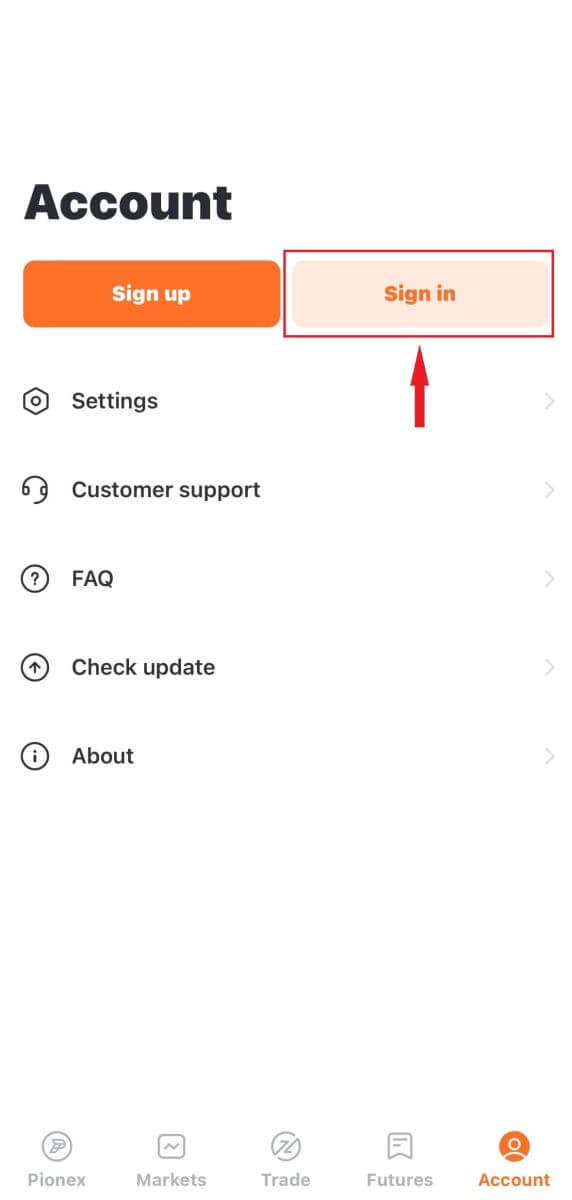
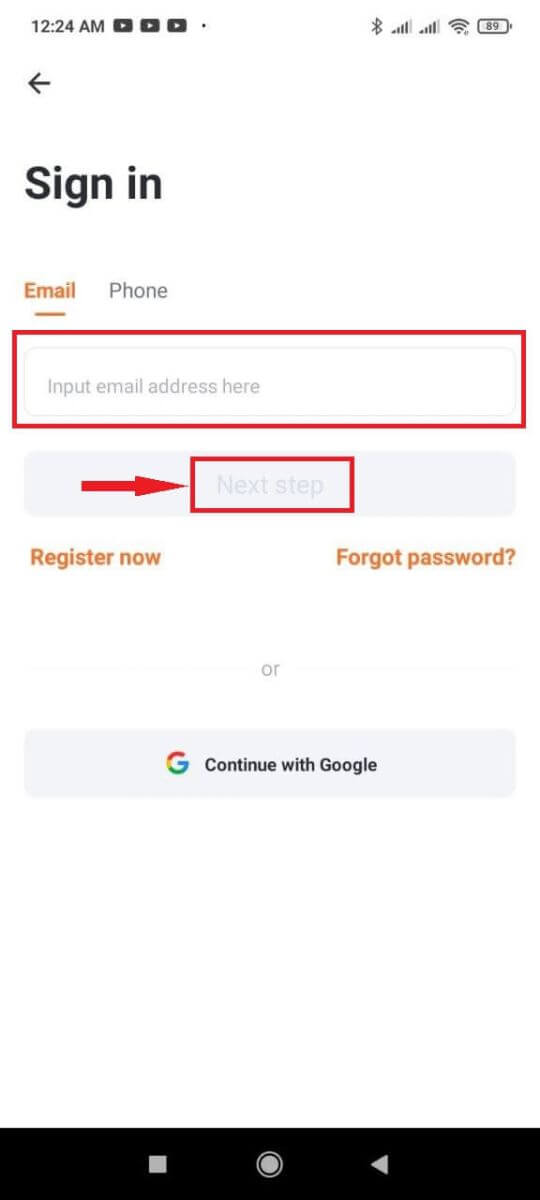
Wait for the installation to complete. Then you can open and sign in to start trading.

How to Login to the Pionex iOS app
You have to visit the App Store and search using the key Pionex to find this app. Also, you need to install the Pionex App from App Store.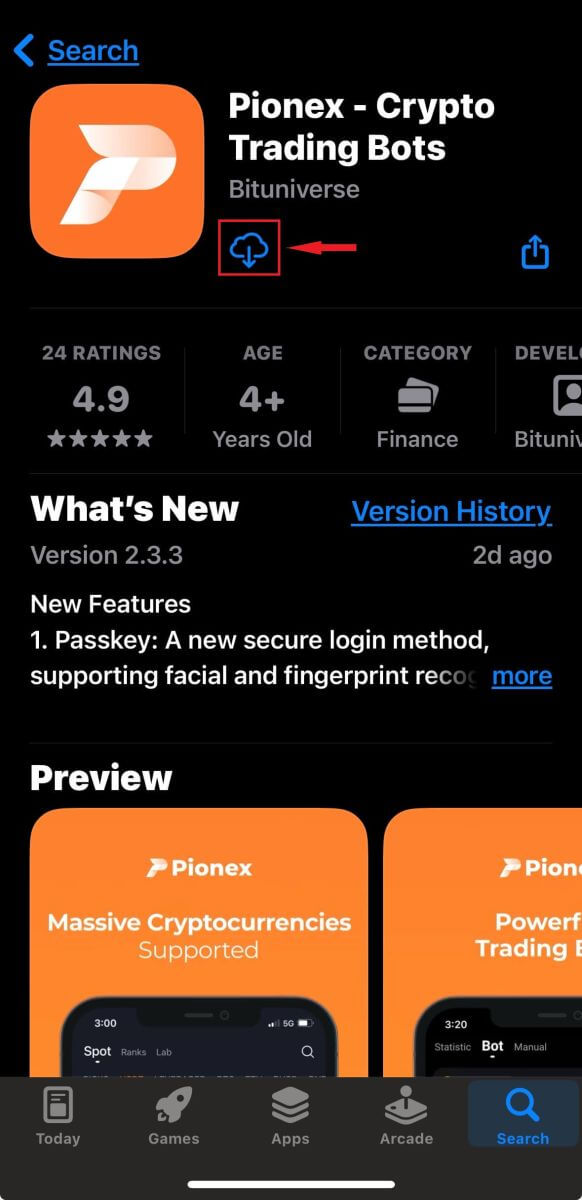
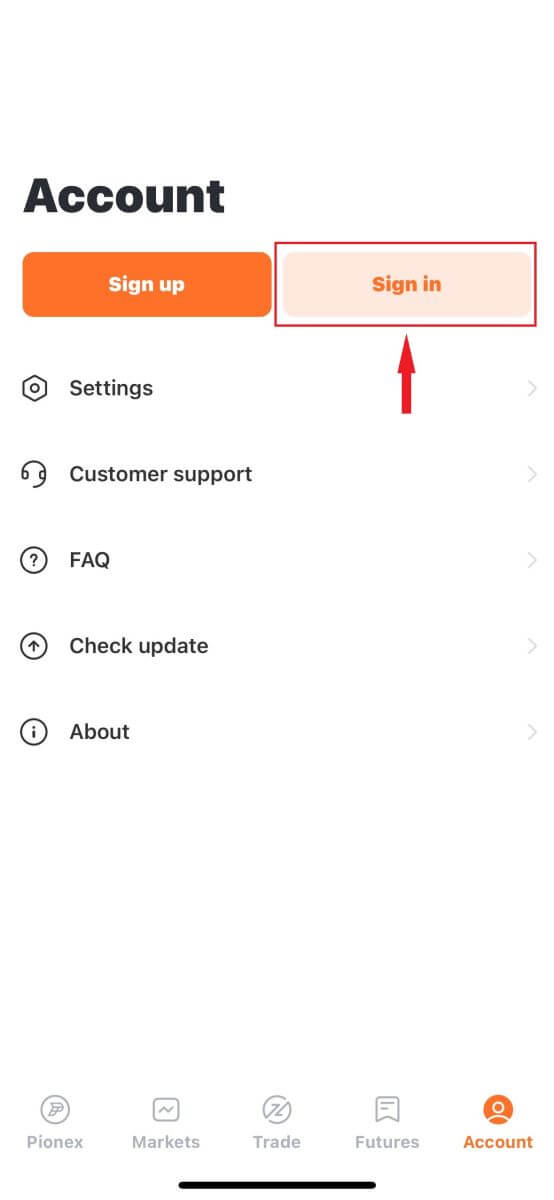
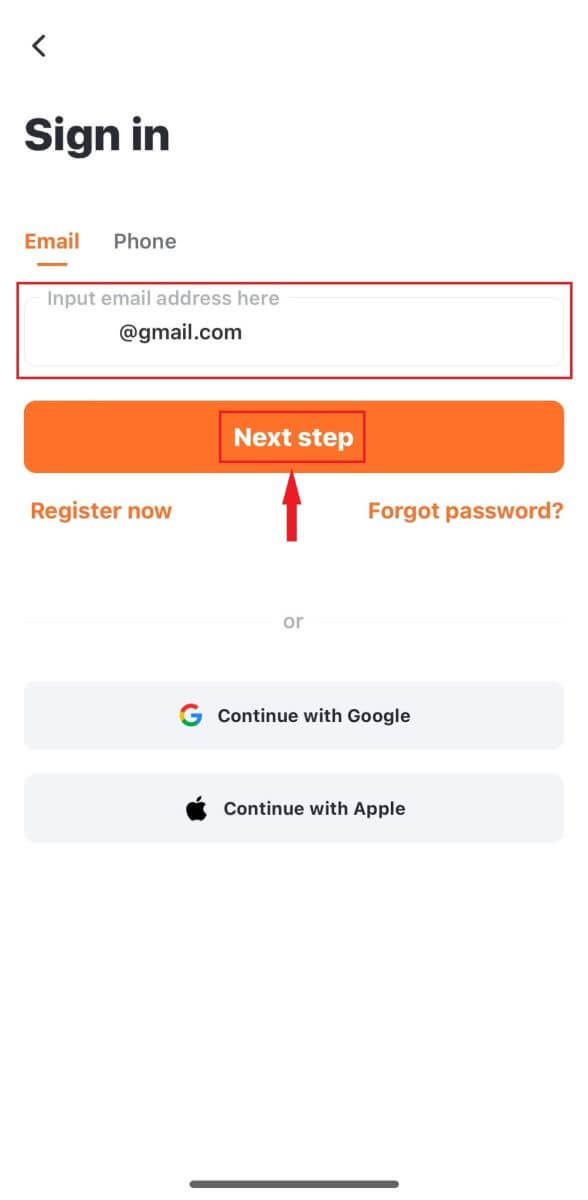
After installation and launching, you may sign in to Pionex iOS mobile app by using your email address, phone number, and Apple or Google account.


I forgot my password from the Pionex account
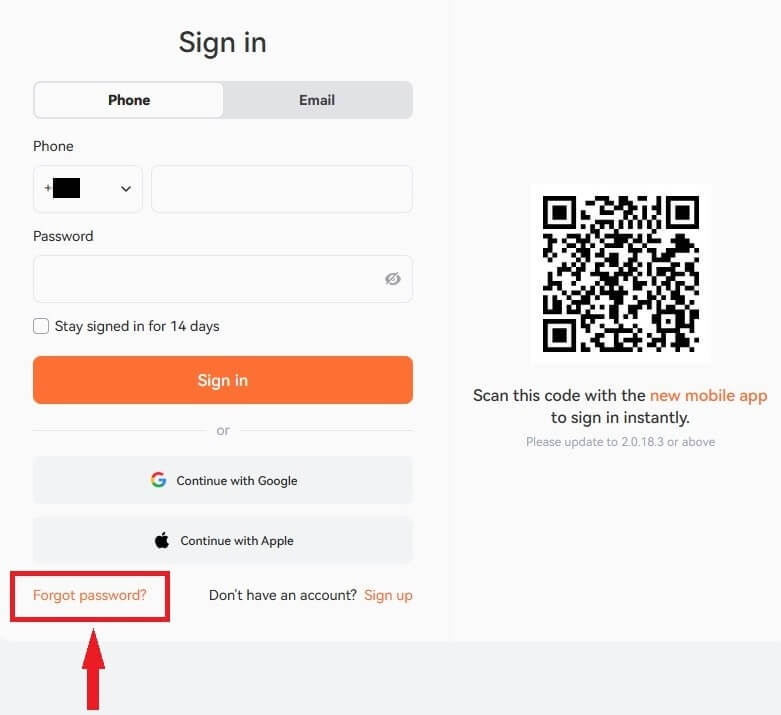
You can reset your account password from the Pionex Website or App. Please note that for security reasons, withdrawals from your account will be suspended for 24 hours after a password reset.1. Go to the Pionex Website and click [Sign in].

2. On the sign in page, click [Forgot Password?].
If you are using the App, click [Forgot password?] as below.


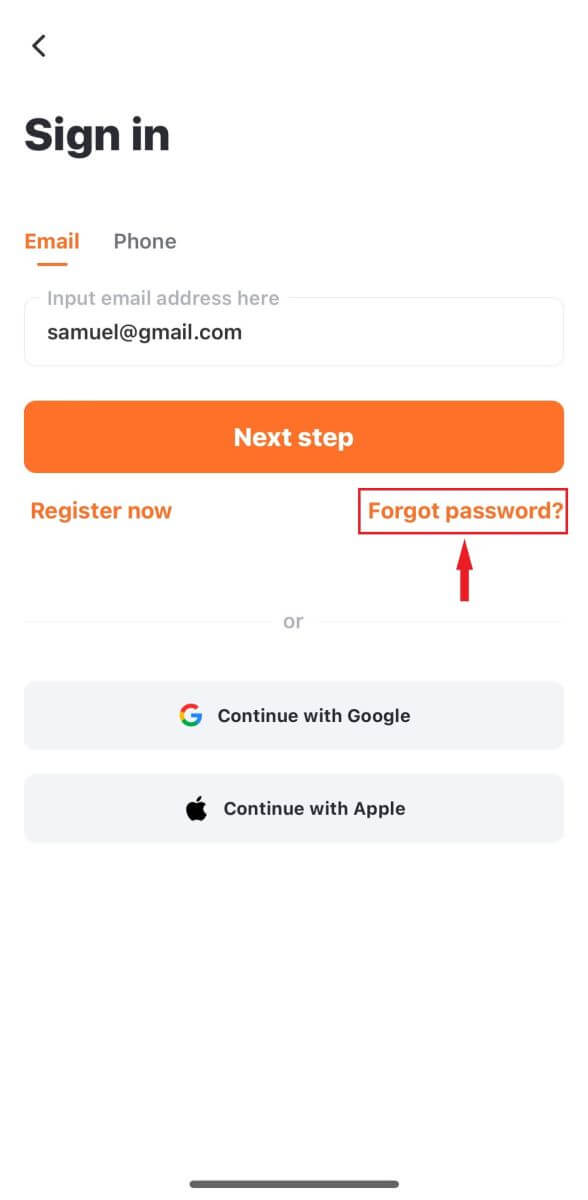
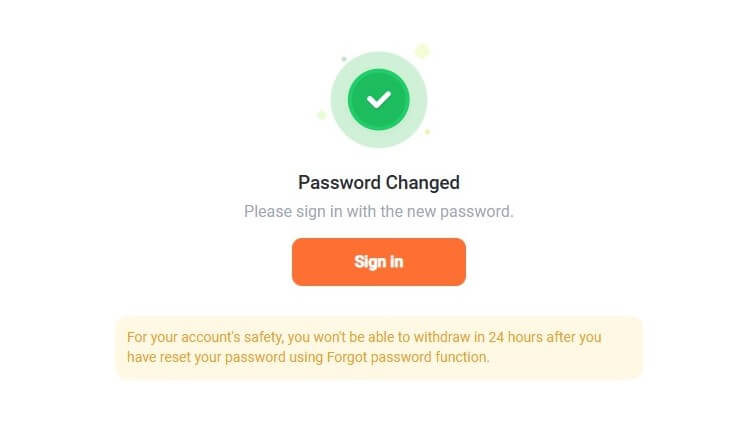
Please note that for your account’s safety, you won’t be able to withdraw in 24 hours after you have reset your password using Forgot password function.
3. Enter your account email or phone number and click [Next].
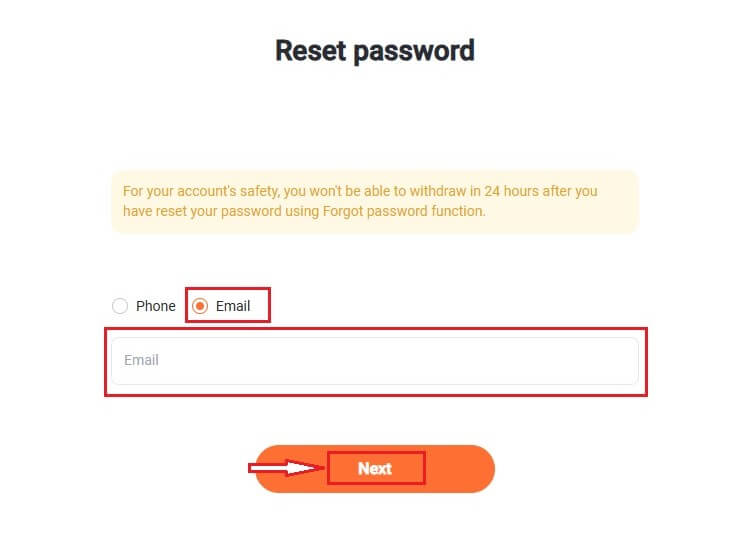
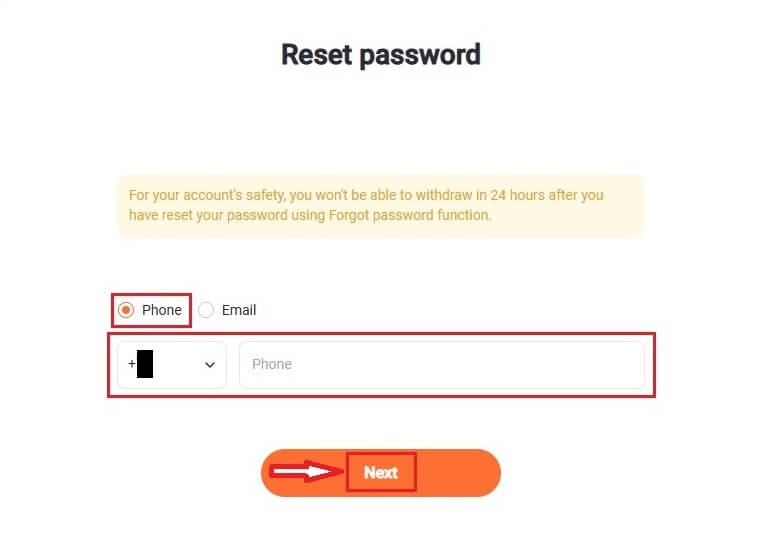
4. Click on "I’m not robot" to complete security verification.
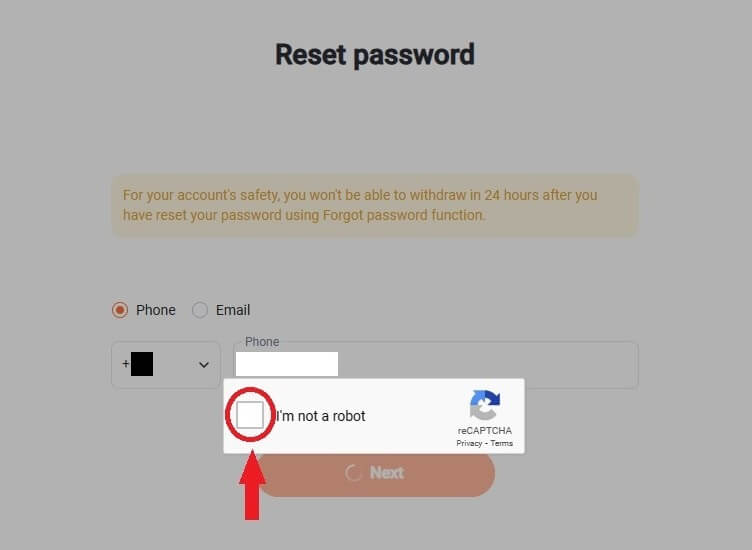
5. Enter the verification code you received in your email or SMS, and click [Confirm] to continue.
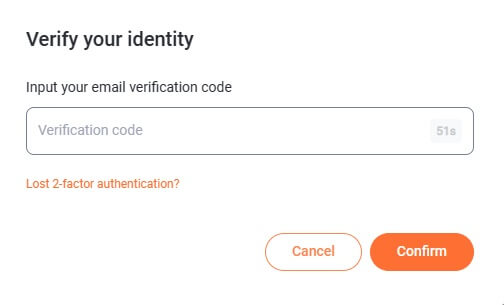
Notes
- If your account is registered with an email and you have enabled SMS 2FA, you can reset your password through your mobile number.
- If your account is registered with a mobile number and you have enabled email 2FA, you can reset the login password using your email.
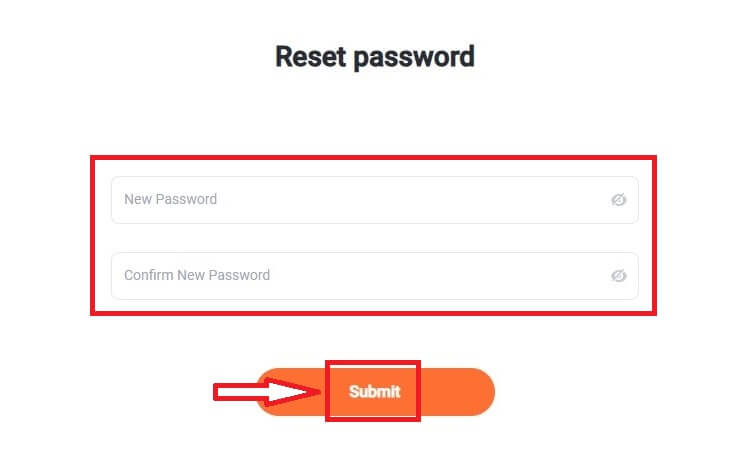
7. Your password has been reset successfully. Please use the new password to log in to your account.
Frequently Asked Questions (FAQ)
How to Change Account Email
If you wish to change the email registered to your Pionex account, please follow the step-by-step guide below.After logging in to your Pionex account, click [Profile] - [Security].
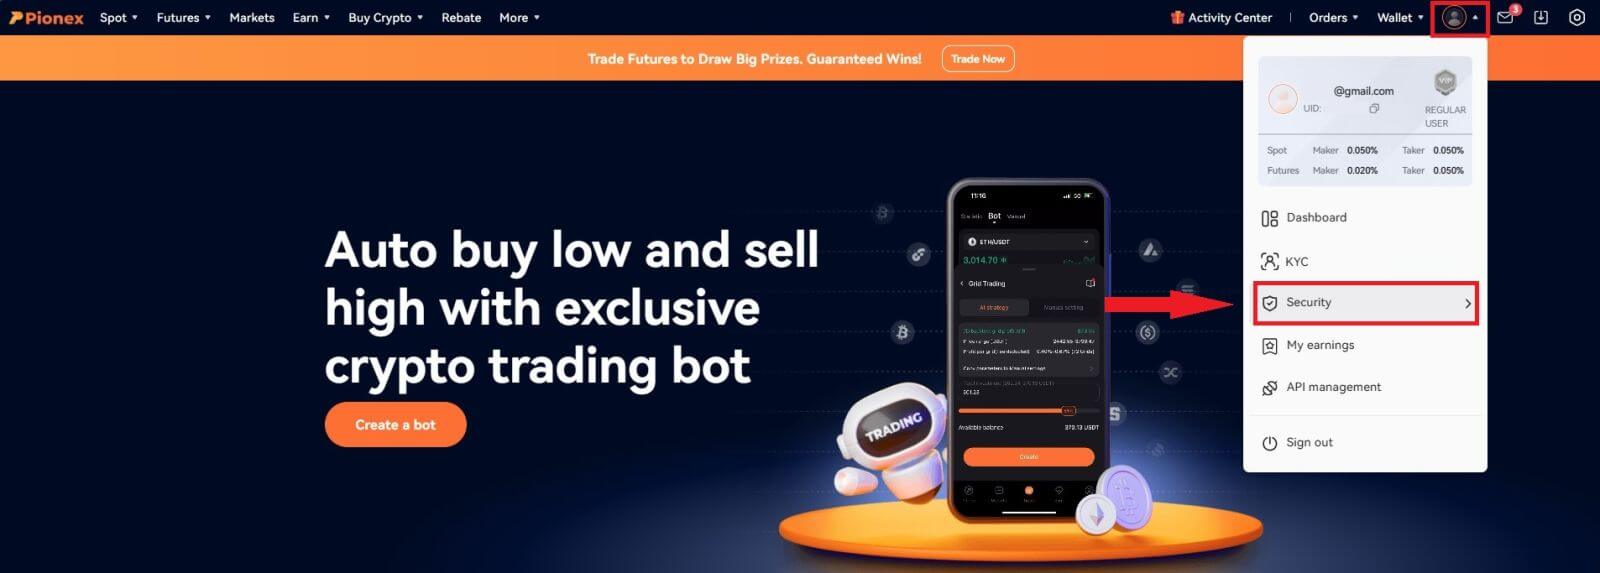
Click [Unbind] next to [Email Verification].
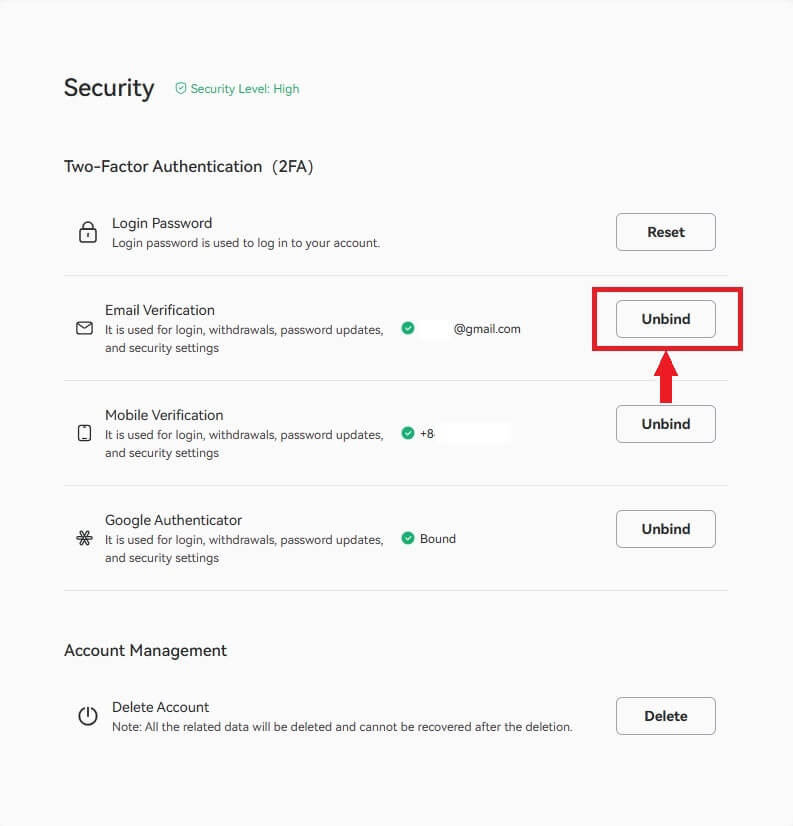
To change your registered email address, you must have enabled Google Authentication and SMS Authentication (2FA).
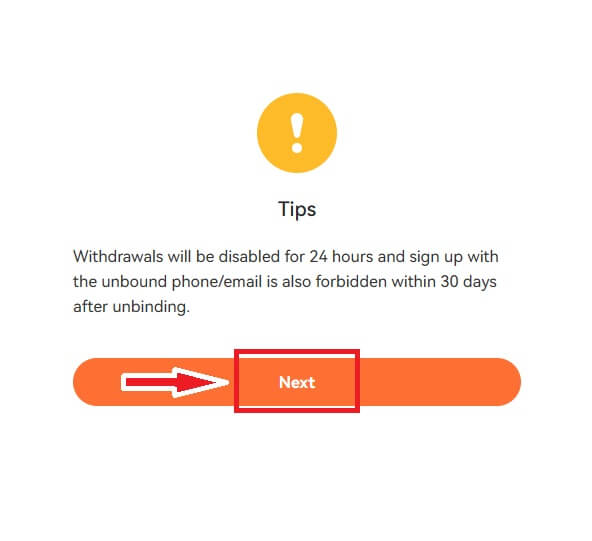
Please note that after changing your email address, withdrawals from your account will be disabled for 24 hours and signing up with the unbound phone/email is also forbidden within 30 days after unbinding for security reasons.
If you wish to proceed, click [Next].
How to reset Google Authenticator【Google 2FA】
If you have uninstalled Google Authenticator, changed your mobile device, reset the system, or encountered any similar actions, the initial connection becomes invalid, rendering your Google verification (2FA) code inaccessible.
In such cases, it is necessary to reinstate your previous connection or submit a request to us for resetting Google Authenticator. After logging in again, you can then re-enable Google Authenticator.
How to manually reset Google Authenticator
1. Device transfer
To transfer your Google Authenticator account from an old device to a new one, follow these steps: On the old device, click the ≡ icon at the top-left of the app, choose [Transfer Accounts], and then select [Export Accounts]. Pick the account you want to export and perform the same steps on the new device by selecting [Transfer Accounts], clicking [Import Accounts], and scanning the QR code displayed on the old device. This manual process ensures the successful transfer of your Google Authenticator account from the old device to the new one.
2. Reset via secret key
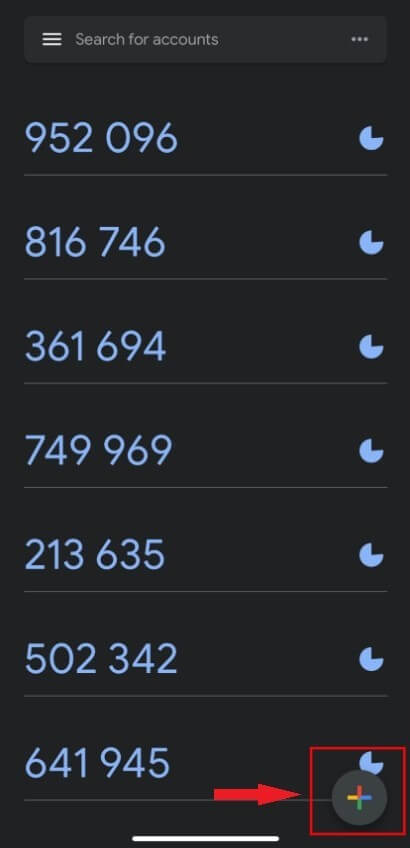
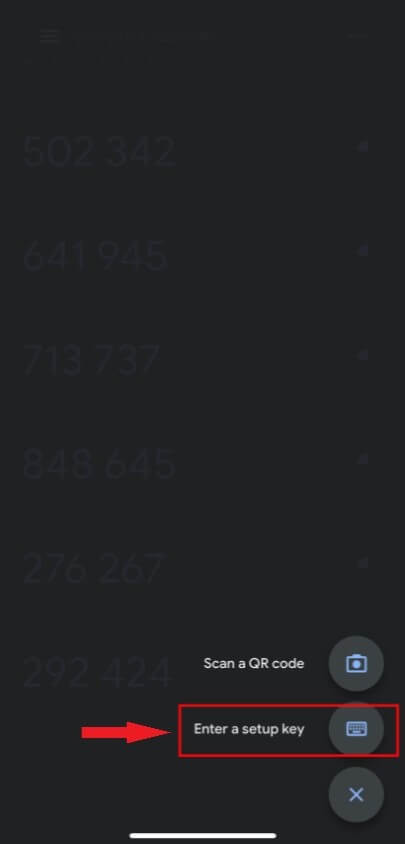
If you have retained the 16-digit key provided during the binding process, follow these steps to restore your original 2FA-bound account in Google Authenticator: Click the (+) icon in the lower right corner of Google Authenticator, choose [Enter a setup key], and input "Pionex (your Pionex account)" in the [Account name] field. Then, enter the 16-digit key in the [Secret key] field, select [Time-based] for the Type of key, verify that all the required information is correctly filled, and press [Add]. This will reinstate the connection to your original 2FA-bound account within Google Authenticator.
How to apply to reset Google Authenticator
If you are unable to reset manually, please request a reset from us.
APP version reset entry:
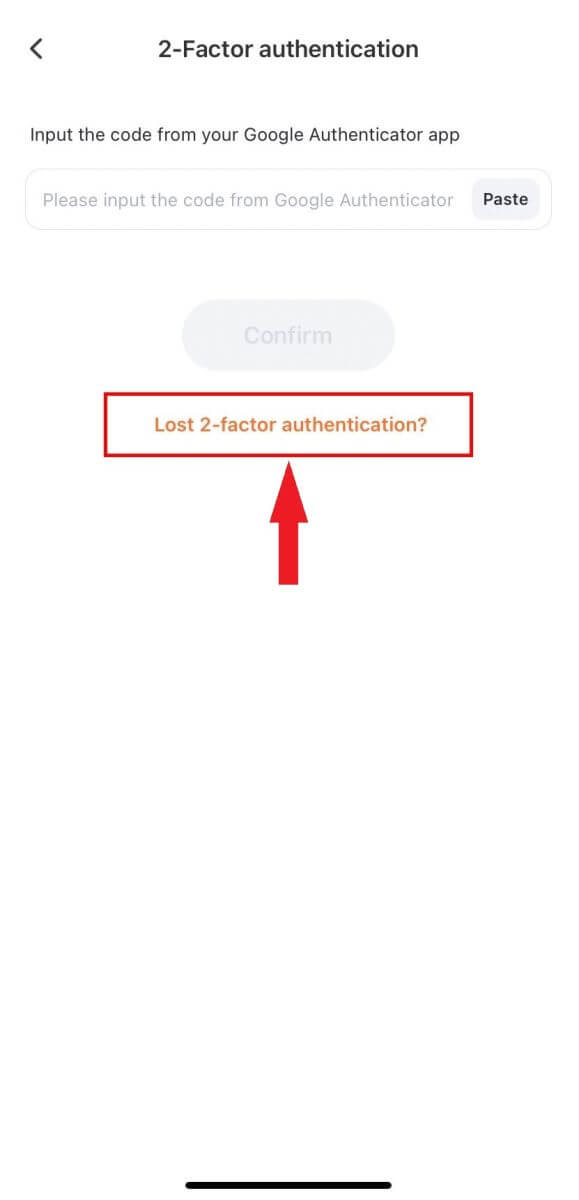
1. Upon entering your account number and password, click on "Lost 2-factor authenticator?" below to initiate the Google Authenticator reset process.
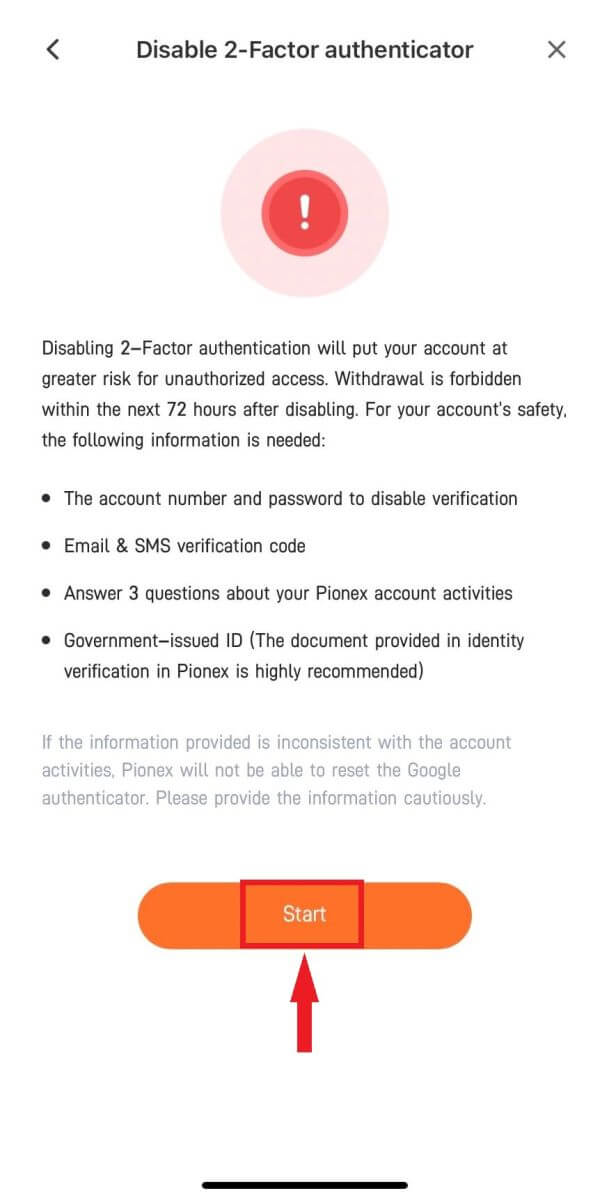
2. Complete basic account authentication to verify your identity and ensure the reset is authorized. Carefully read the notification and follow the system guide to provide relevant account information. (We will automatically assess the input information based on your account security level during the review.)
3. After the application review, we will unbind the Google Authenticator within 1-3 working days and notify you of the progress via email.
Please notice:
- The reset process requires 1-3 working days for review and completion (excluding national holidays).
- If your application is declined, you will receive an email notification from [email protected], providing alternative solutions.
- Following the reset of Google Authenticator, promptly log in to your account to rebind the Google Authenticator.
How to disable SMS/Email manually when logged in
If you want to change or disable one of the authenticator verification of your account.
It is required to bind SMS/Email and Google 2FA at the same time. And you can follow the steps below to self-service disable the authenticator.
How to disable:
1. Begin by signing in to your Pionex account. Click on the account avatar and select "Security".

2. Identify the Email/SMS option you wish to deactivate, and click on "Unbind" to disable it.
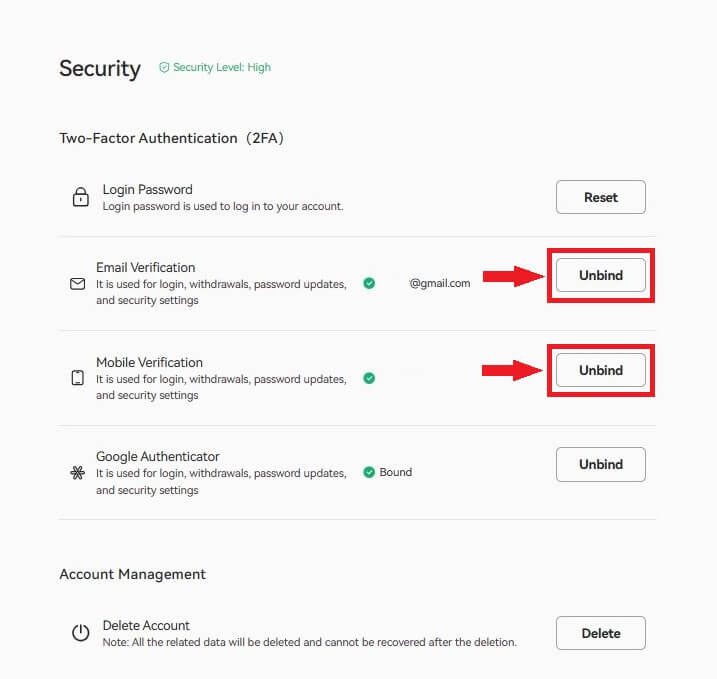
Please notice:
Following the unbinding process, Pionex will temporarily suspend your withdrawal function for 24 hours. Additionally, the information you unbind will remain suspended for 30 days after the unbinding action.
3. Once you click "Next step," enter the Google 2FA code, and then click "Confirm".
If you encounter a 2FA code error, refer to this link for troubleshooting.
4. Verify both the email and SMS verification codes, then click "Confirm" again.
If you are unable to receive one of the verification codes due to factors like a mobile phone change or email account suspension, find an alternative solution here.
5. Congratulations! You have successfully unbound Email/SMS authentication.
For the safety of your account, please re-bind at your earliest convenience!
How to Bind Google Authenticator
You may bind Google Authenticator as the following steps:Web
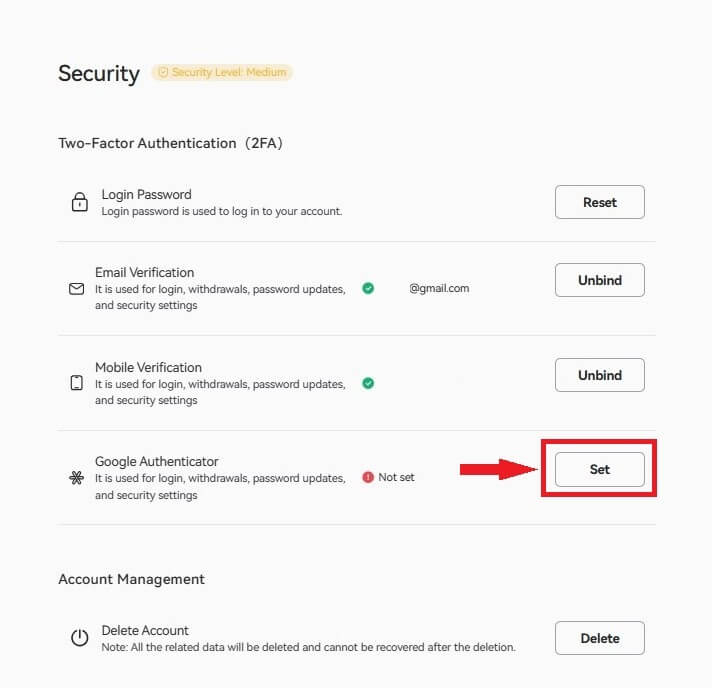
1. Navigate to your Avatar on Pionex.com, select "Security", then go to "Google Authenticator" and click "Set".
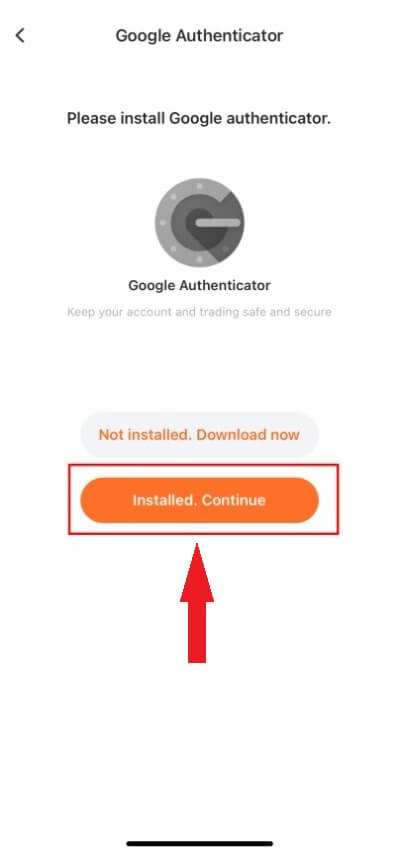
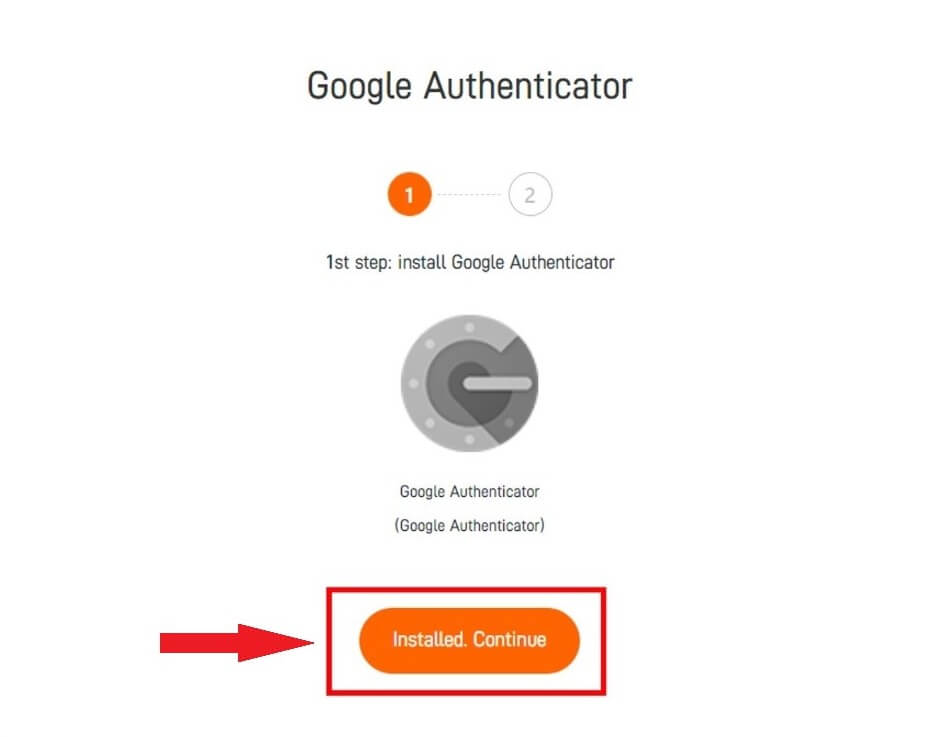
2. Install the [Google Authenticator] App on your mobile device.
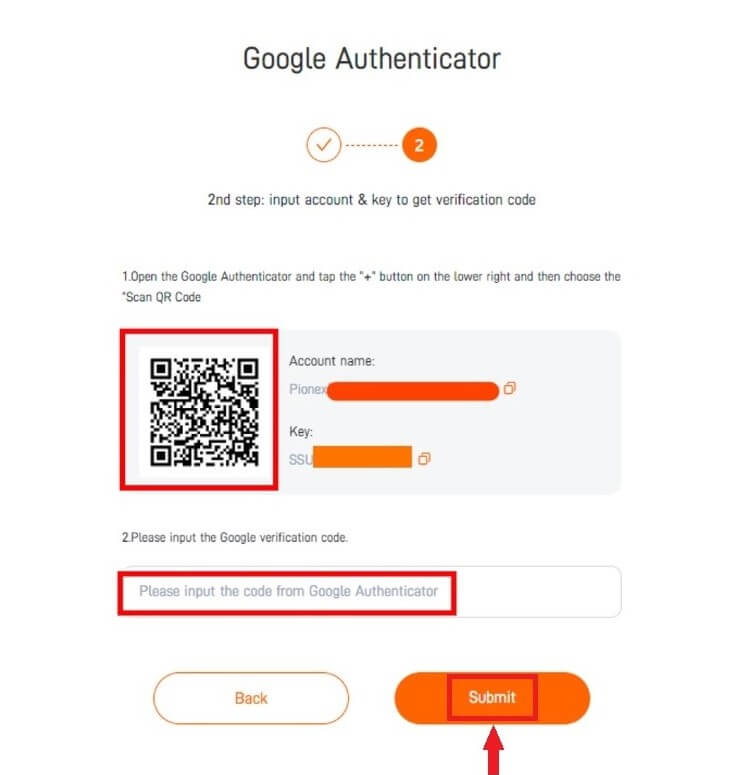
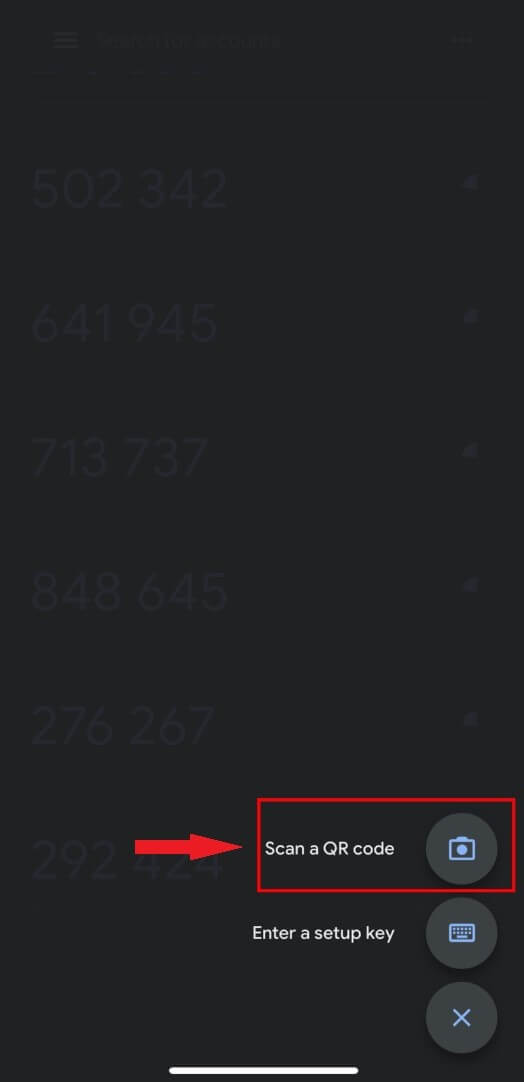
3. Open your Google Authenticator and select “Scan a QR code“.
4. Obtain a 6-digit verification code (valid within every 30 seconds) for your Pionex account. Input this code on your website page.
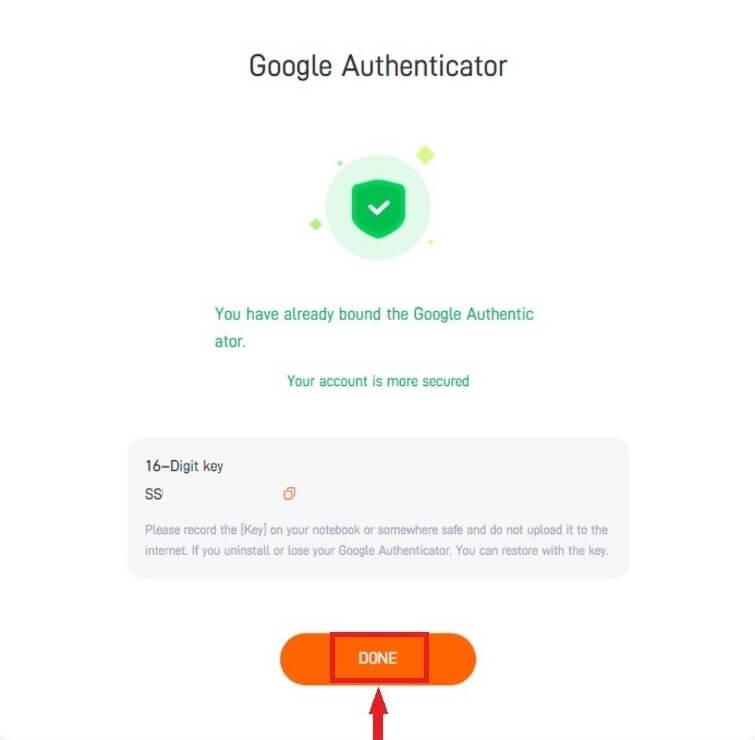
5. Congratulations! You have successfully linked Google Authenticator to your account.
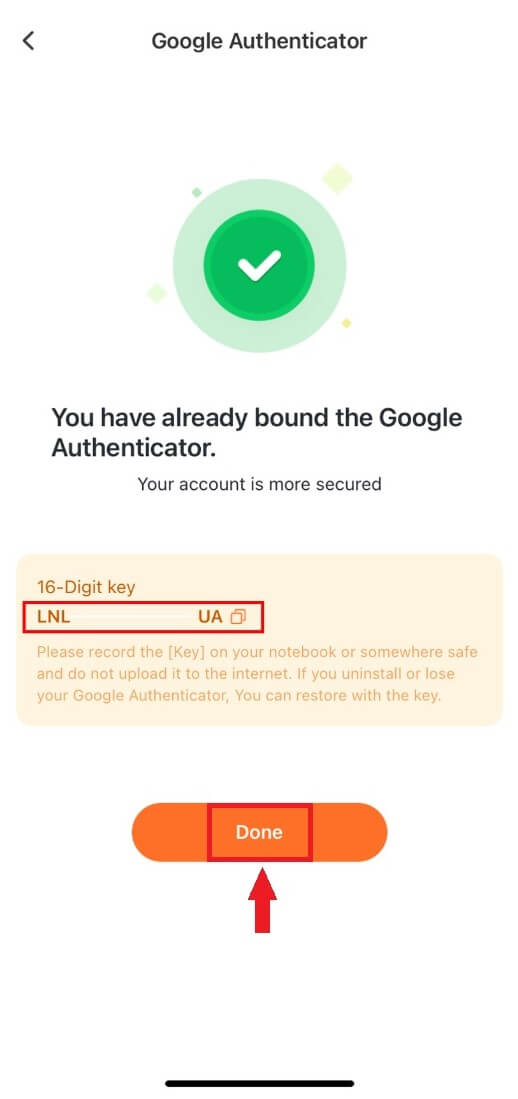
Remember to record the [Key] in a secure location, like a notebook, and avoid uploading it to the internet. In case of uninstallation or loss of Google Authenticator, you can reset it using the [Key].


App
1. Launch the Pionex APP and go to “Account” -- “Settings” -- “Security” -- “2-Factor authenticator” -- “Google Authenticator” -- “Download”.
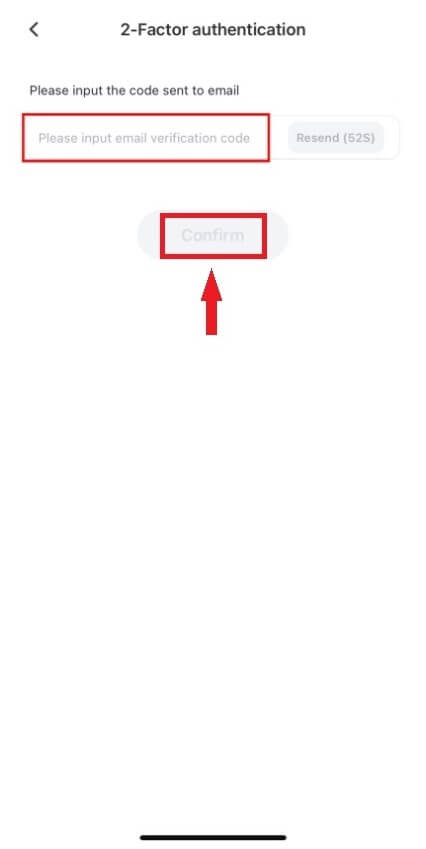
2. Enter your Email/SMS verification code.
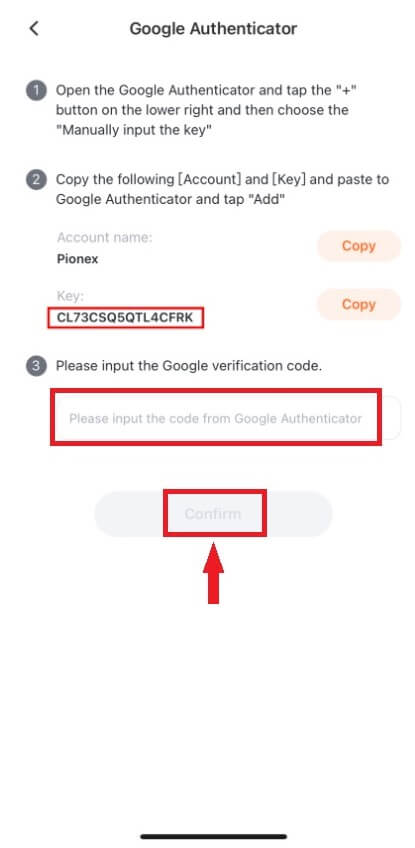
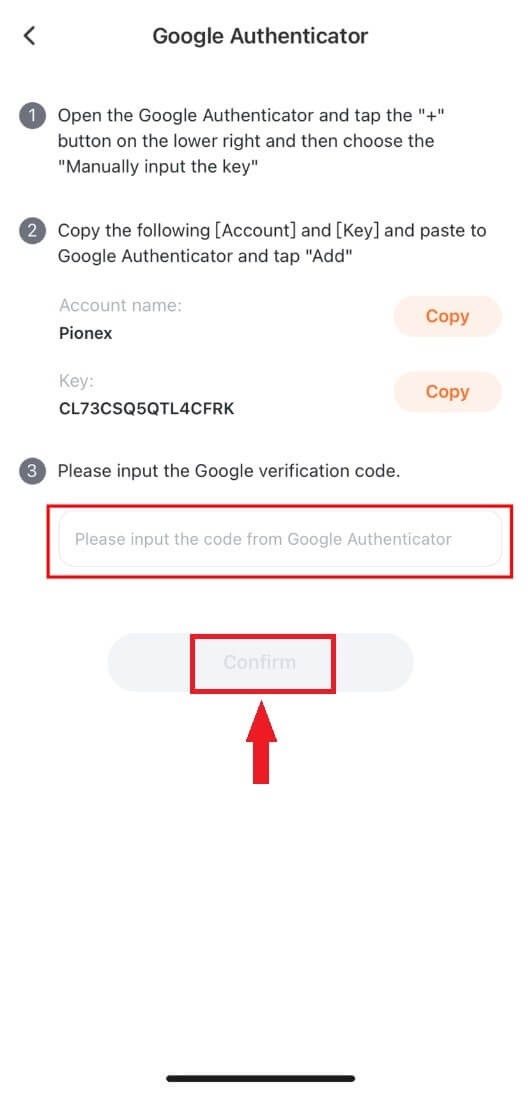
3. Follow the system prompts to copy and paste the Pionex account name and Key (secret key) into Google Authenticator.
4. Obtain a 6-digit verification code (valid only within every 30 seconds) for your Pionex account.
5. Return to the Pionex APP and input the received verification code.
6. Congratulations! You have successfully linked Google Authenticator to your account.
Please record the [Key] in your notebook or somewhere safe and do not upload it to the internet. If you uninstall or lose your Google Authenticator. You can reset it with the [Key].
