How to Start Pionex Trading in 2025: A Step-By-Step Guide for Beginners

How to Open an Account on Pionex
Open an Account on Pionex with a Phone Number or Email
1. Go to Pionex and click [Sign up].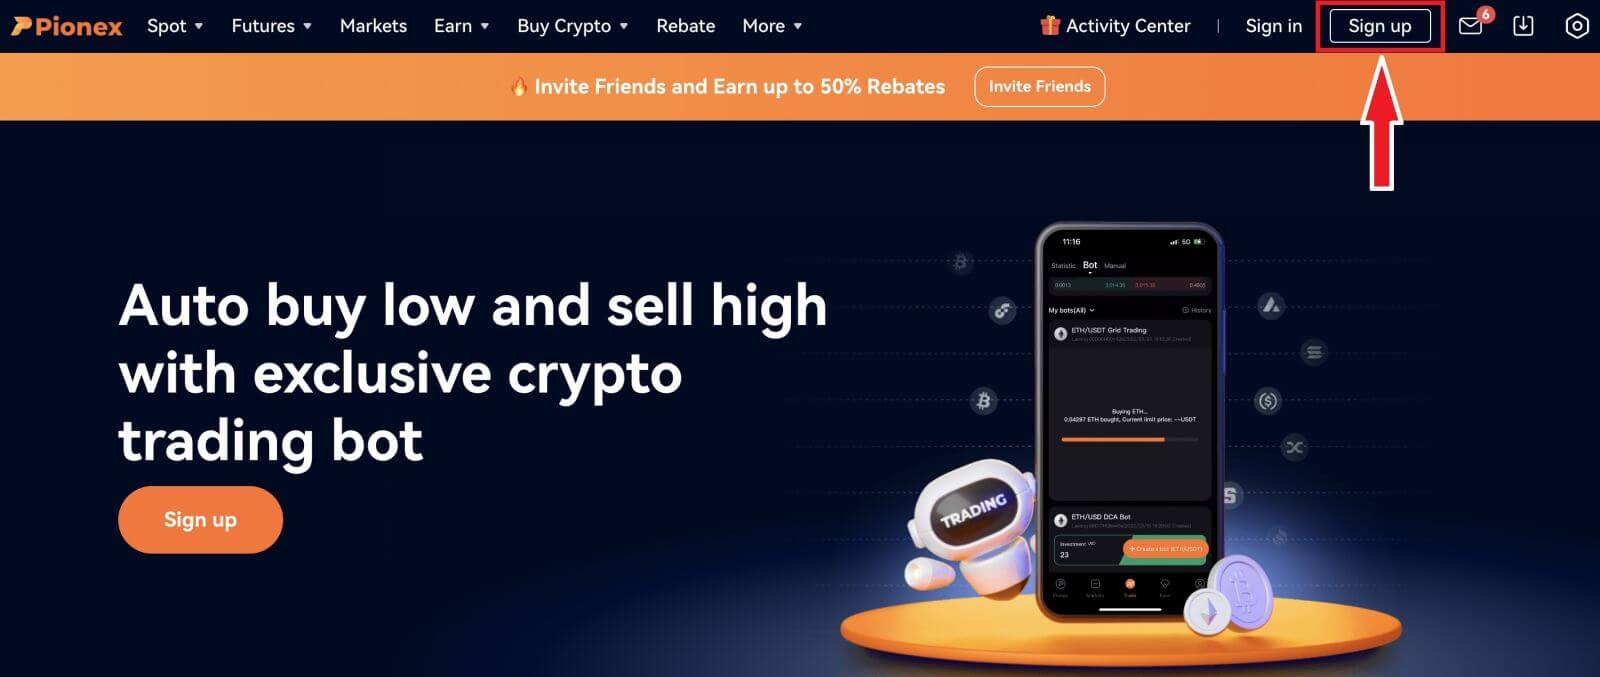
2. Select a registration method. You can sign up with your email address, phone number, Apple account or Google account.
Please select the type of account carefully. Once registered, you cannot change the account type.
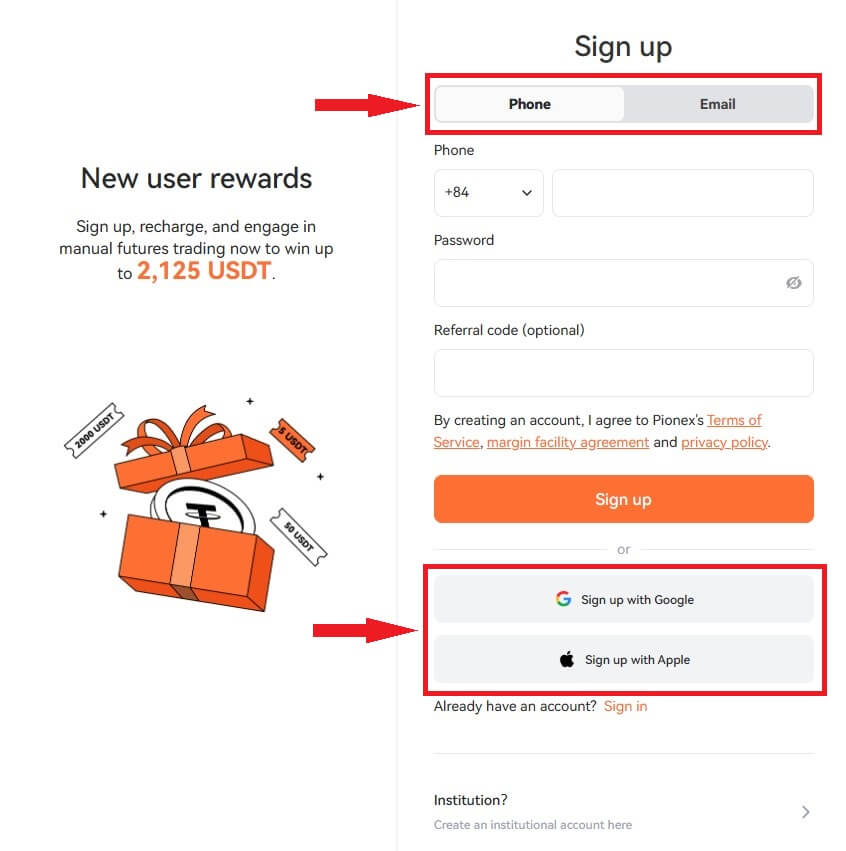
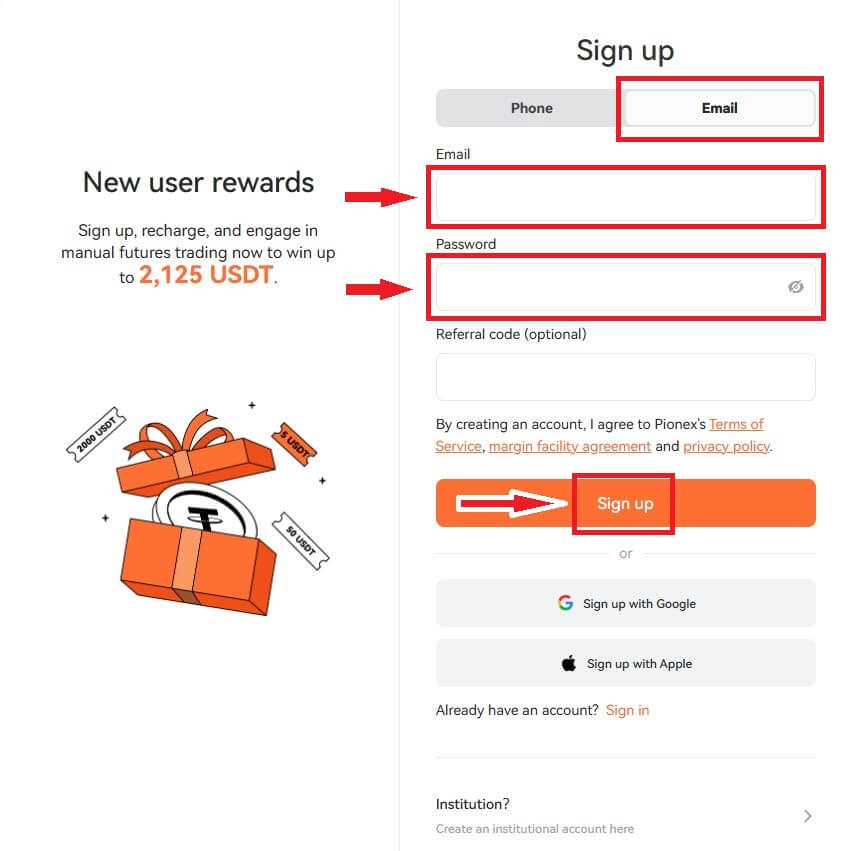
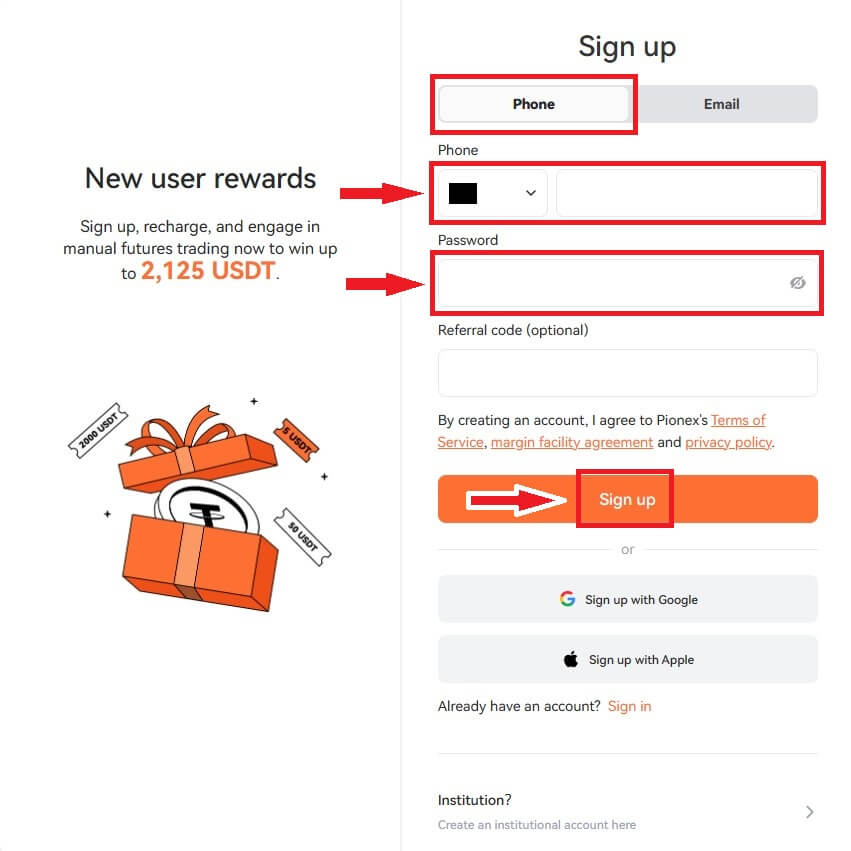
3. Select [Email] or [Phone Number] and enter your email address/phone number. Then, create a secure password for your account.
Note: Your password must contain at least 8 characters, including letters and numbers.
Read the Terms of Service, margin facility agreement and privacy policy, then click [Sign up].
4. You will receive a 6-digit verification code in your email or phone. Enter the code within 60 seconds and click [Confirm].
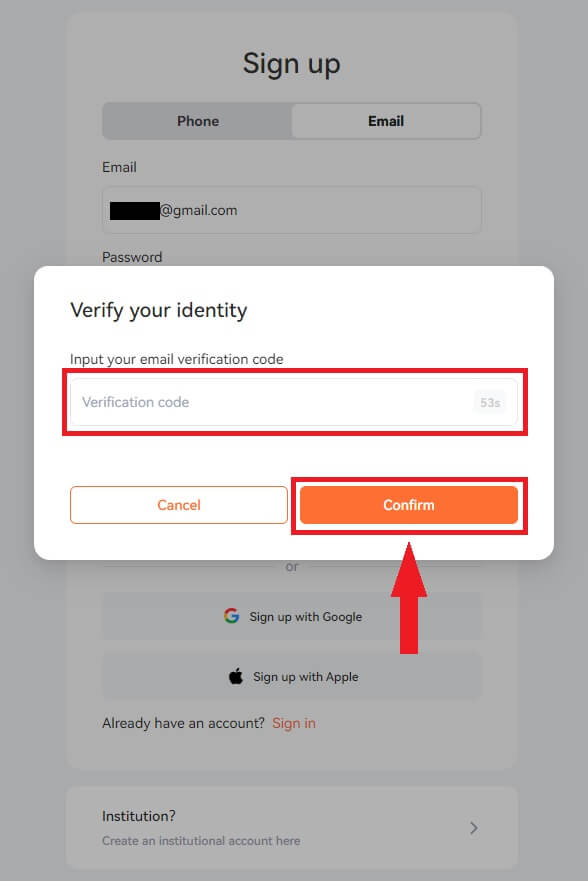
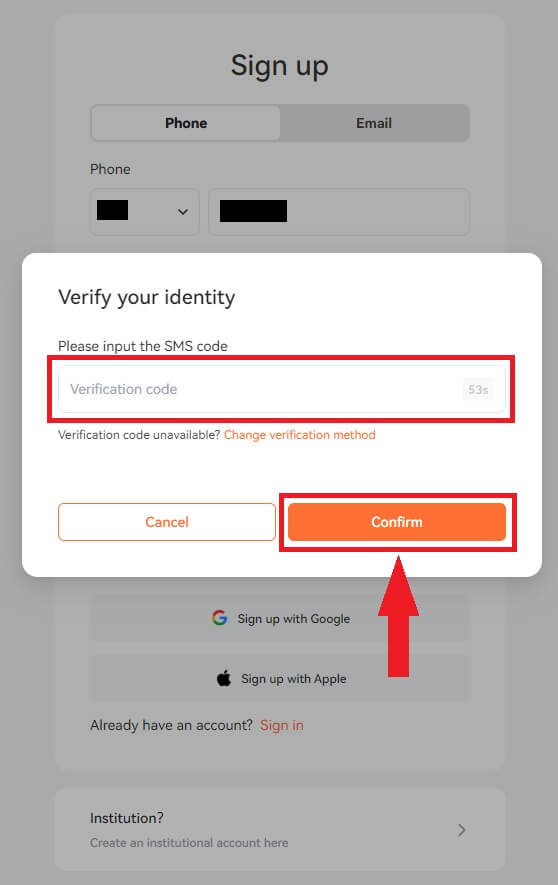
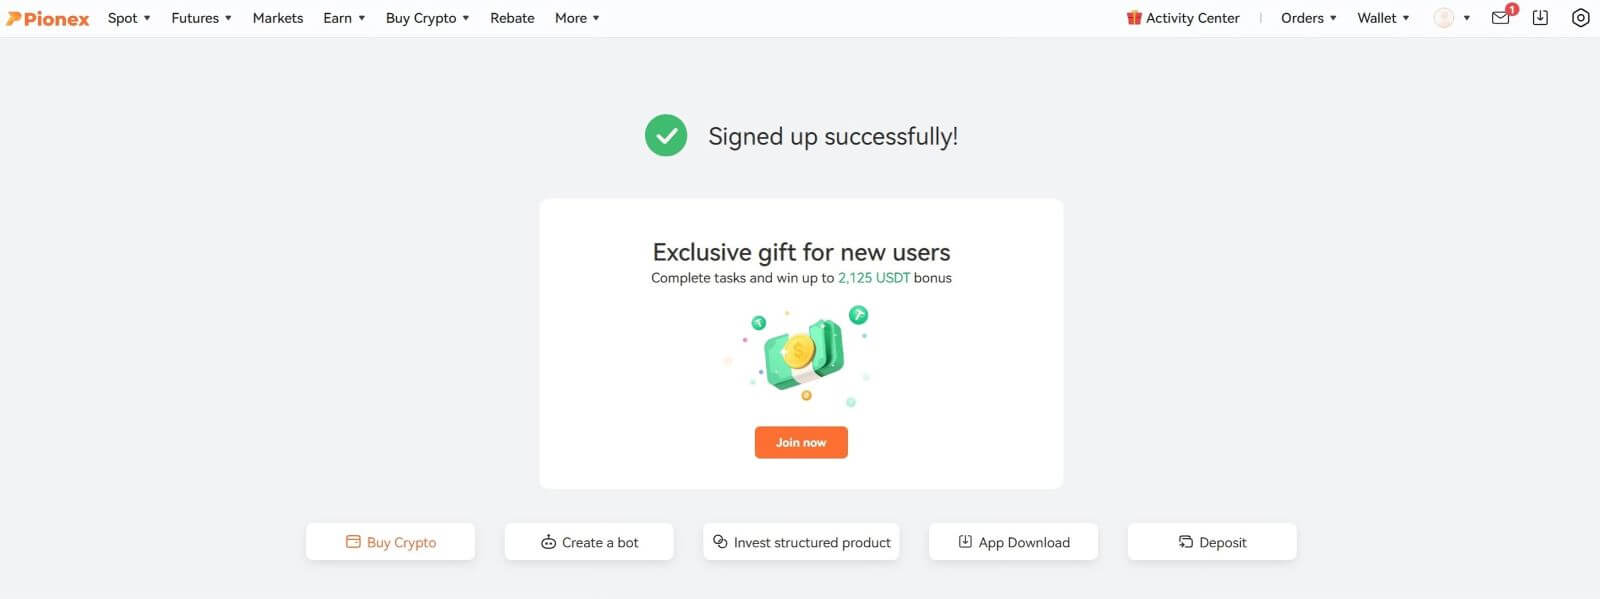
5. Congratulations, you have successfully registered on Pionex.
Open an Account on Pionex with Apple
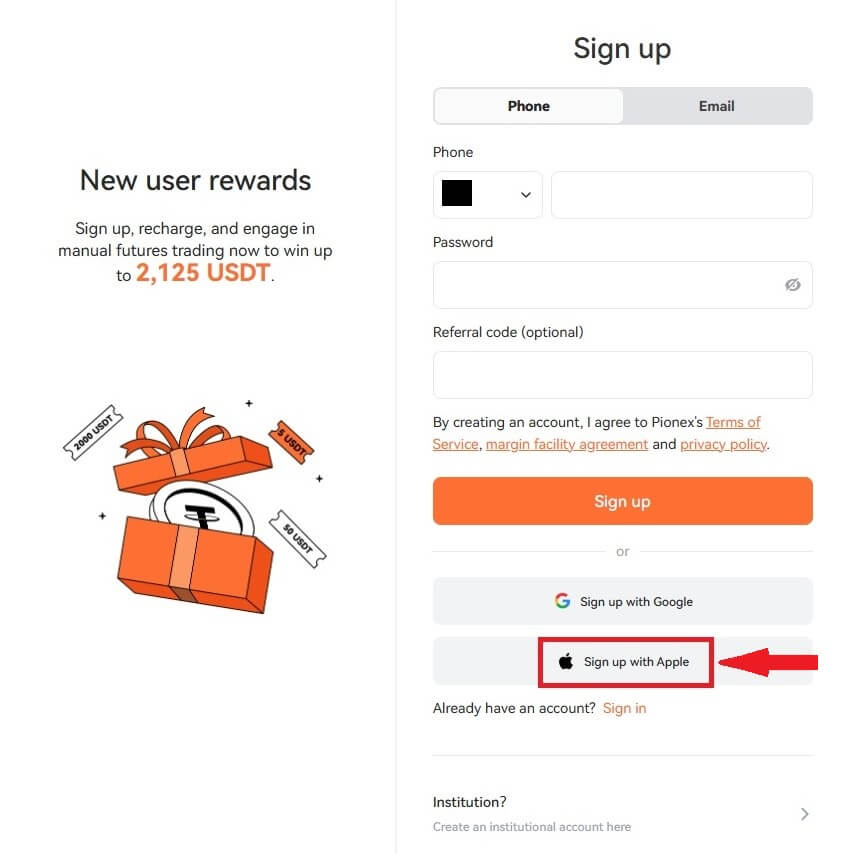
1. Alternatively, you can sign up using Single Sign-On with your Apple account by visiting Pionex and clicking [Sign up].
2. Select [Sign up with Apple], a pop-up window will appear, and you will be prompted to sign in to Pionex using your Apple account.
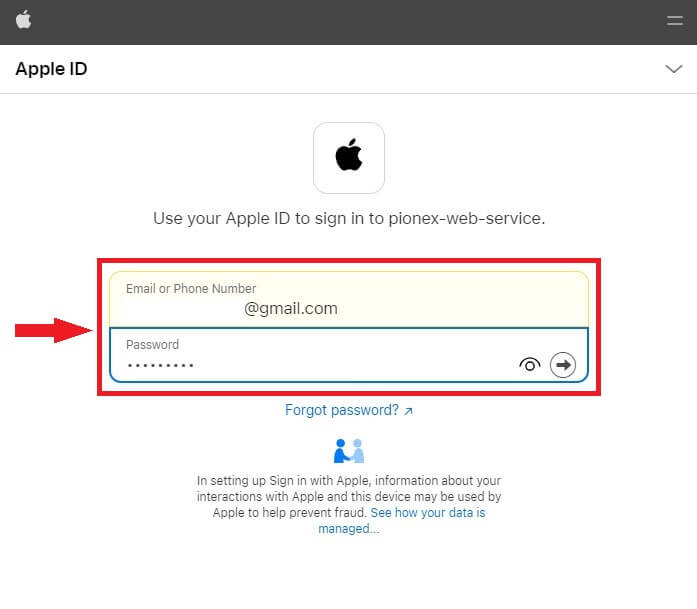
3. Enter your Apple ID and password to sign in to Pionex.
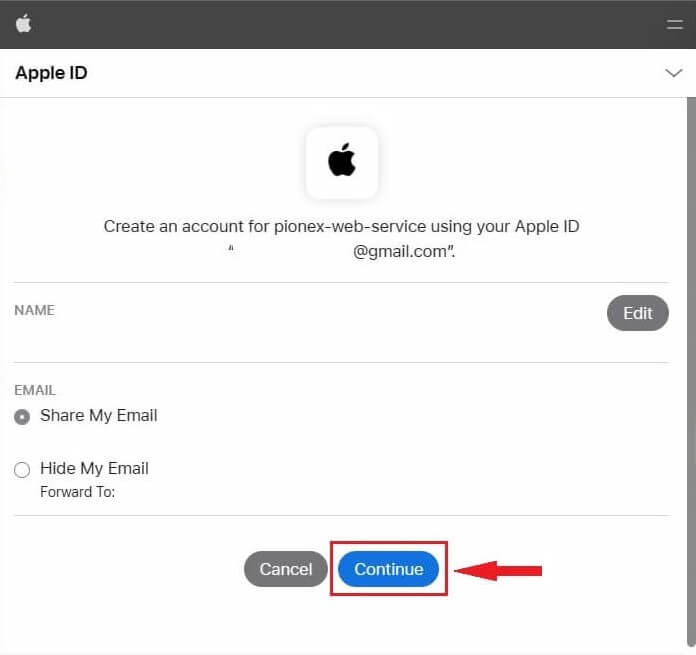
Click "Continue".
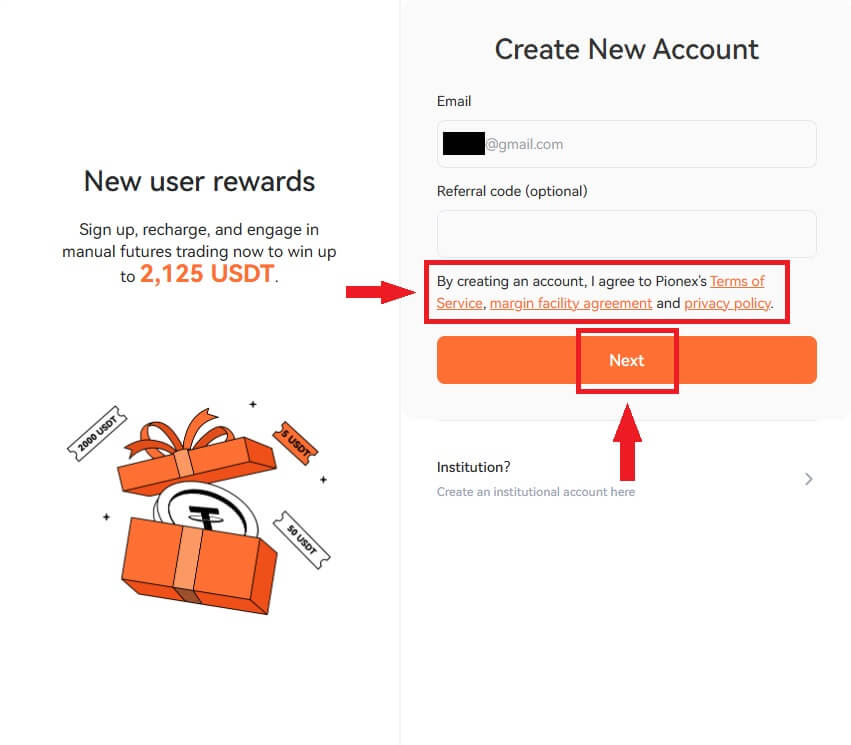
4. After signing in, you will be redirected to the Pionex website.
Read the Terms of Service, margin facility agreement and privacy policy, then click [Next].
5. Congratulations! You have successfully created a Pionex account.

Open an Account on Pionex with Google
Moreover, you can create a Pionex account through Gmail. If you wish to do that, please follow these steps:1. Firstly, you’ll need to head over to the Pionex homepage and click [Sign up].

2. Click on the [Sign up with Google] button.
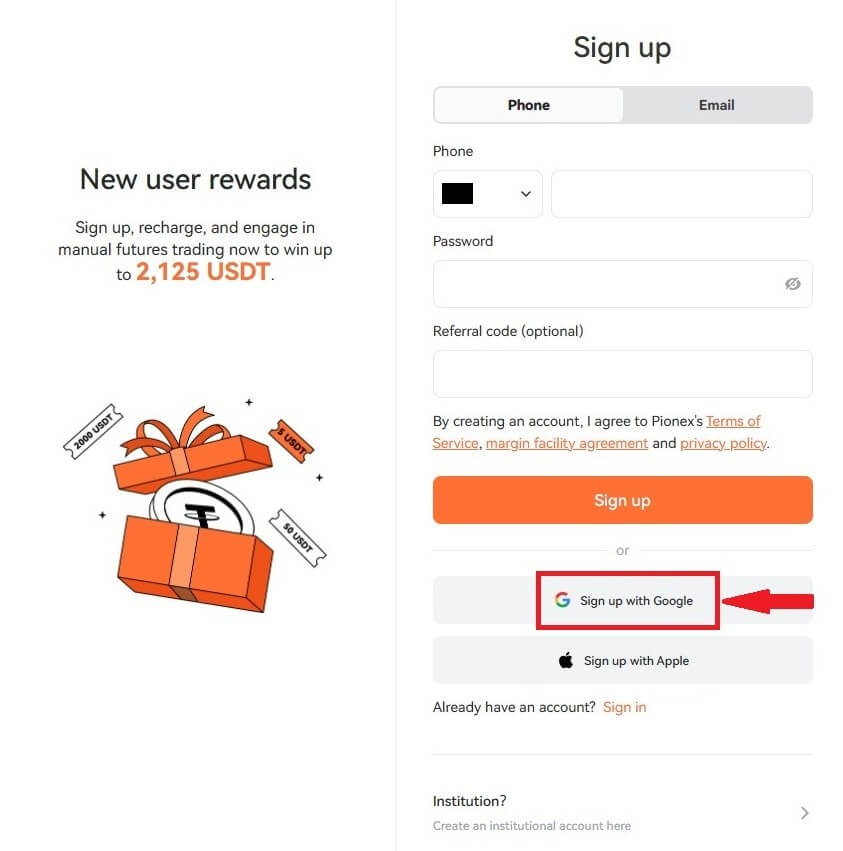
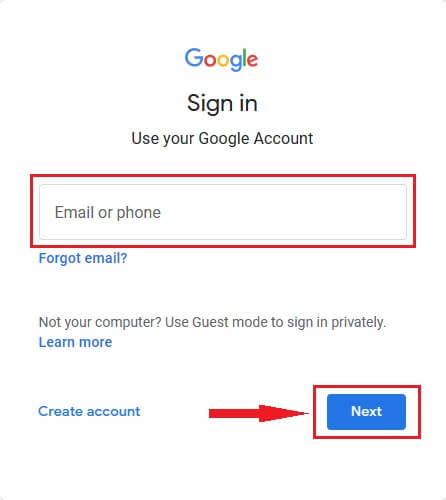
3. A sign-in window will be opened, where you will need to enter your Email address or Phone number and click on “Next”.
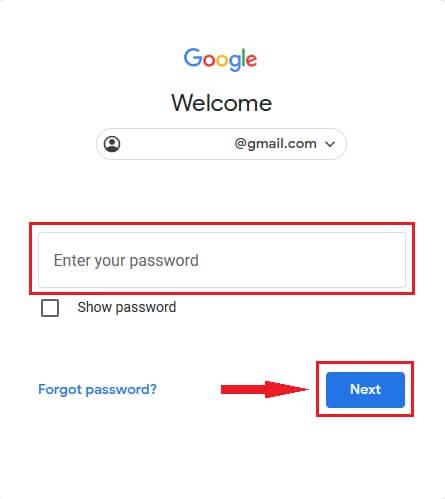
4. Then enter the password for your Gmail account and click “Next”.
5. After signing in, you will be redirected to the Pionex website.
Read the Terms of Service, margin facility agreement and privacy policy, then click [Next].

6. Congratulations! You have successfully created a Pionex account.

Open an Account on the Pionex App
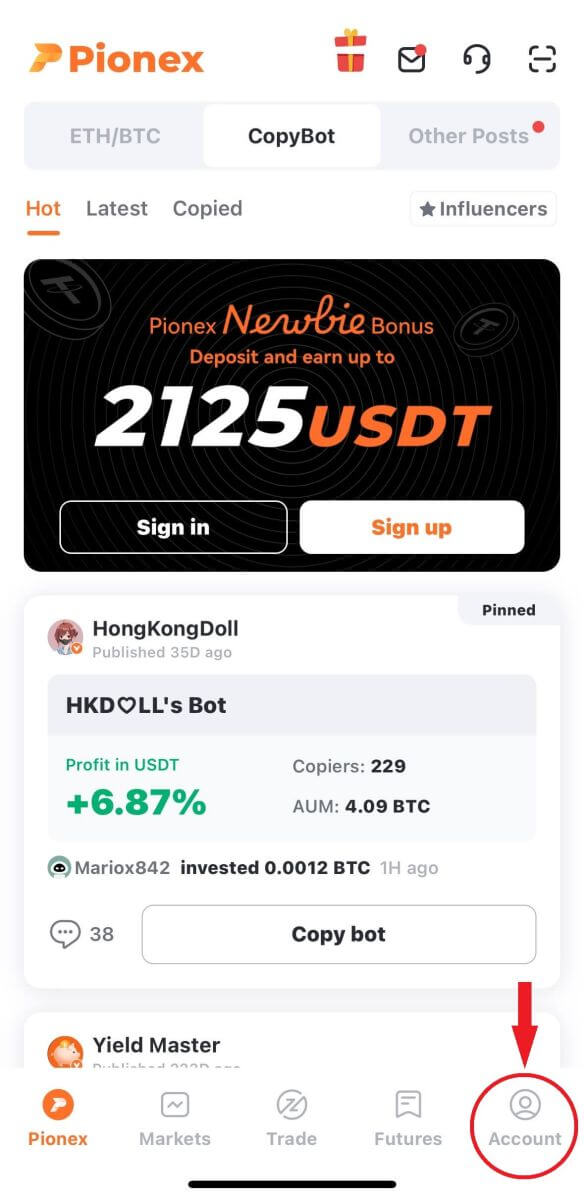
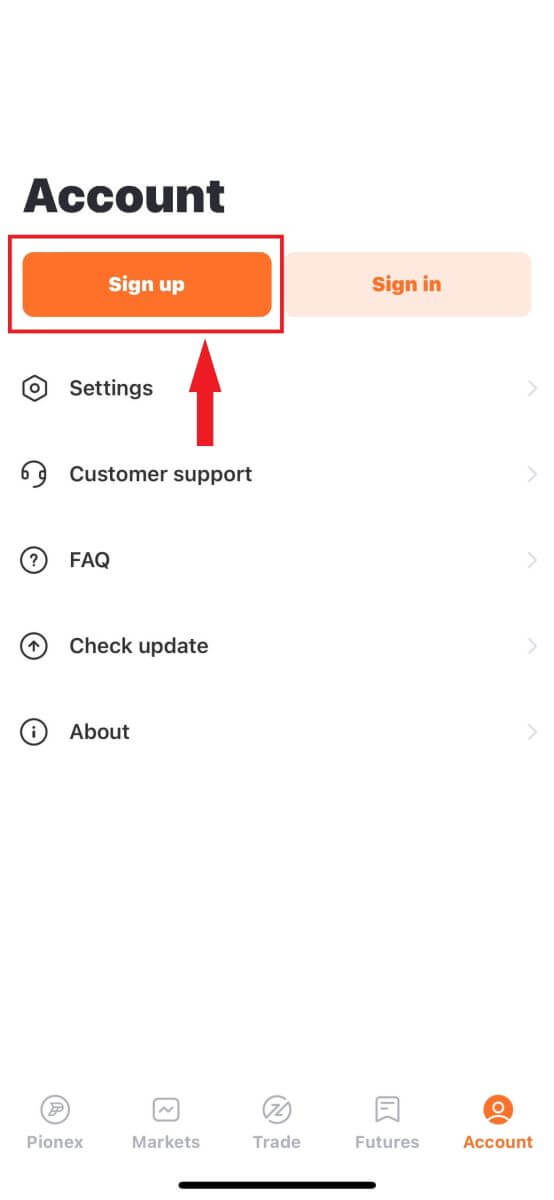
You can register for a Pionex account with your email address, phone number, or your Apple/Google account on the Pionex App easily with a few taps.1. Open the Pionex App, tap Account at the bottom corner then tap [Sign up].
2. Select a registration method.
Please select the type of account carefully. Once registered, you cannot change the account type.
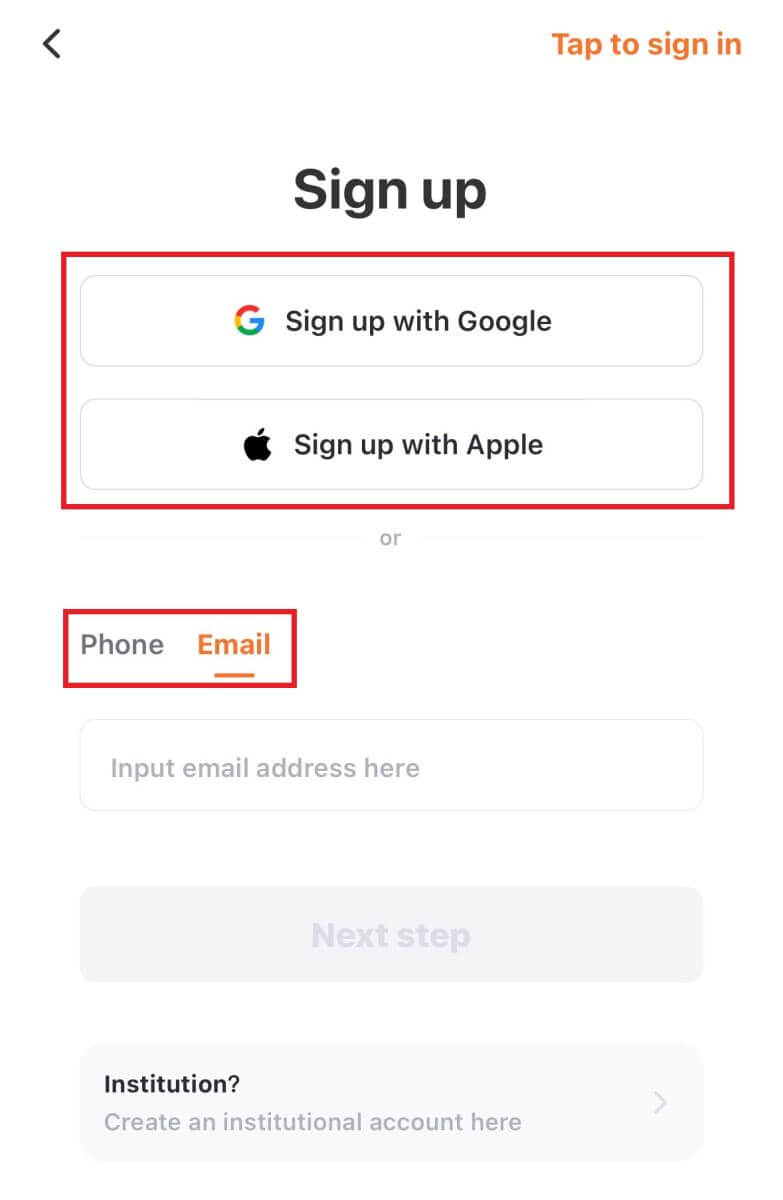
Sign up with your email/phone number:
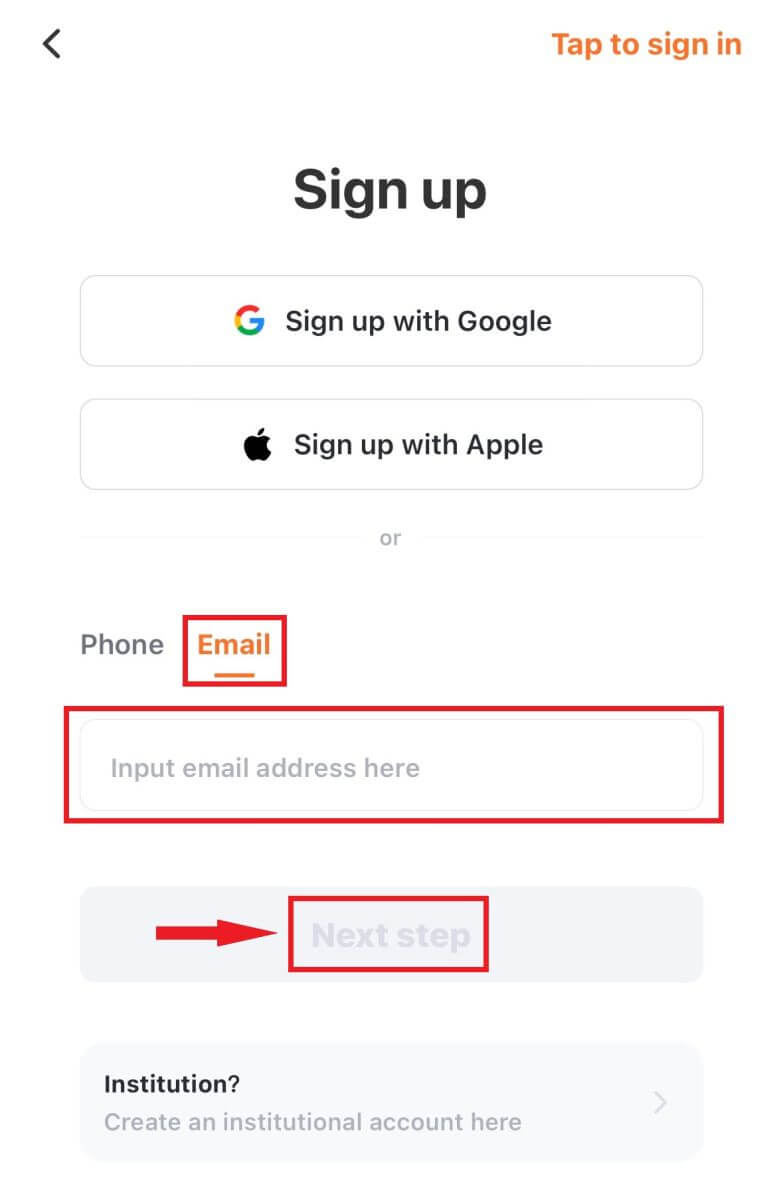
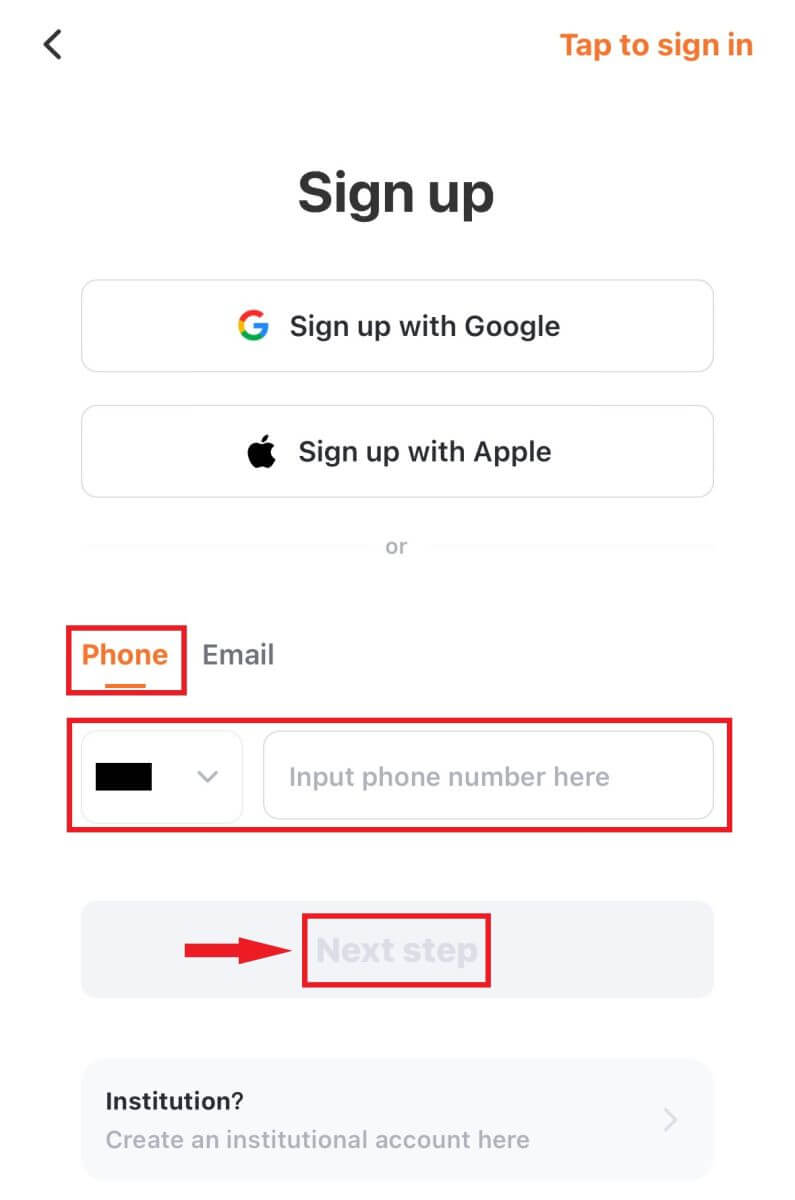
3. Select [Email] or [Phone Number], enter your email address/phone number and tap [Next step].
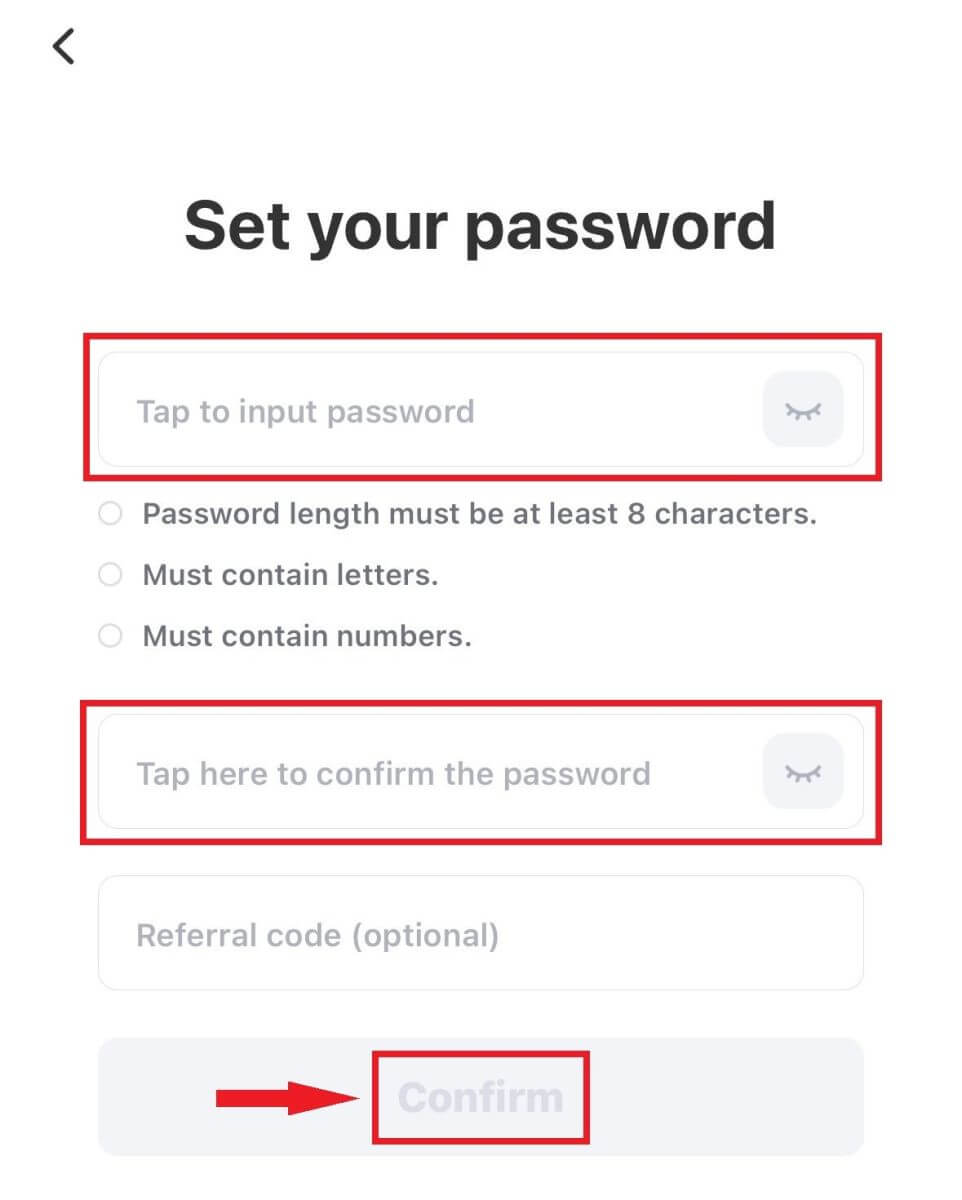
Then, set up a secure password for your account. Type your password again for the confirmation and tap [Confirm].
Note: Your password must contain at least 8 characters, including letters and numbers.
4. You will receive a 6-digit verification code in your email or phone. Enter the code within 60 seconds and click [Next step].
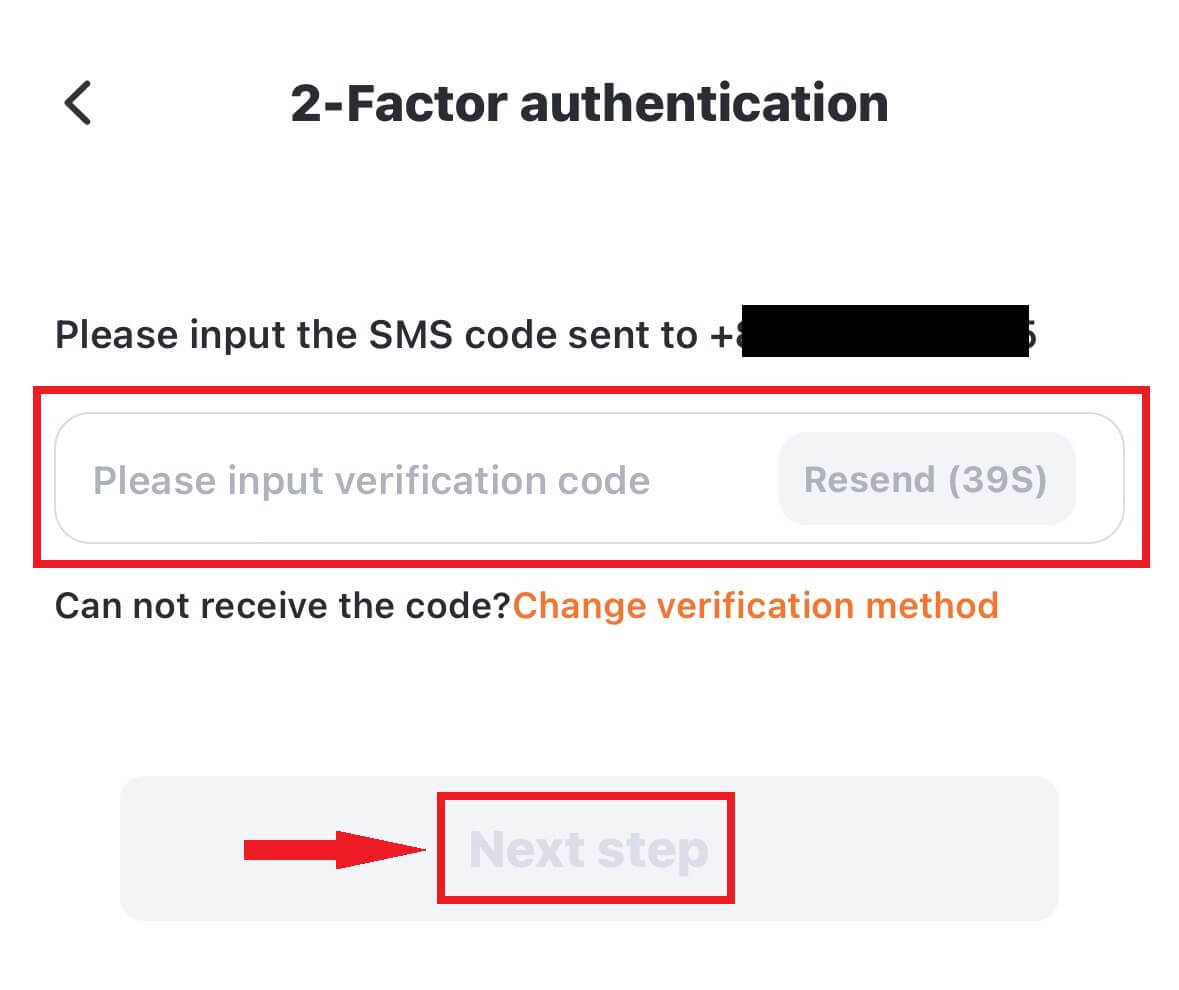
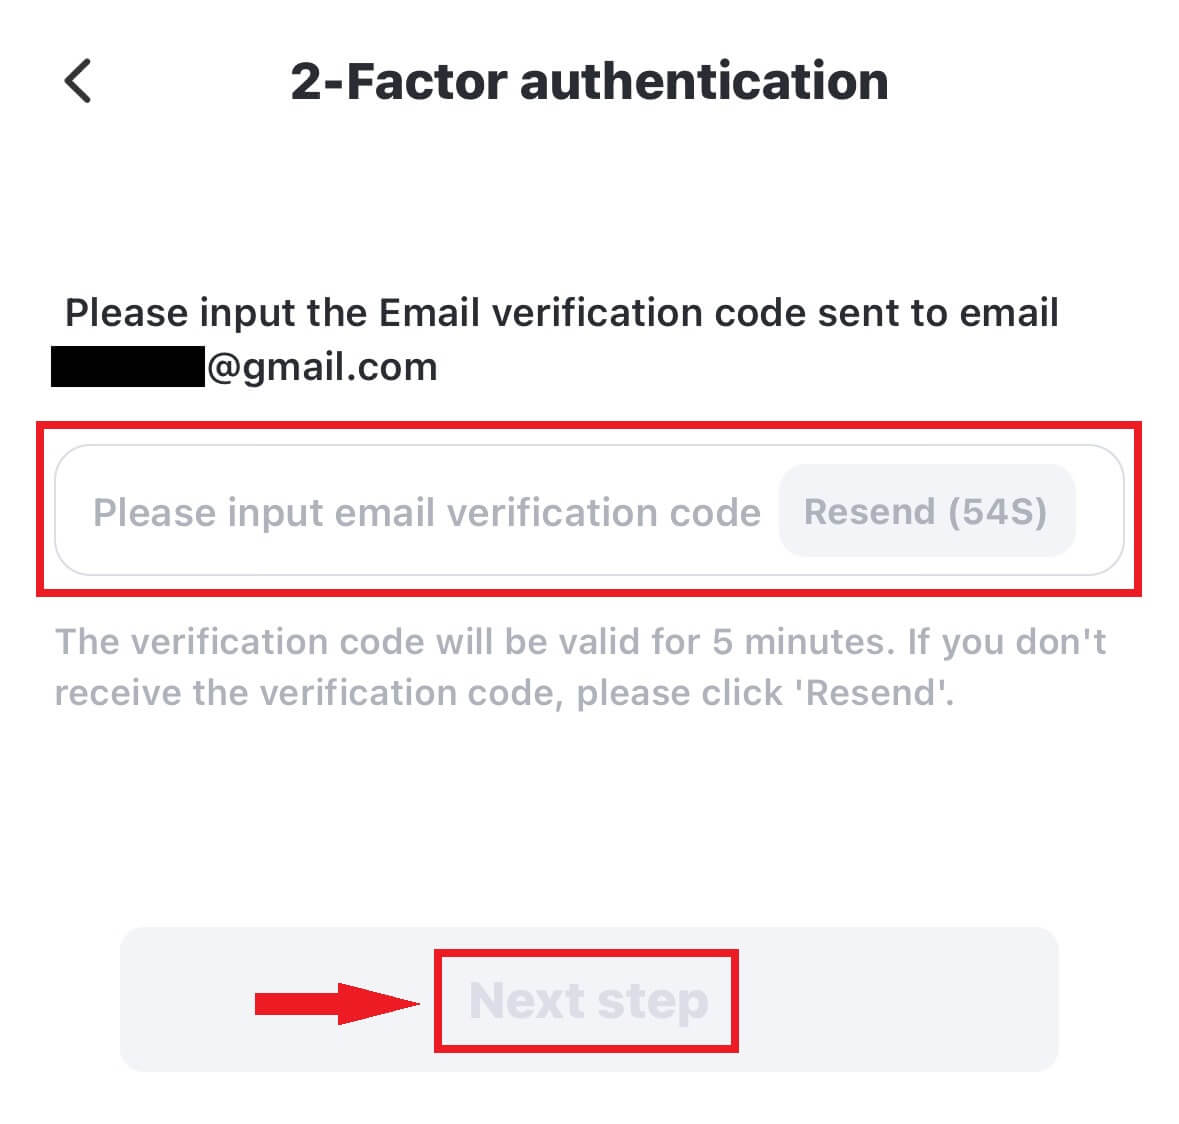
5. Congratulations! You have successfully created Pionex account.
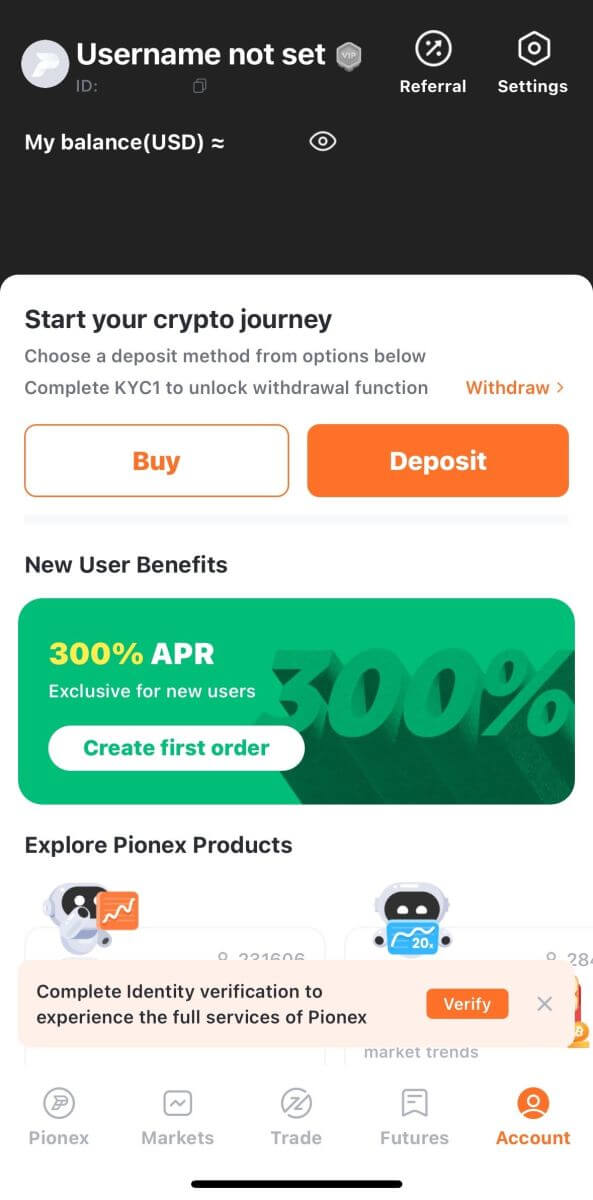
Sign up with your Apple/Google account:
3. Select [Sign up with Apple] or [Sign up with Google]. You will be prompted to sign in to Pionex using your Apple or Google account.
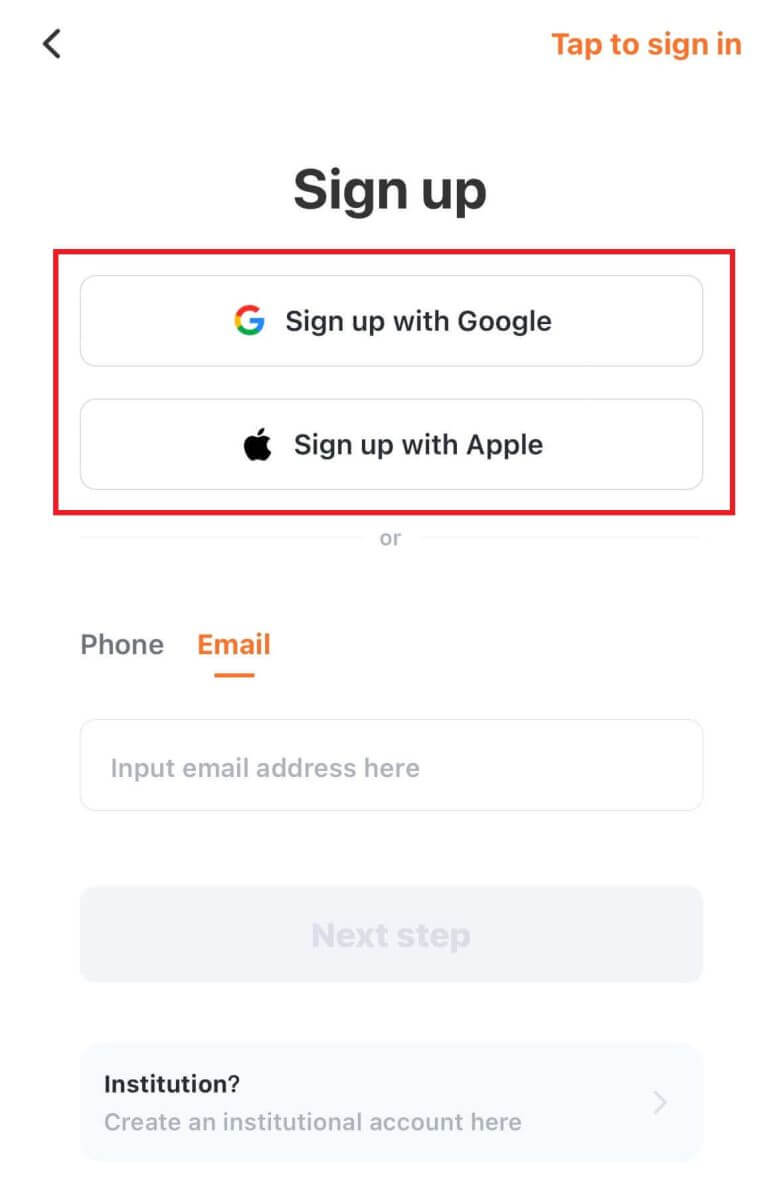
Tap [Continue].
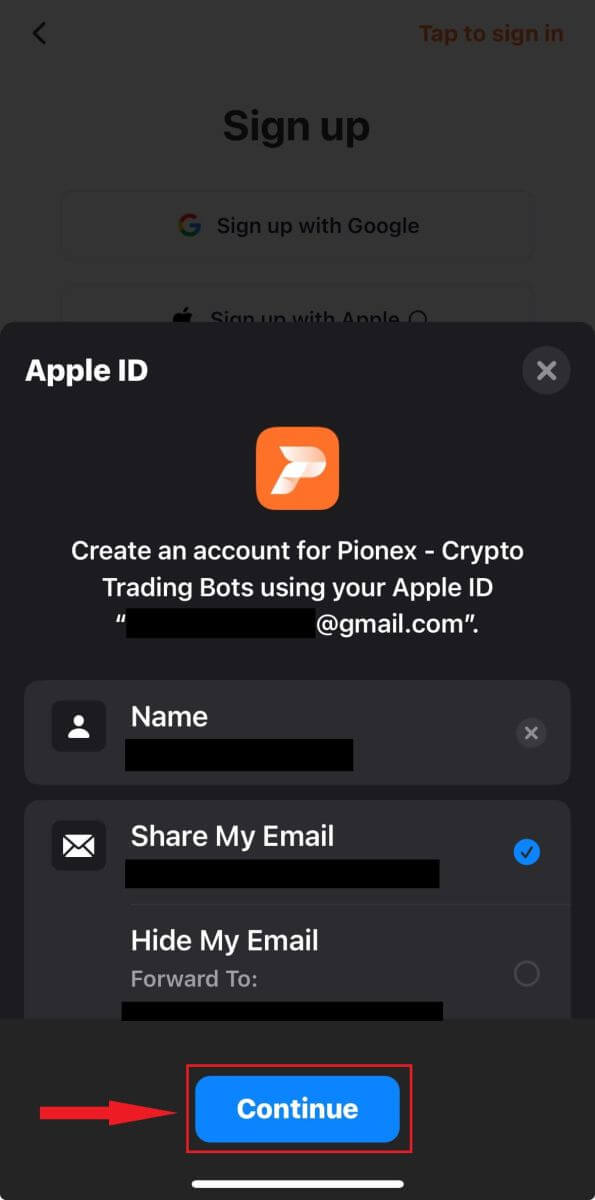
4. Congratulations! You have successfully created Pionex account.

Note:
- To protect your account, we highly recommend enabling at least 1 two-factor authentication (2FA).
- Please note that you must complete Identity Verification to experience the full services of Pionex.
How to Verify Pionex Account
What is identity verification? (KYC)
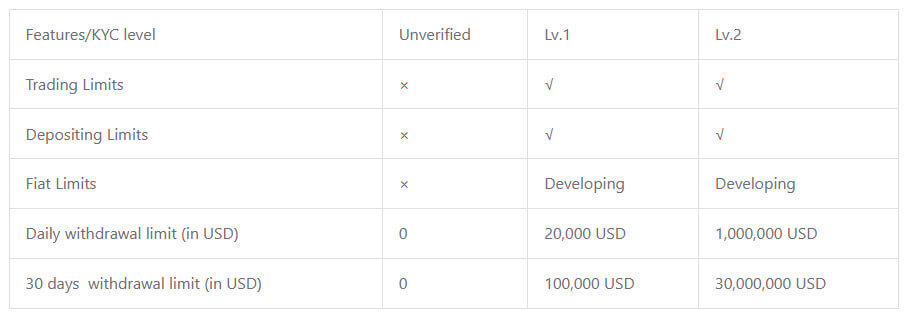
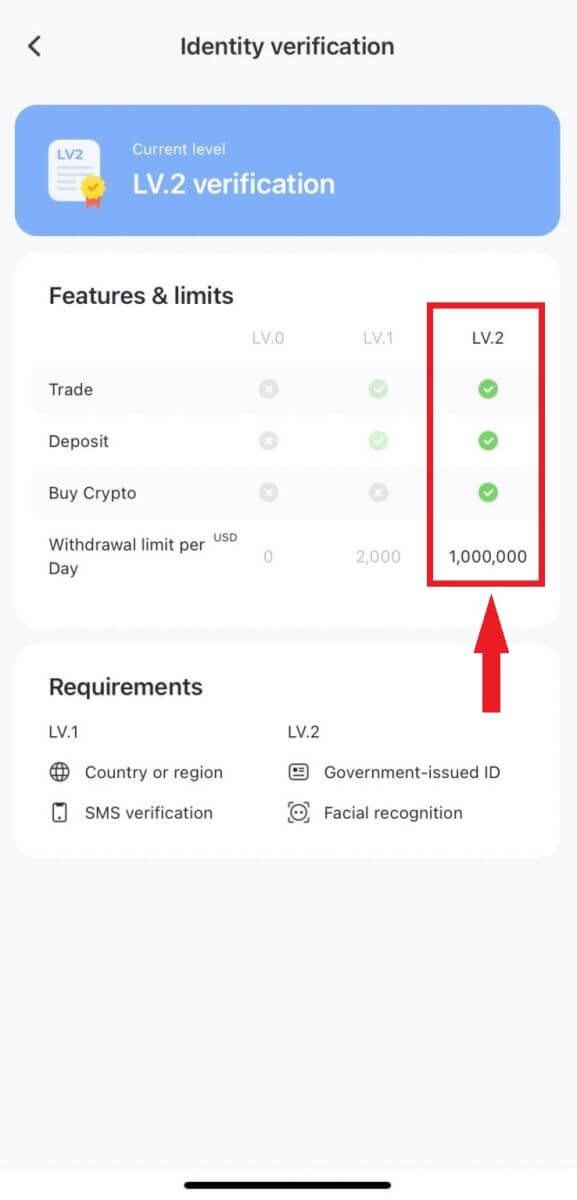
Completing KYC identity verification on Pionex enhances your account security level and raises the daily withdrawal limit. Simultaneously, you gain access to the service for purchasing crypto with a credit card.
There are two levels of verification, more details are as follows:
- Features and Limits:
- Requirements:
KYC Lv.1 verification: Country or region, Full legal name
KYC Lv.2 verification: Government-issued ID, Facial recognition
For additional information on KYC identity verification, please consult the announcement.
How to Complete Identity Verification on Pionex
Where can I get my account verified?
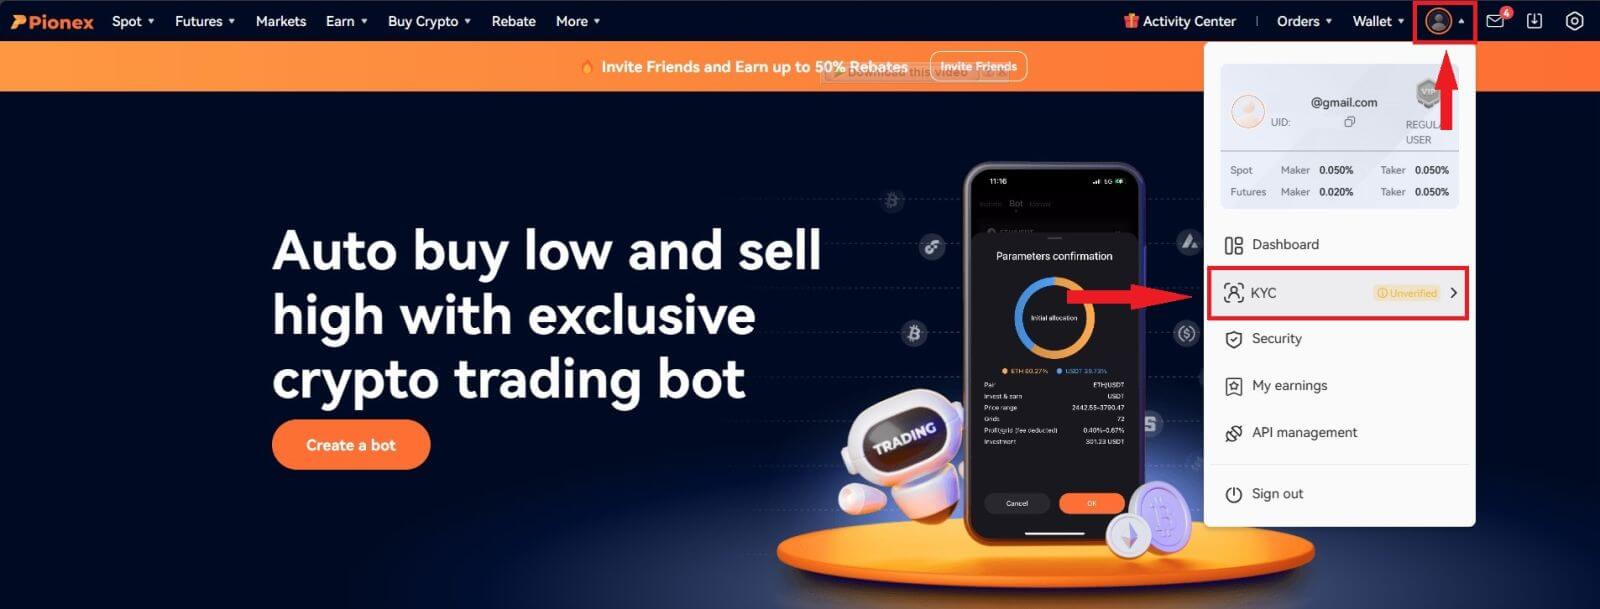
You can access Identity Verification by navigating to [Account] - [KYC]. On this page, you can review your existing verification level, which directly influences the trading limit for your Pionex account. If you wish to enhance your limit, kindly proceed to complete the corresponding Identity Verification level.
How to Complete Identity Verification on Pionex App? A step-by-step guide
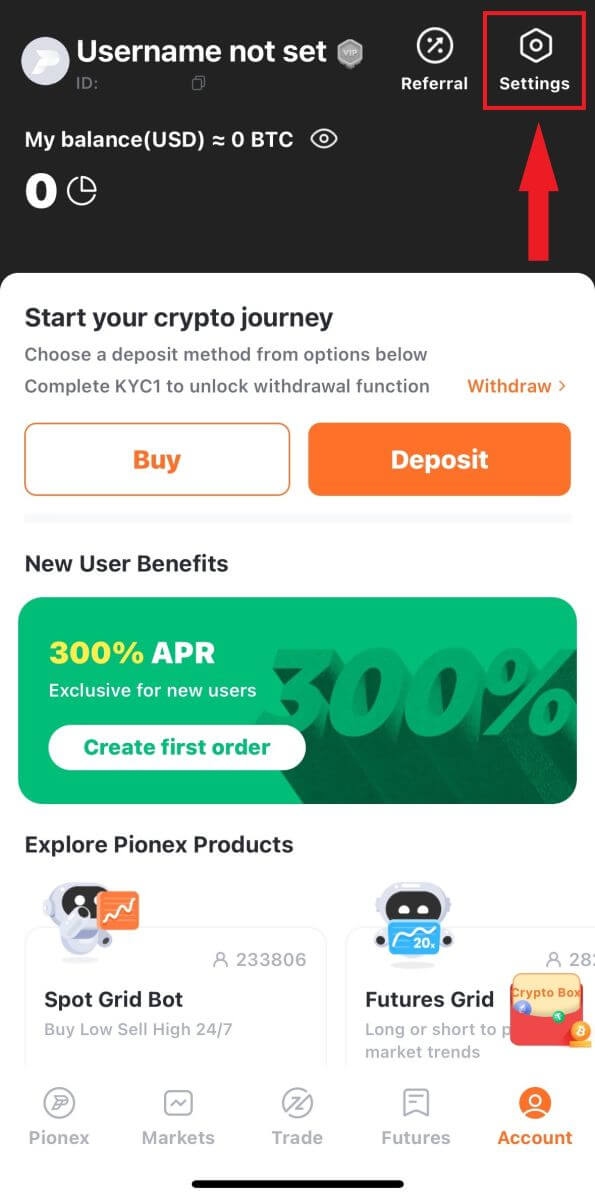
1. Login to your Pionex account on the App, Select “Account” -- “Settings” -- “Identity verification“.
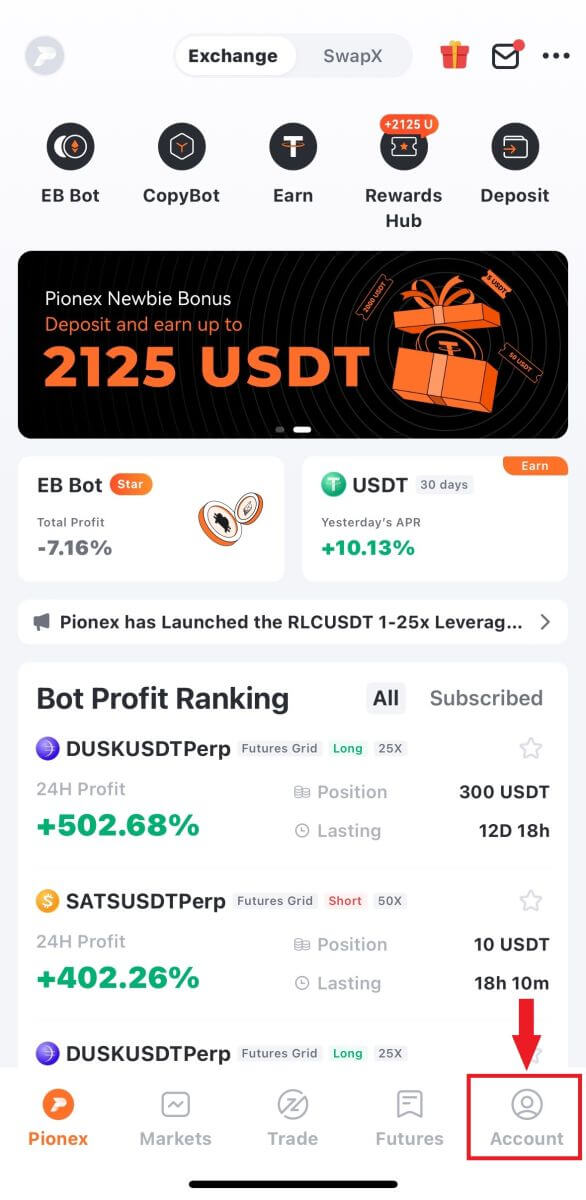
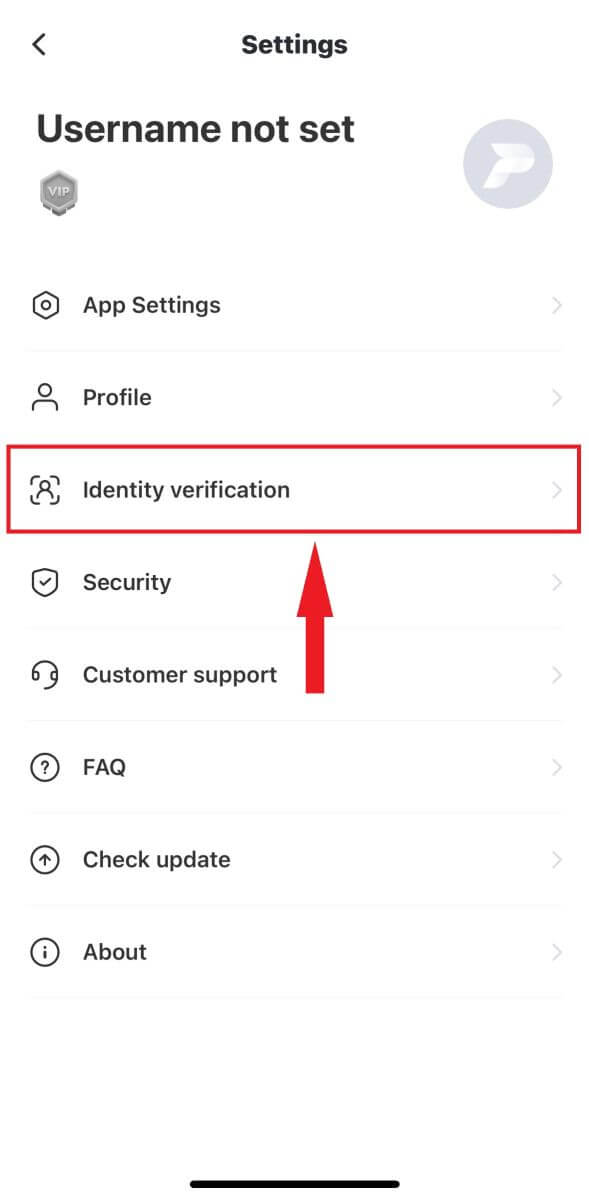
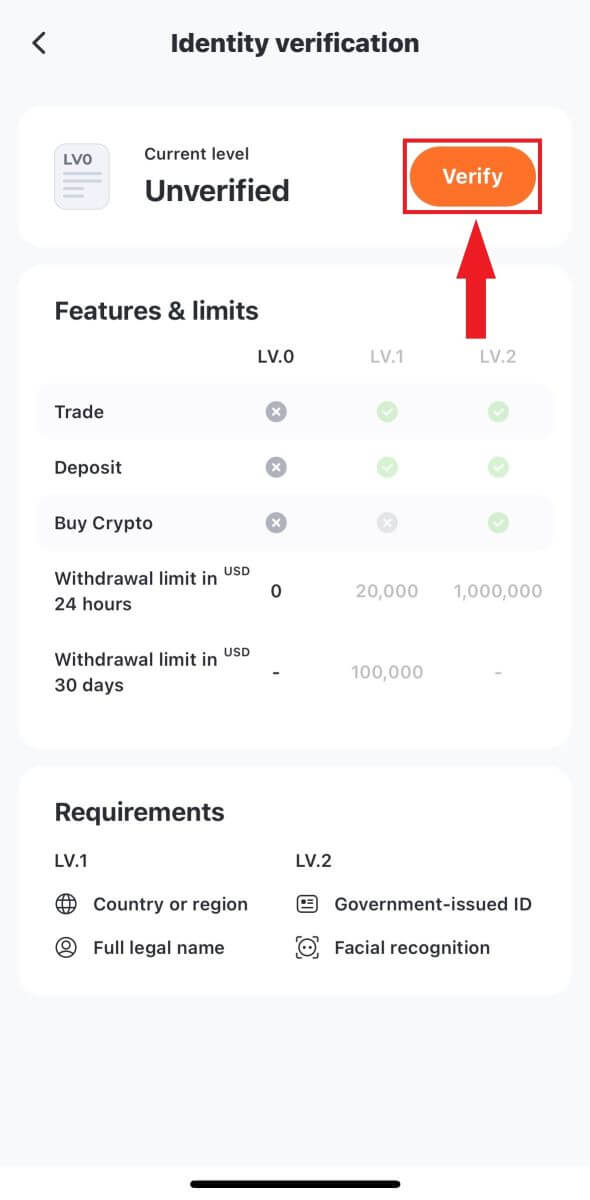
2. Select "Verify" on the page; LV.1 verification will authenticate your location country and full legal name.
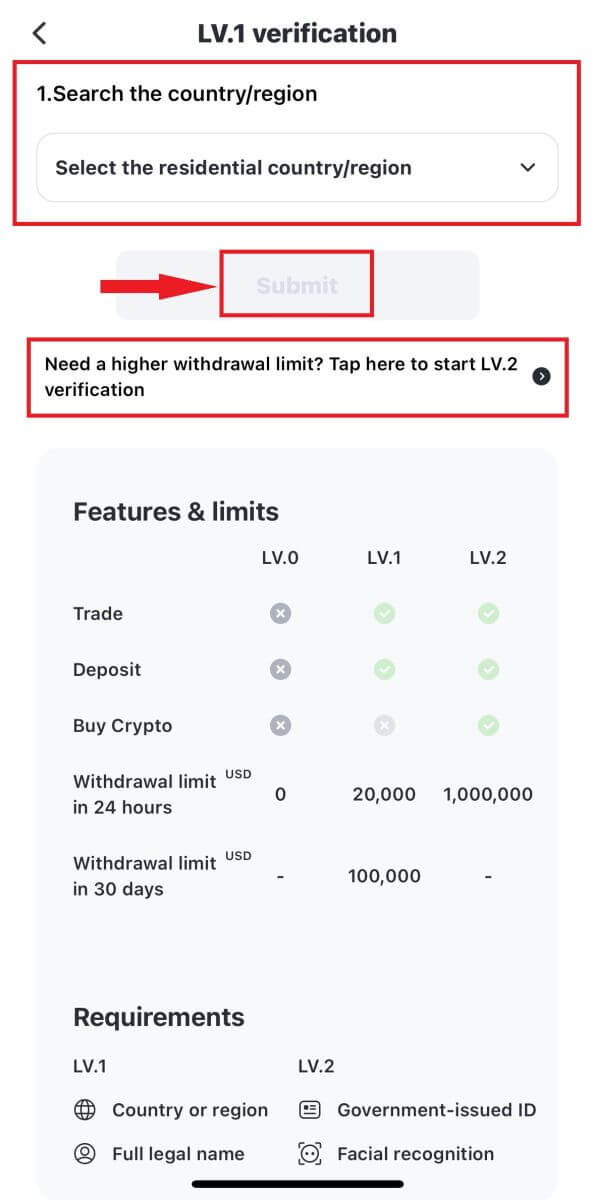
3. Follow the instructions and carefully review the notifications. Once all information is confirmed, click "Submit" to complete LV.1 Verification (KYC1).
4. For an elevated withdrawal limit, proceed with LV.2 verification.
Choose your countries/regions and submit the required legal ID card for verification.
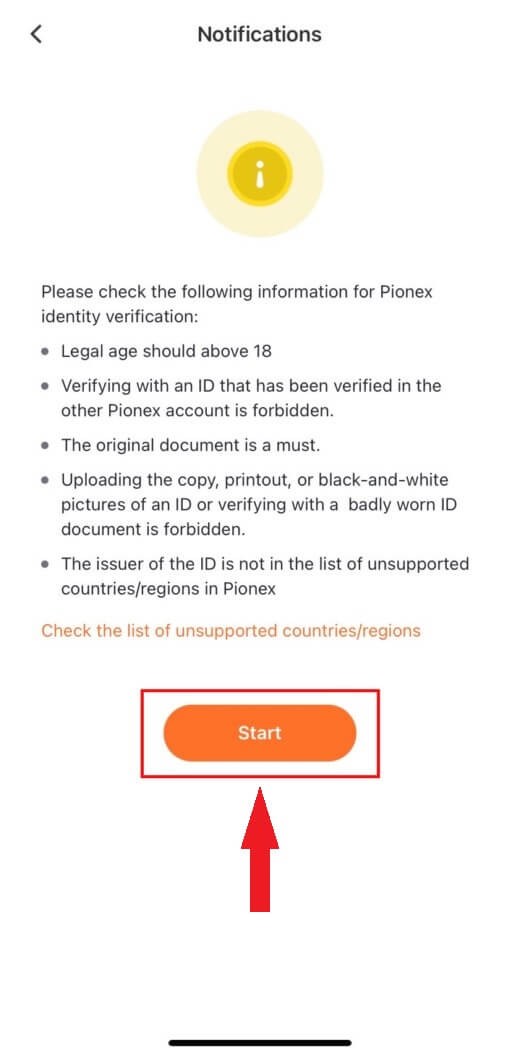
5. Upon capturing photos of your ID card and selfie, the system will initiate verification, typically completing the review within 15 – 60 minutes. Feel free to leave the page temporarily and check the status at a later time.
Once these steps are completed, LV.2 verification will be visible on your page. You can proceed to purchase Crypto with a credit card (USDT) and then create your first trading bot on Pionex!
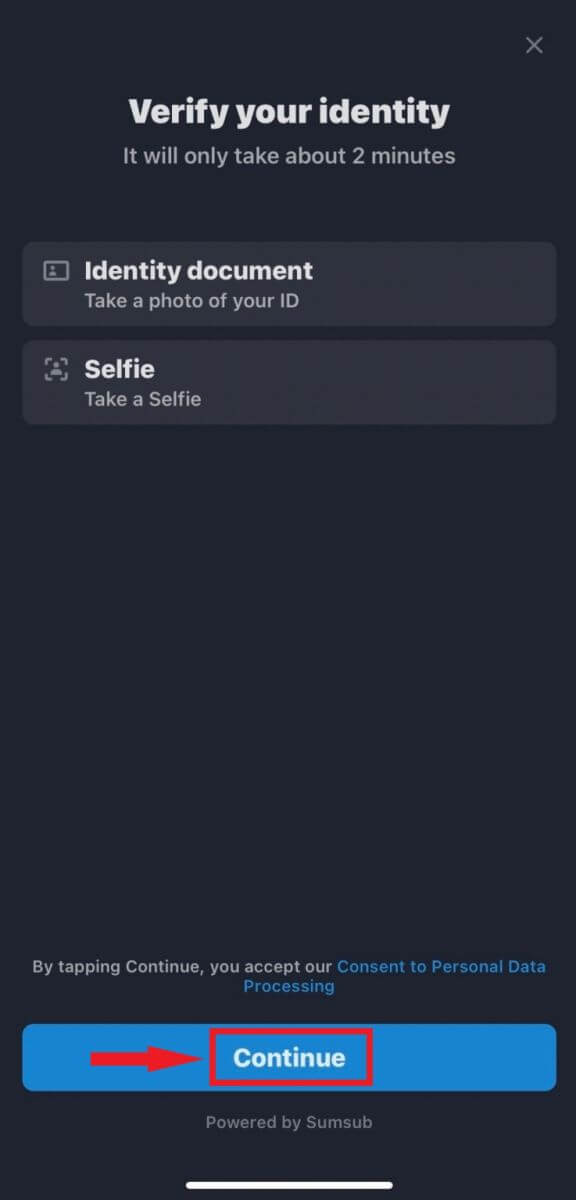
Please Caution:
- Avoid attempting to use another person’s ID card or providing false information for verification, as Pionex may restrict your account services as a consequence.
- Each user is permitted to verify only their own personal information on an account, multiple accounts will not successfully pass KYC.
- Refrain from using watermarks when uploading documents or employing photo editing software to capture images of documents.
How to Deposit/Buy Crypto in Pionex
If you possess cryptocurrency on a different platform or wallet, you have the option to transfer it to your Pionex Wallet. This facilitates trading activities or allows you to explore various passive income opportunities through our range of services.
How to Buy Crypto with Credit Card on Pionex
The rapid processing of credit cards simplifies the acquisition of crypto for first-time buyers or investors using fiat currency. Credit card transactions can be completed within a matter of seconds.
Buy Crypto with Credit Card (Web)
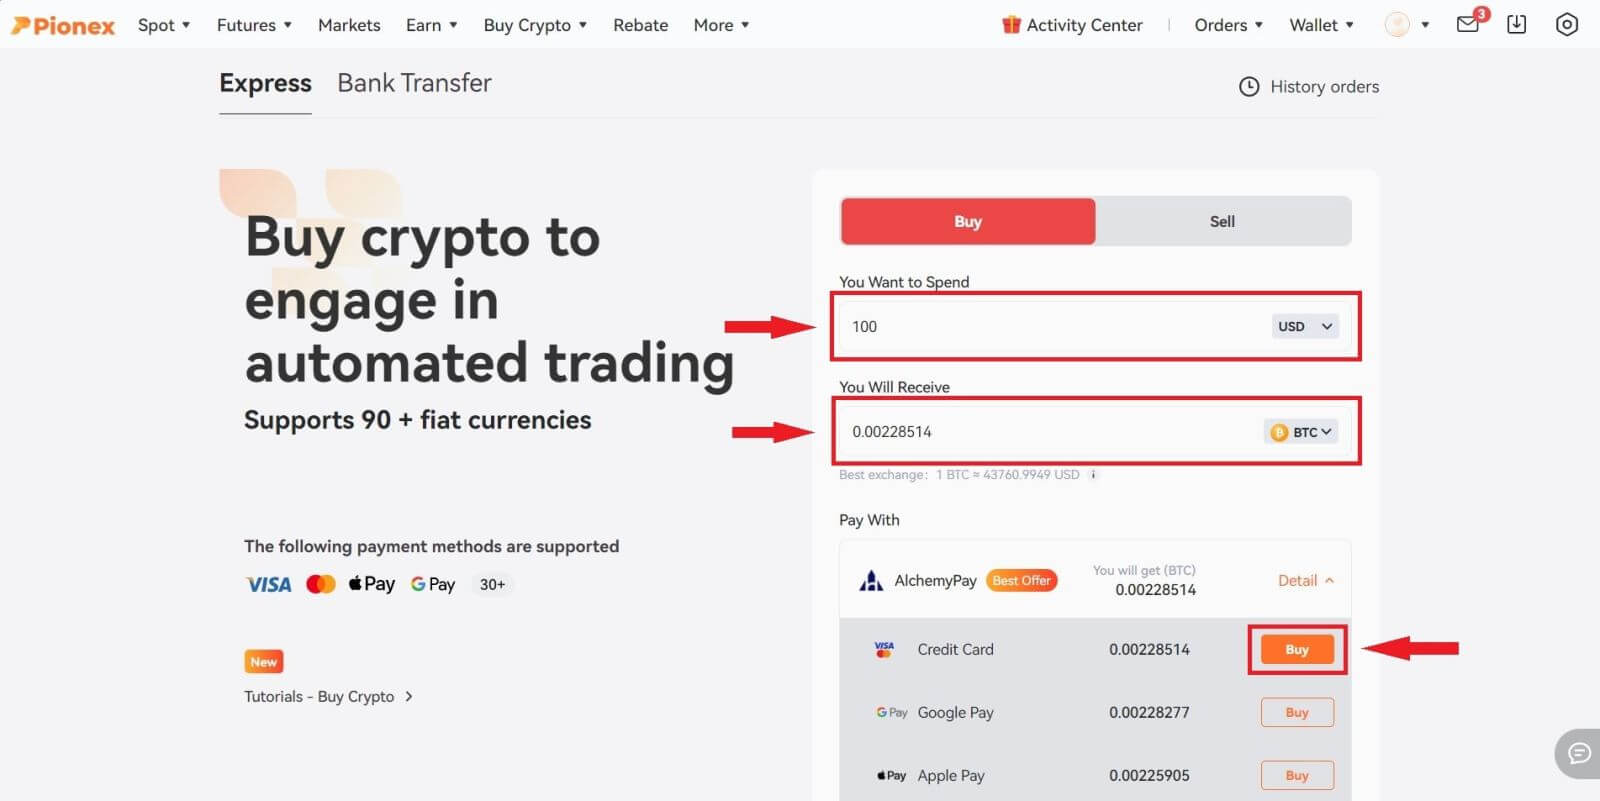
1. Sign in to your Pionex account and click [Buy Crypto] -- [Express].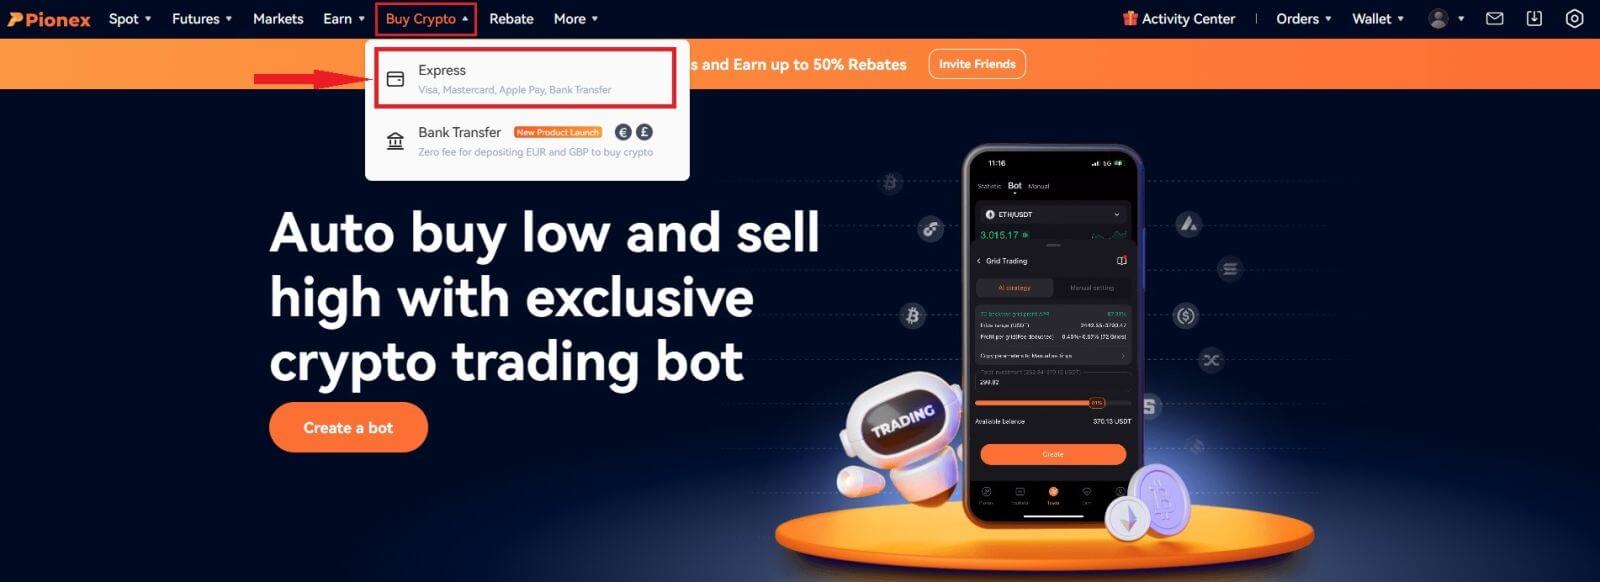
2. Choose the preferred platform (AlchemyPay/BANXA/Advcash), input the purchase amount, and then choose the preferred payment (Credit Card/Google Pay/Apple Pay). The system will automatically convert the expected cryptocurrency amount for you. After verifying that the information is accurate, click "Buy" to continue to the payment page.
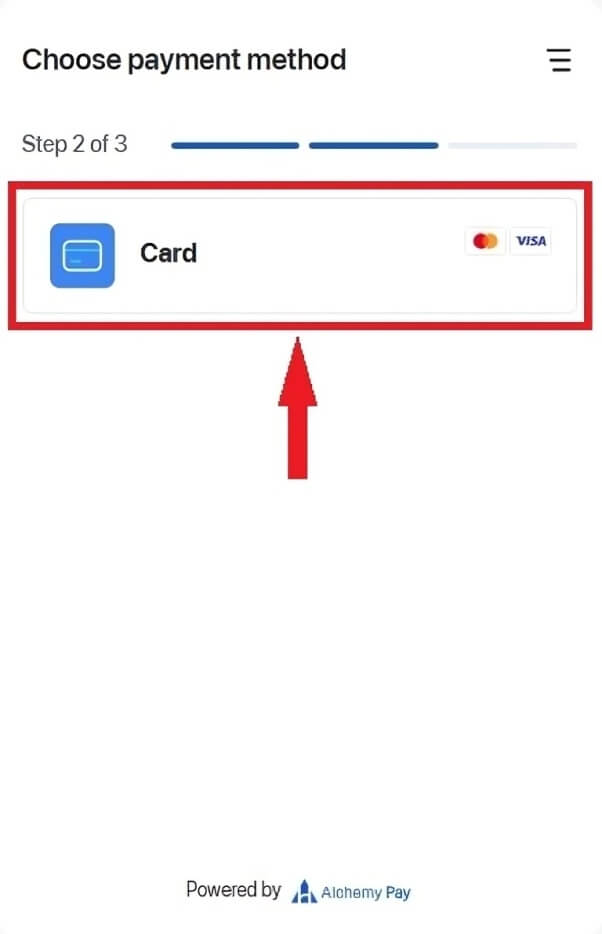
3. Choose your payment method and click [Card].
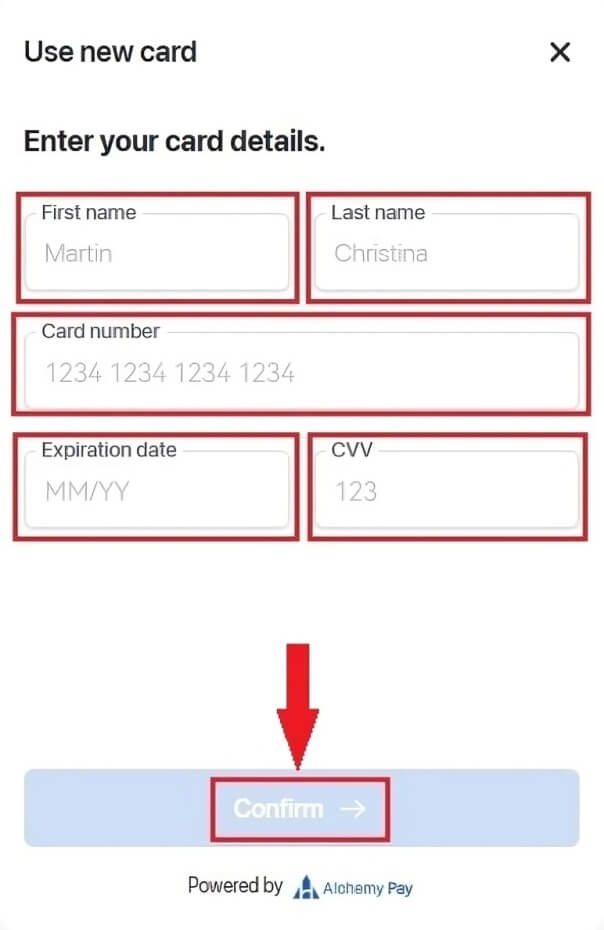
4. Provide your credit card information, ensuring that the credit card used is registered under your name, and then click [Confirm].
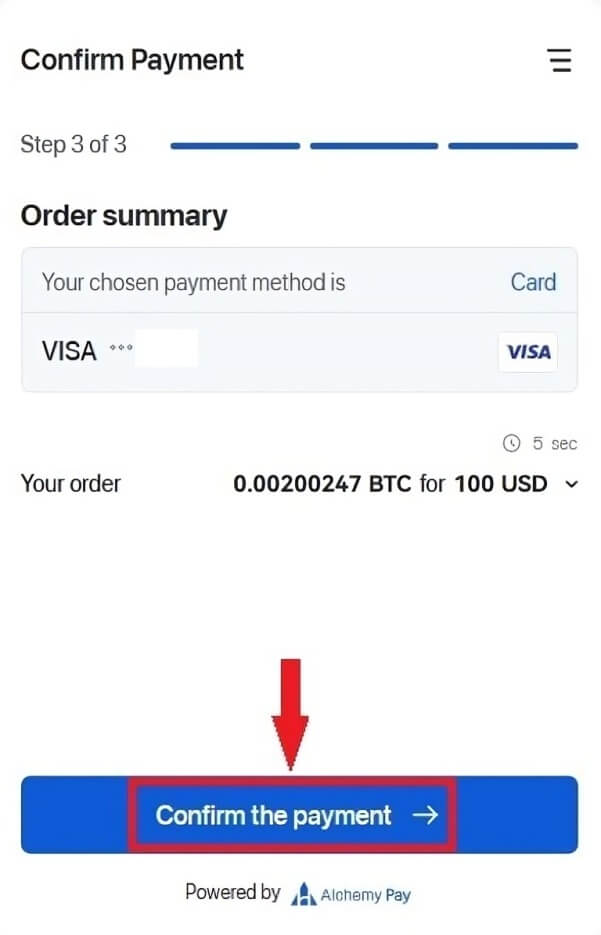
5. Review the confirm payment details and finalize your order within 15 seconds. After this timeframe, the cryptocurrency’s price and the corresponding amount will be recalculated. Feel free to click [Refresh] to view the most up-to-date market price.
6. You will be directed to your bank’s OTP transaction page. Please follow the on-screen instructions to authenticate and verify the payment.
Buy Crypto with Credit Card (App)
1. Sign in to your Pionex account and tap [Account] -- [Buy Crypto] -- [Third-Party].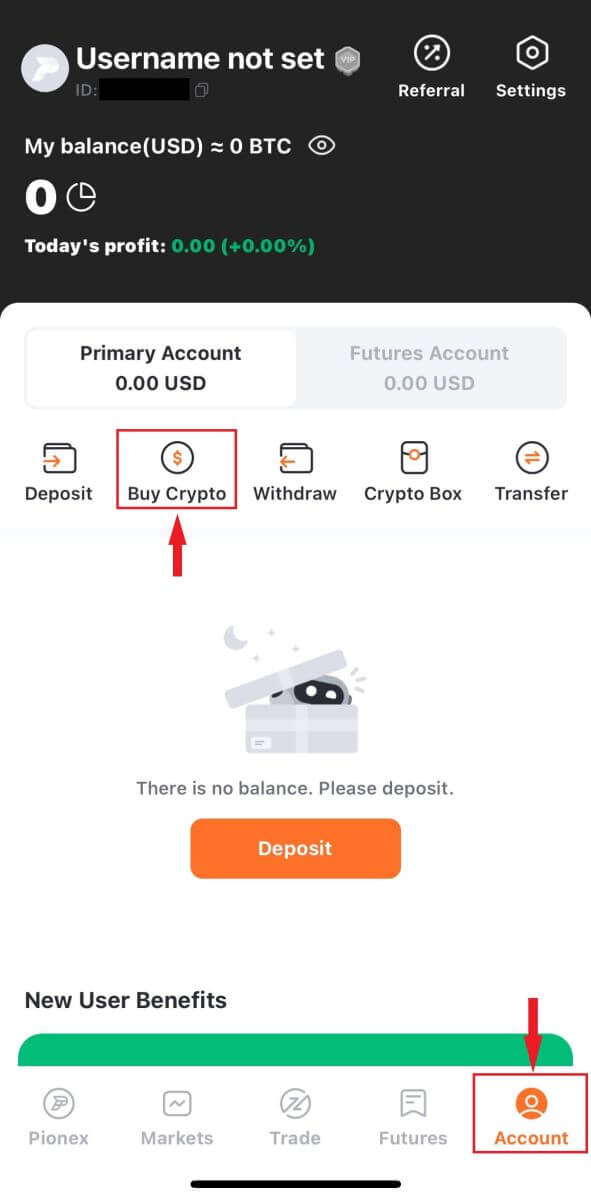
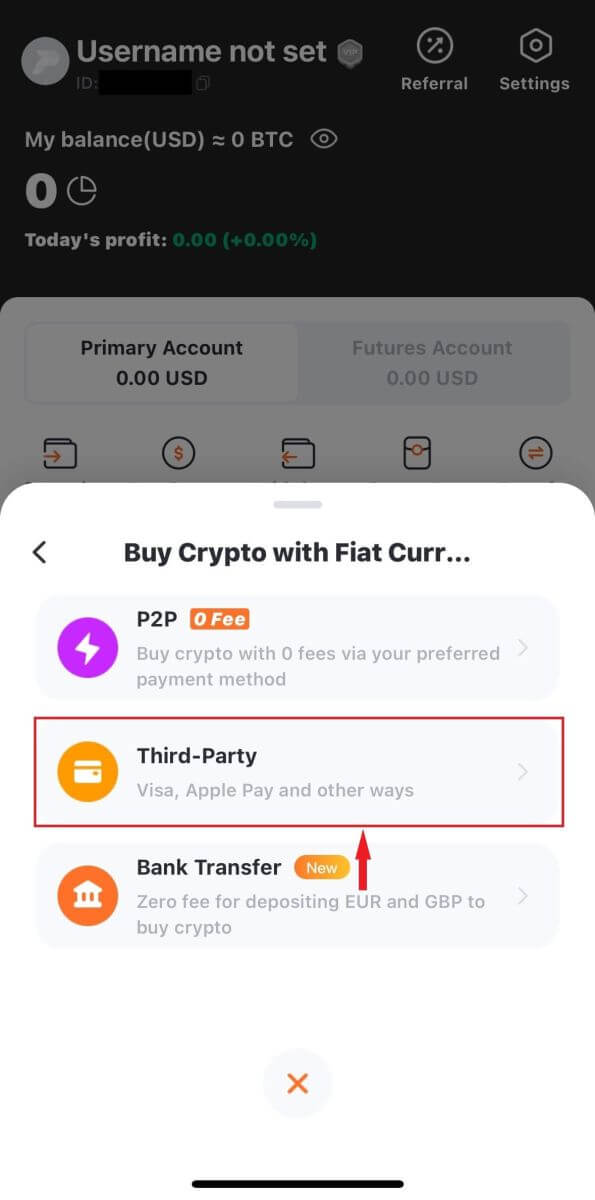
2. Choose the preferred platform (AlchemyPay/BANXA/Advcash), input the purchase amount, and then choose the preferred payment (Credit Card/Google Pay/Apple Pay). The system will automatically convert the expected cryptocurrency amount for you. After verifying that the information is accurate, click "Buy" to continue to the payment page.
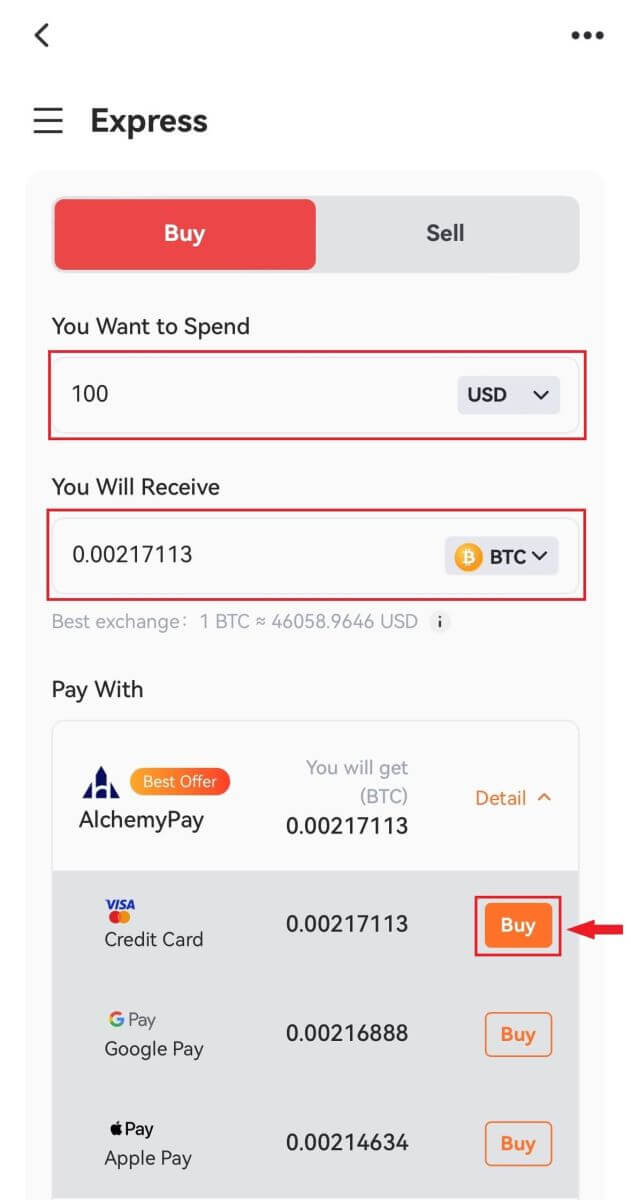
3. Choose your payment method and tap [Card].
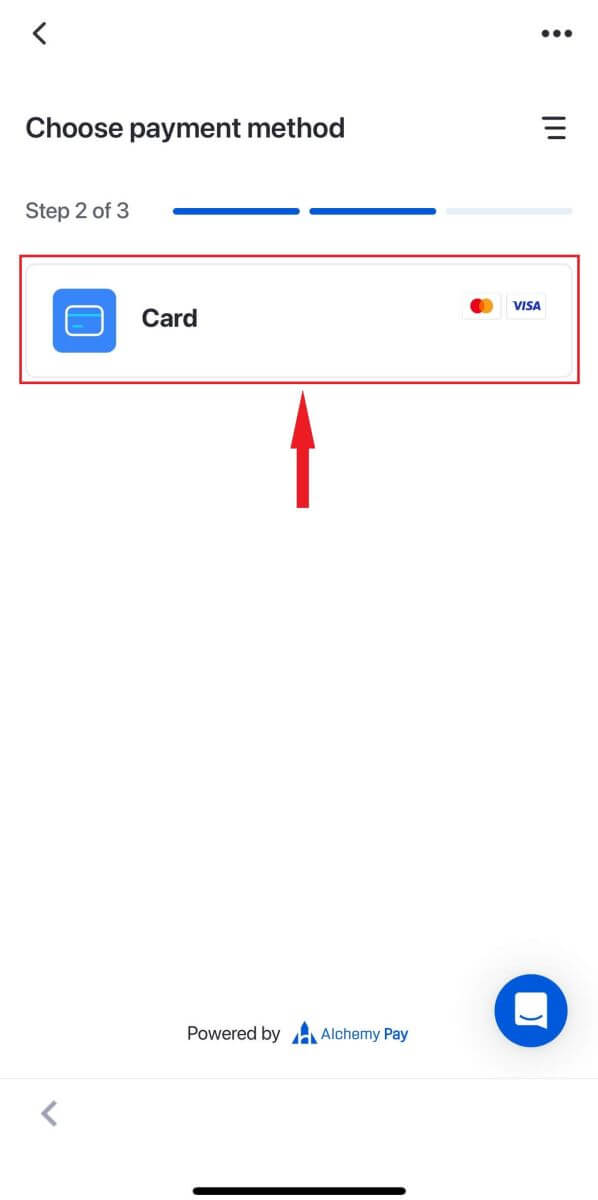
4. Provide your credit card information, ensuring that the credit card used is registered under your name, and then tap [Confirm].
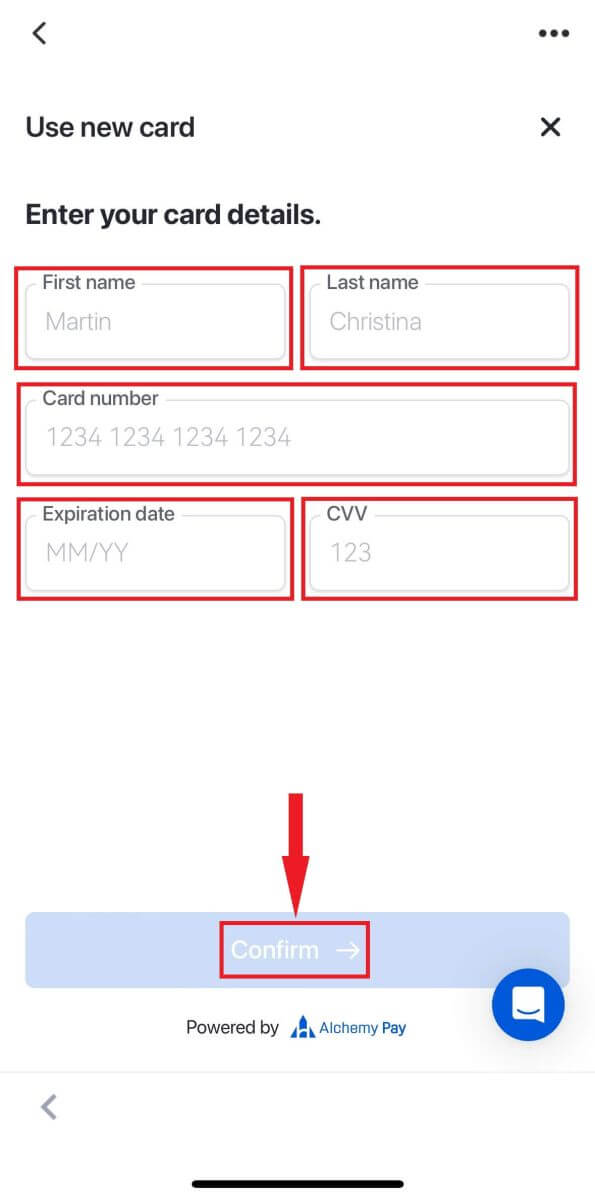
5. Review the confirm payment details and finalize your order within 15 seconds. After this timeframe, the cryptocurrency’s price and the corresponding amount will be recalculated.
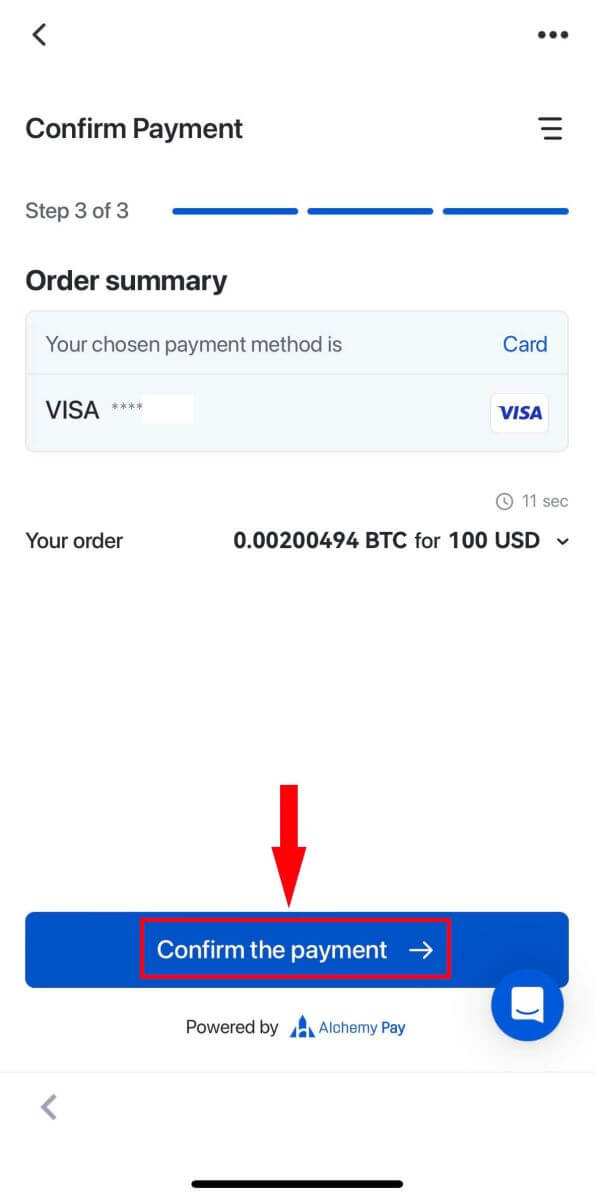
6. You will be directed to your bank’s OTP transaction page. Please follow the on-screen instructions to authenticate and verify the payment.
How to Deposit Crypto in Pionex
To enhance the efficiency of your trading journey, we welcome deposits in cryptocurrencies. Allow us to guide you through the process of making these deposits.
Deposit Crypto on Pionex (Web)
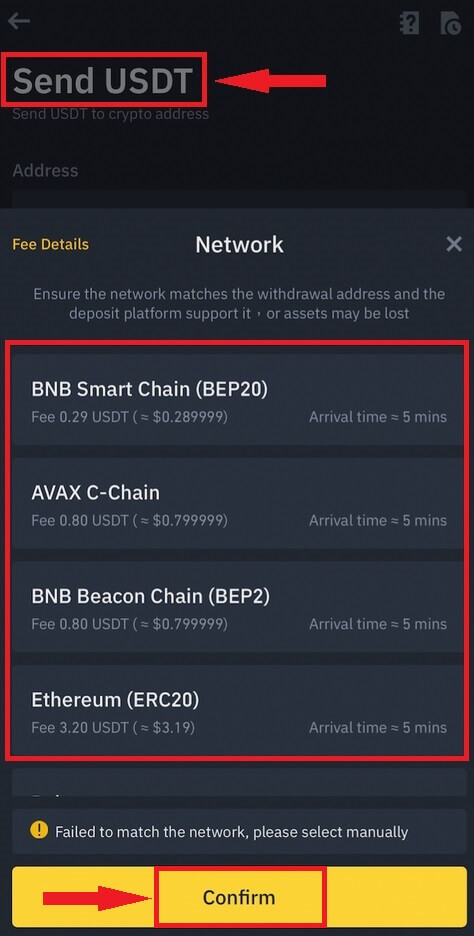
Before initiating a deposit, you make sure to identify the specific coin and network for the transfer.
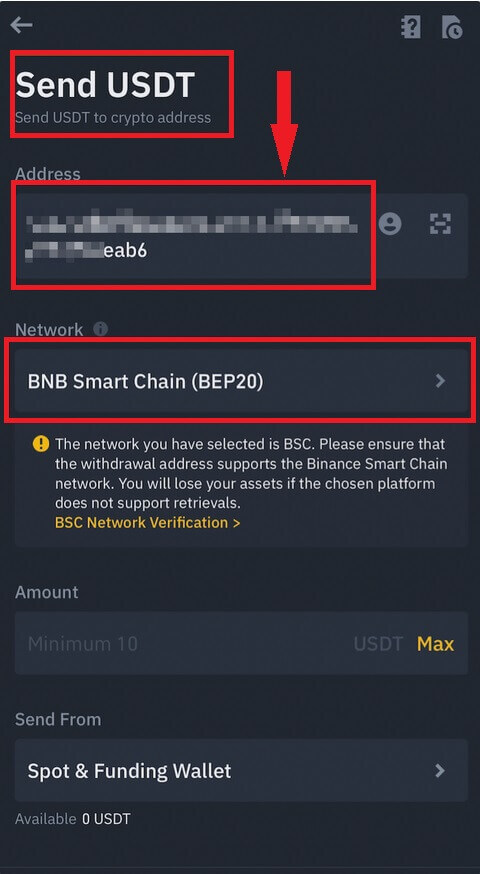
For instance, if you plan to withdraw USDT from an external exchange to your Pionex account, navigate to the external exchange’s withdrawal section, select "Withdraw," and choose USDT. Confirm the network that supports USDT withdrawals on the external exchange.
Here’s an illustrative example:
Select the corresponding token and network on the withdrawal platform for the withdrawal. (For instance, if you opt for BSC (BEP20) to withdraw USDT, select a BSC address for USDT.)
It is crucial to note that using the wrong network during a deposit may result in the potential loss of assets.
How to check the deposit address and memo
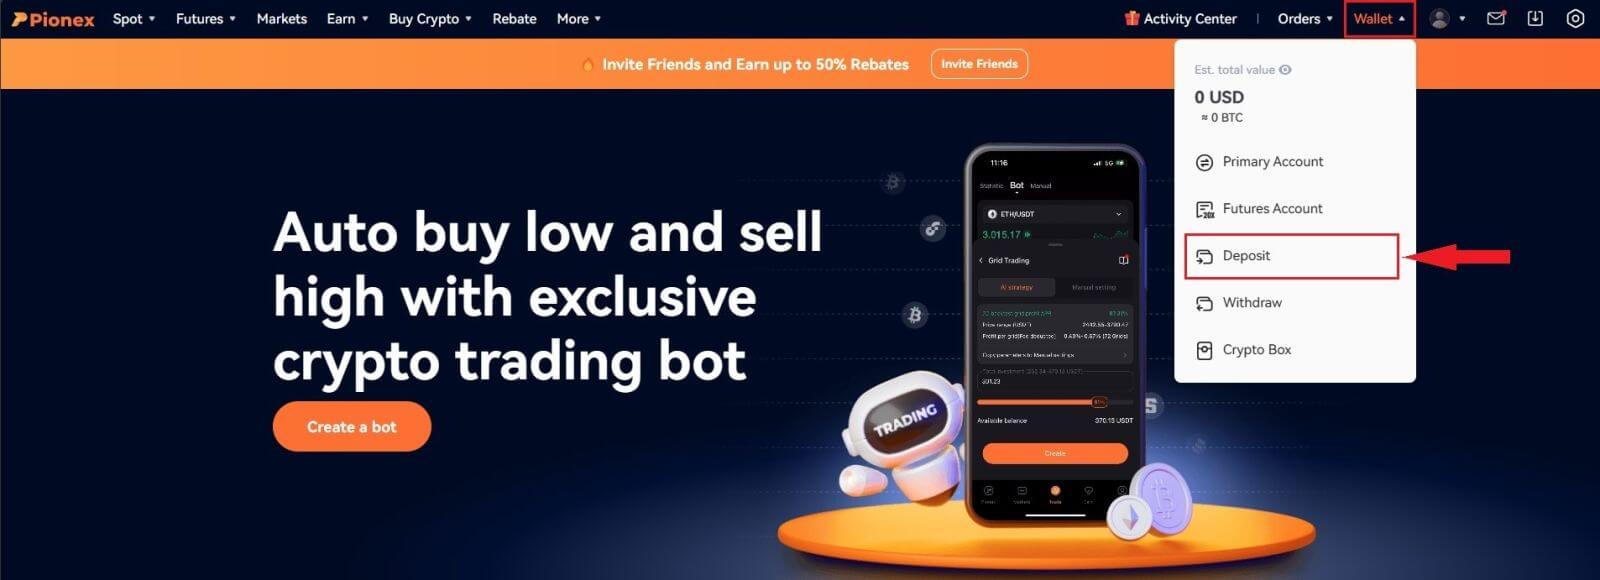
1. Sign in to the Pionex website and on the top-right of the home page, click [Wallet] -- [Deposit].
2. Choose the cryptocurrency and network for the deposit. Click to [Copy] the deposit address from your Pionex Wallet and [Paste] it into the address field on the platform from which you plan to withdraw cryptocurrency.

Important note: Some cryptocurrencies require the input of a memo/tag. If you encounter a memo/tag, provide all the required information for a successful deposit.
3. Upon confirming the withdrawal request, the transaction undergoes a confirmation process. The duration of this confirmation varies based on the blockchain and its current network traffic. Following the completion of the transfer process, the funds will be promptly credited to your Pionex account.
Caution:
- Loss of assets may occur if deposited on the wrong network.
- Withdrawal fees are imposed by the withdrawal exchange/wallet.
- Upon reaching specific confirmations on the blockchain, you will receive your assets. Refer to the cryptocurrency scan platform for details; for instance, check TRC20 transactions on TRONSCAN.
Deposit Crypto on Pionex (App)
Before initiating a deposit, you make sure to identify the specific coin and network for the transfer.
For instance, if you intend to withdraw USDT from an external exchange to your Pionex account, access the external exchange’s withdrawal section, select "Withdraw," and choose USDT. Verify the network that supports USDT withdrawals on the external exchange.
Here’s an illustrative example:
Select the corresponding token and network on the withdrawal platform for the withdrawal. (For instance, if you opt for BSC (BEP20) to withdraw USDT, select a BSC address for USDT.)
It is crucial to note that using the wrong network during a deposit may result in the potential loss of assets.

How to check the deposit address and memo
1. Access the Pionex app, navigate to the [Account] page, and tap on [Deposit].
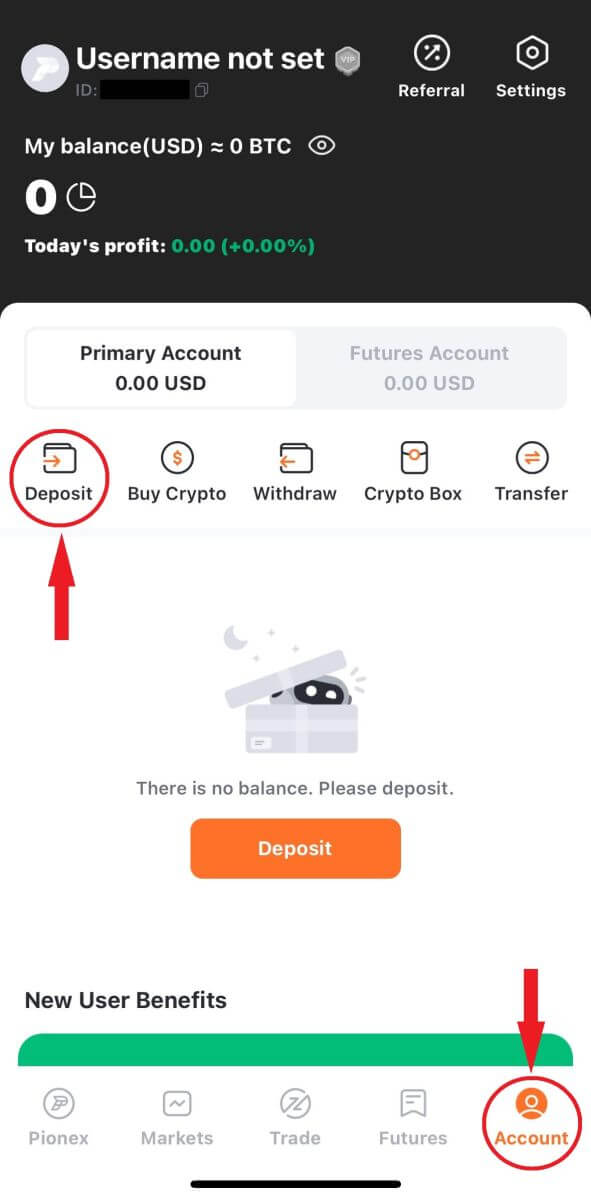
2. Choose the currency and network for the fund transfer. Tap [Copy] and [Paste] the address into the platform from which you wish to withdraw (alternatively, scan the QR code on the Pionex deposit page).
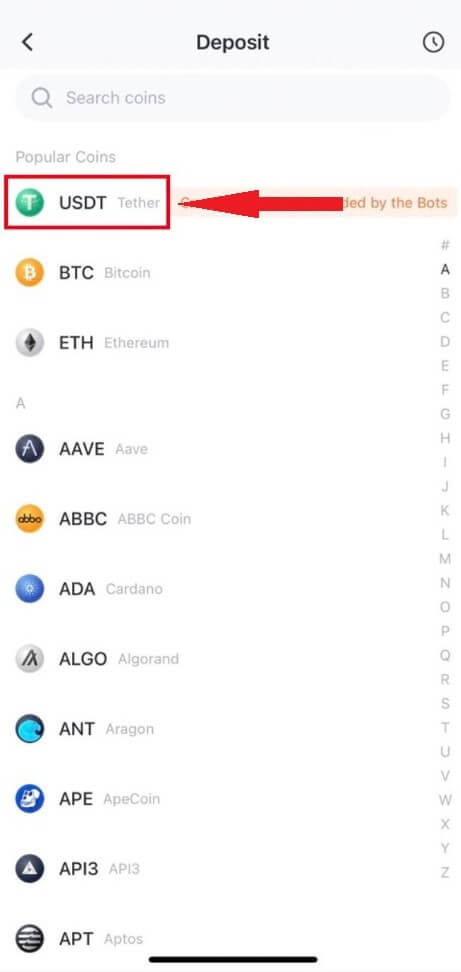
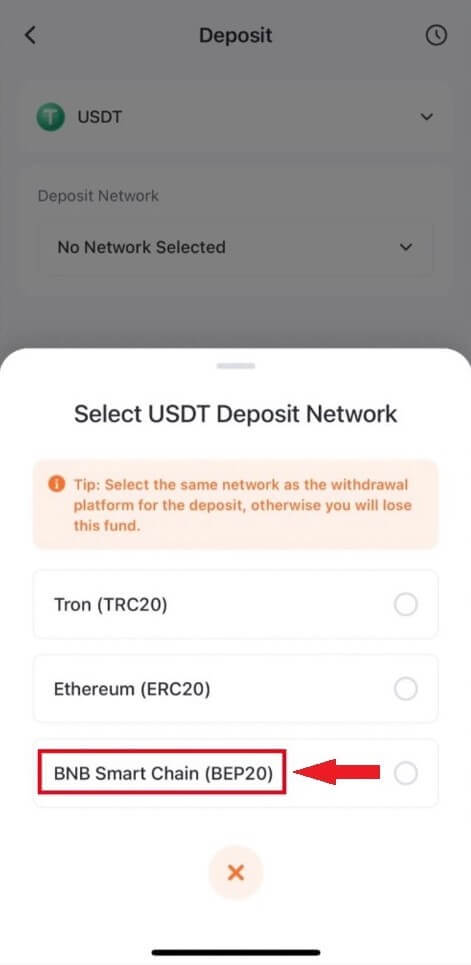
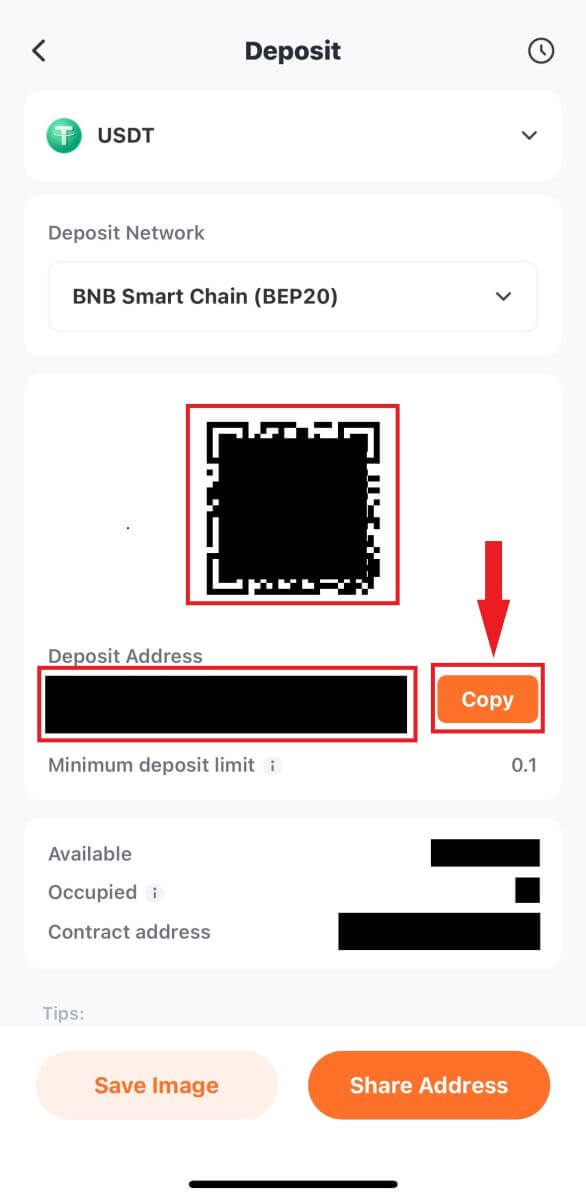

Important notice: Some cryptocurrencies require the input of a memo/tag. If you encounter a memo/tag, kindly provide the necessary information for a successful deposit.
3. Upon confirming the withdrawal request, the transaction undergoes a confirmation process. The duration of this confirmation varies based on the blockchain and its current network traffic. Following the completion of the transfer process, the funds will be promptly credited to your Pionex account.
Caution:
- Loss of assets may occur if deposited on the wrong network.
- Withdrawal fees are imposed by the withdrawal exchange/wallet.
- Upon reaching specific confirmations on the blockchain, you will receive your assets. Refer to the cryptocurrency scan platform for details; for instance, check TRC20 transactions on TRONSCAN.
How to Deposit Fiat Currency in Pionex
Pionex continually expands its roster of supported fiat currencies!
At Pionex, our commitment to constructing robust and scalable systems is unwavering. Consequently, each officially supported fiat currency is equipped to facilitate sizable wire transfers in and out with minimal fees.
Deposit EUR and Fiat Currencies via SEPA Bank Transfer
1. Sign in to your Pionex account and click [Buy Crypto] -- [Bank Transfer].
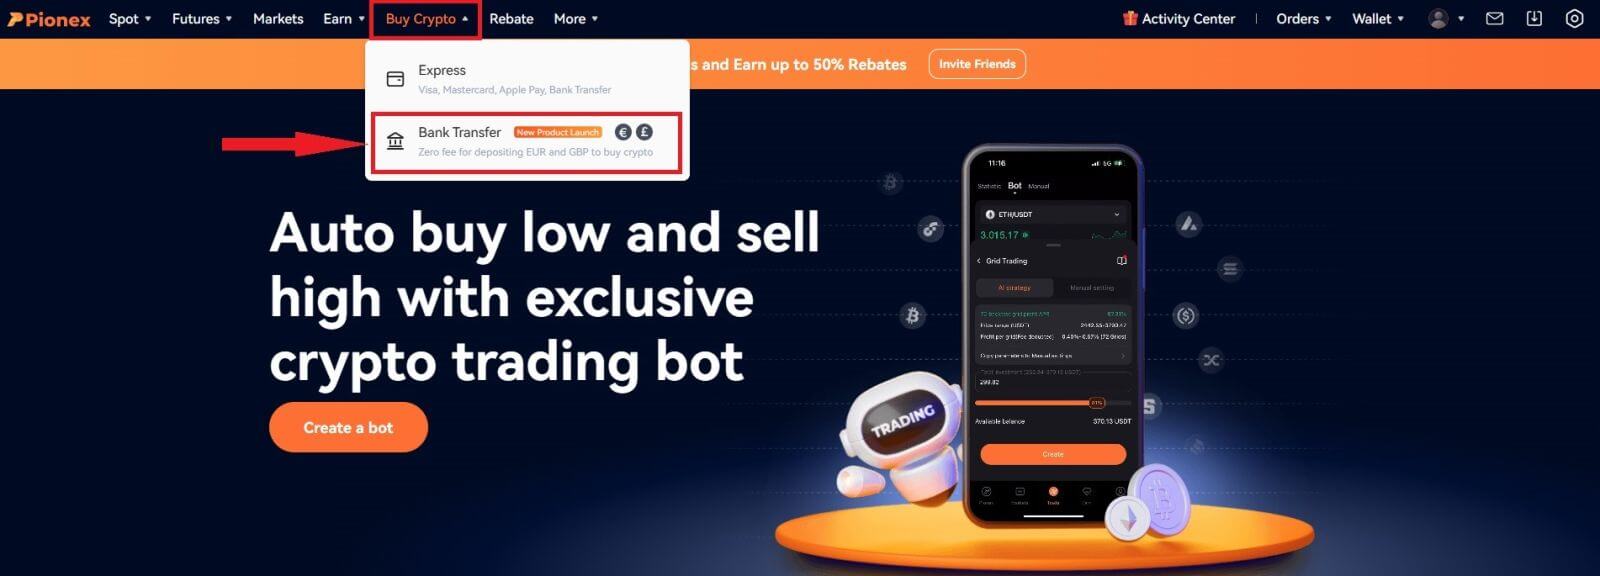
2. Select your preferred fiat currency; currently, you have the option to buy USDT using euros, pounds, or reals. Input the desired expenditure amount, select the channel, and click "Deposit".
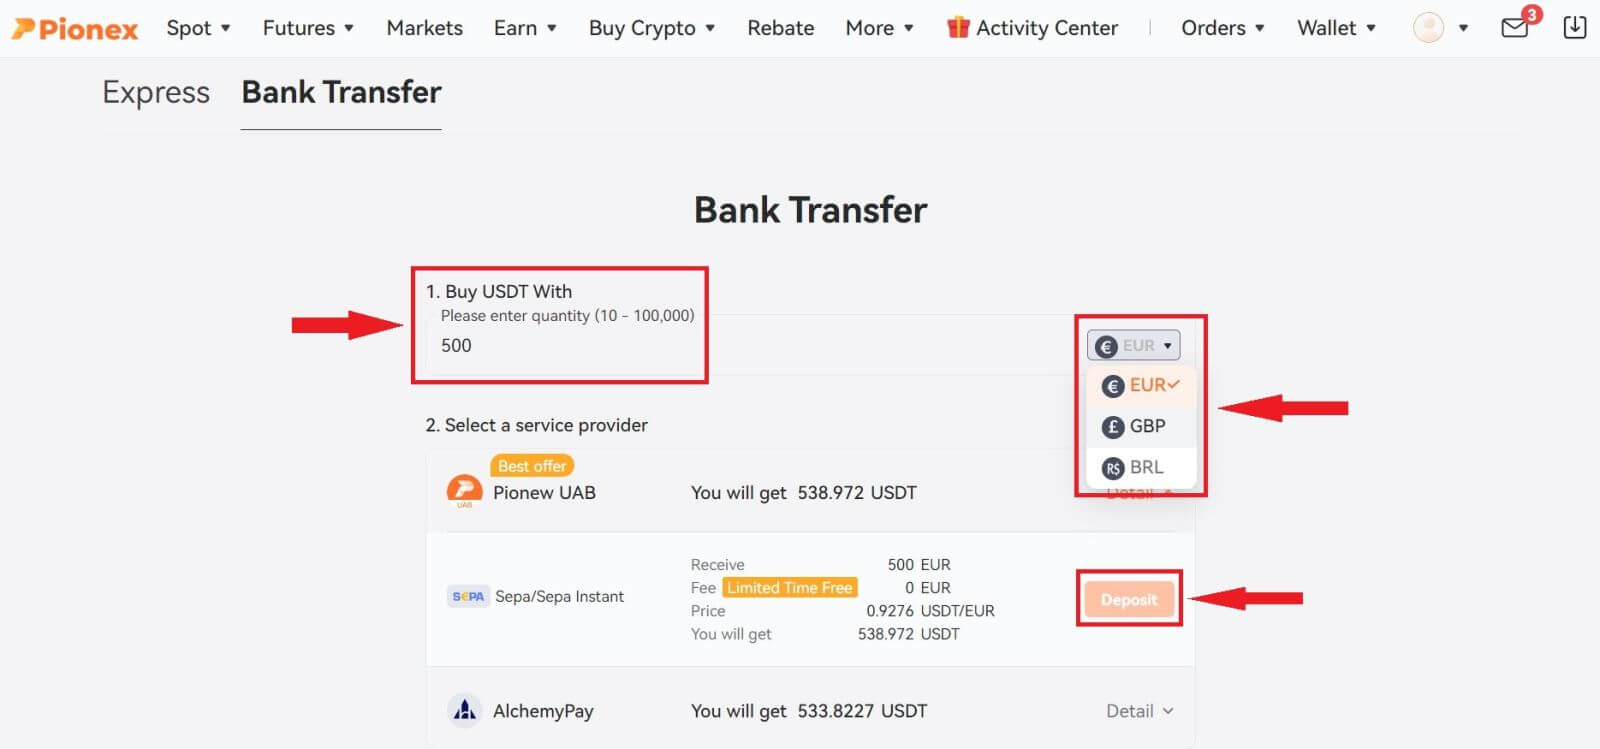
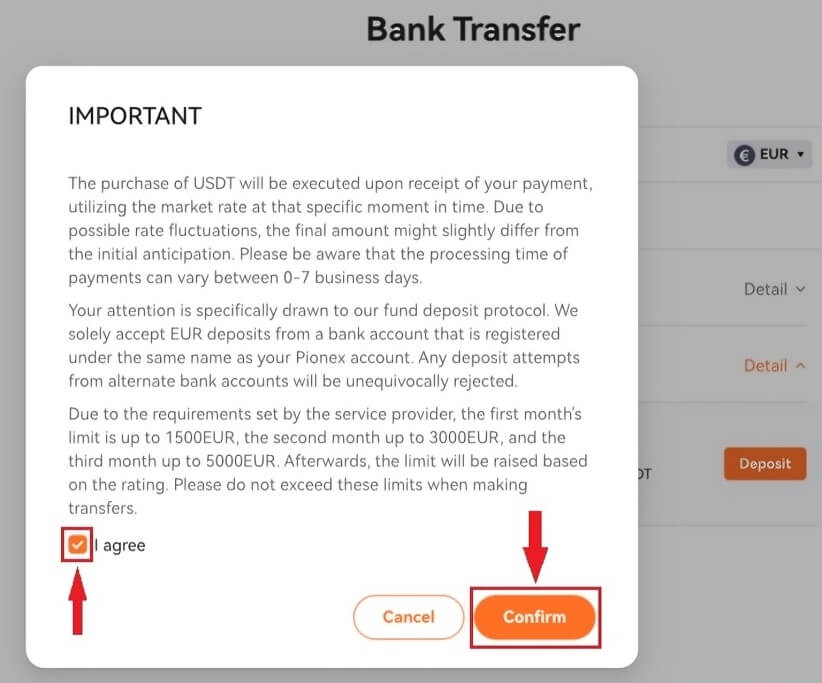
Important note:
- Before making a purchase, it is necessary to fulfill LV.2 KYC requirements. If you haven’t completed KYC verification, click the "Verify" button and follow the instructions. Once you’ve submitted the required KYC information, you can proceed with your purchase upon successful verification.
- If you haven’t provided an email address, kindly supplement this information. This step may be unnecessary if you’ve already provided your email during the Pionex registration process.
- Please agree to pertinent notifications and take note of the payment limit.
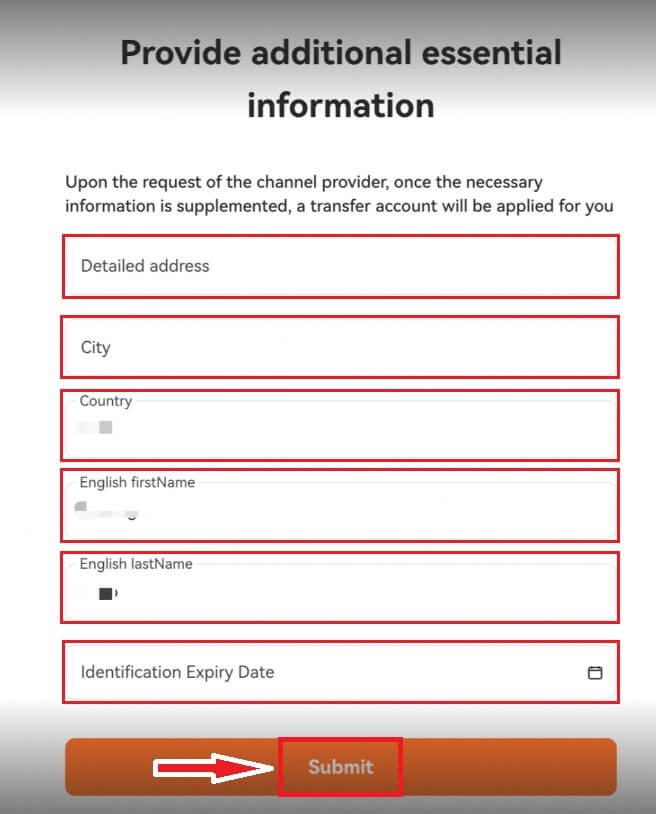
4. Provide additional essential information. At the request of the channel provider, once the required information is provided, a transfer account will be initiated for you. Complete the detailed address, city, and identification expiration date. Typically, the English name and country will be automatically filled based on your KYC. If not, you will need to provide this information. Once you’ve completed filling in the essential information, click "Submit".
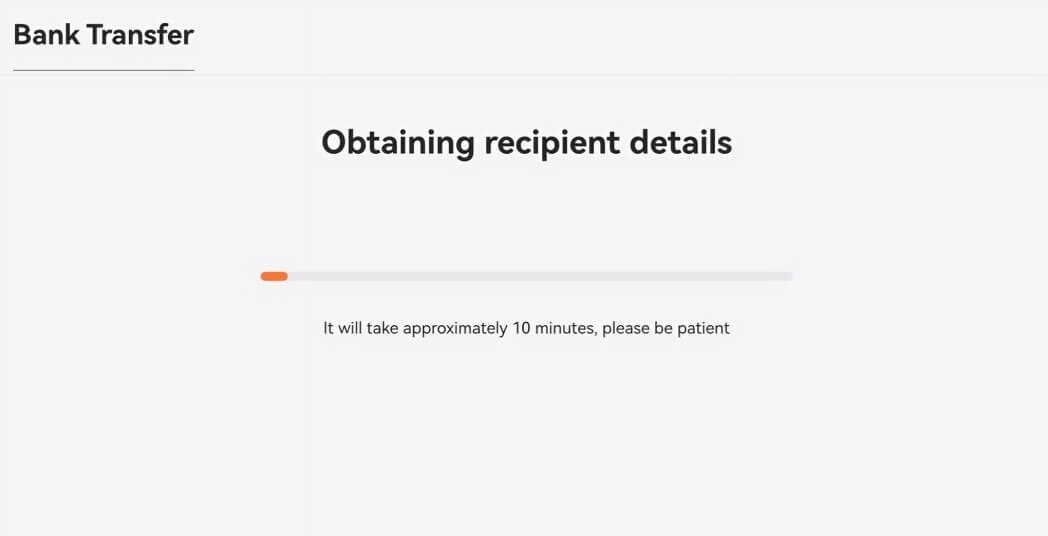
5. Awaiting account generation. This process is expected to take around 10 minutes. Your patience is appreciated.
6. Finalize the Bank Transfer. Check your Name Confirmation and Recipient Details then click "I have completed the transfer". Once you’ve successfully completed the preceding steps, you will receive unique transfer information from the bank. In the event of a timeout or failure, please reach out to our customer support for assistance.
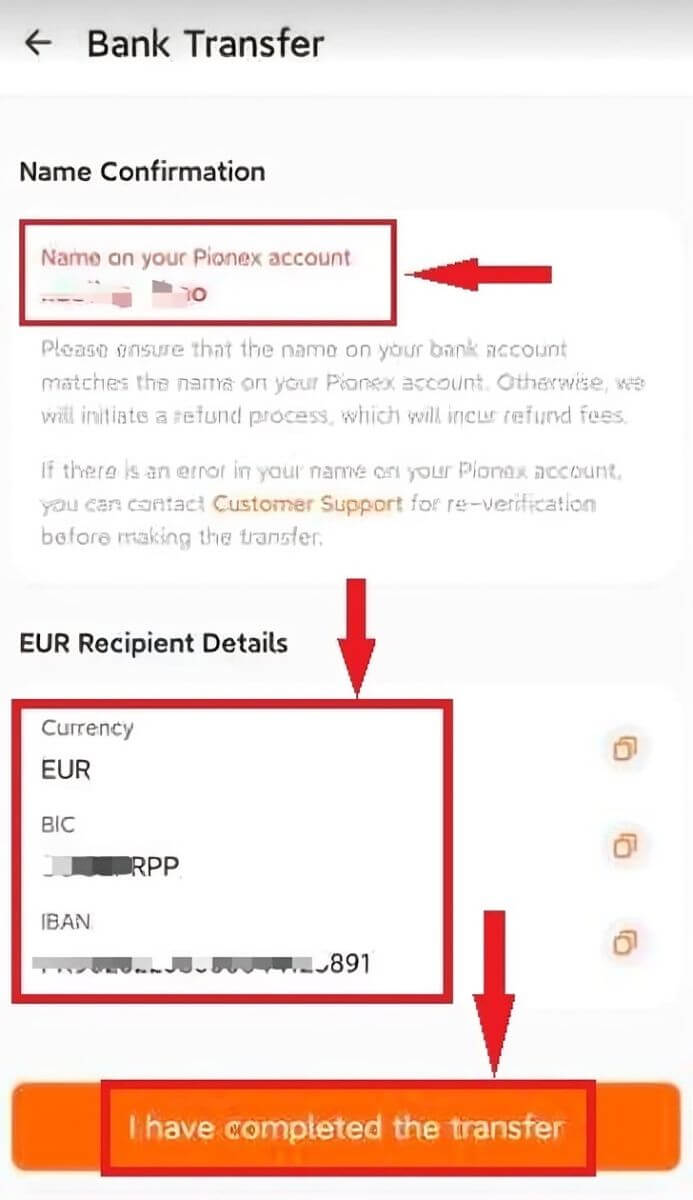
Upon receipt of your payment from the bank, we will promptly release your USDT. Please note that any unforeseen delays arising from your bank are beyond Pionex’s control. Take into account the transfer time, which may extend up to one business day. You can expect to receive your USDT within 0-3 business days. Additionally, we will notify you via email once your funds have been successfully processed.
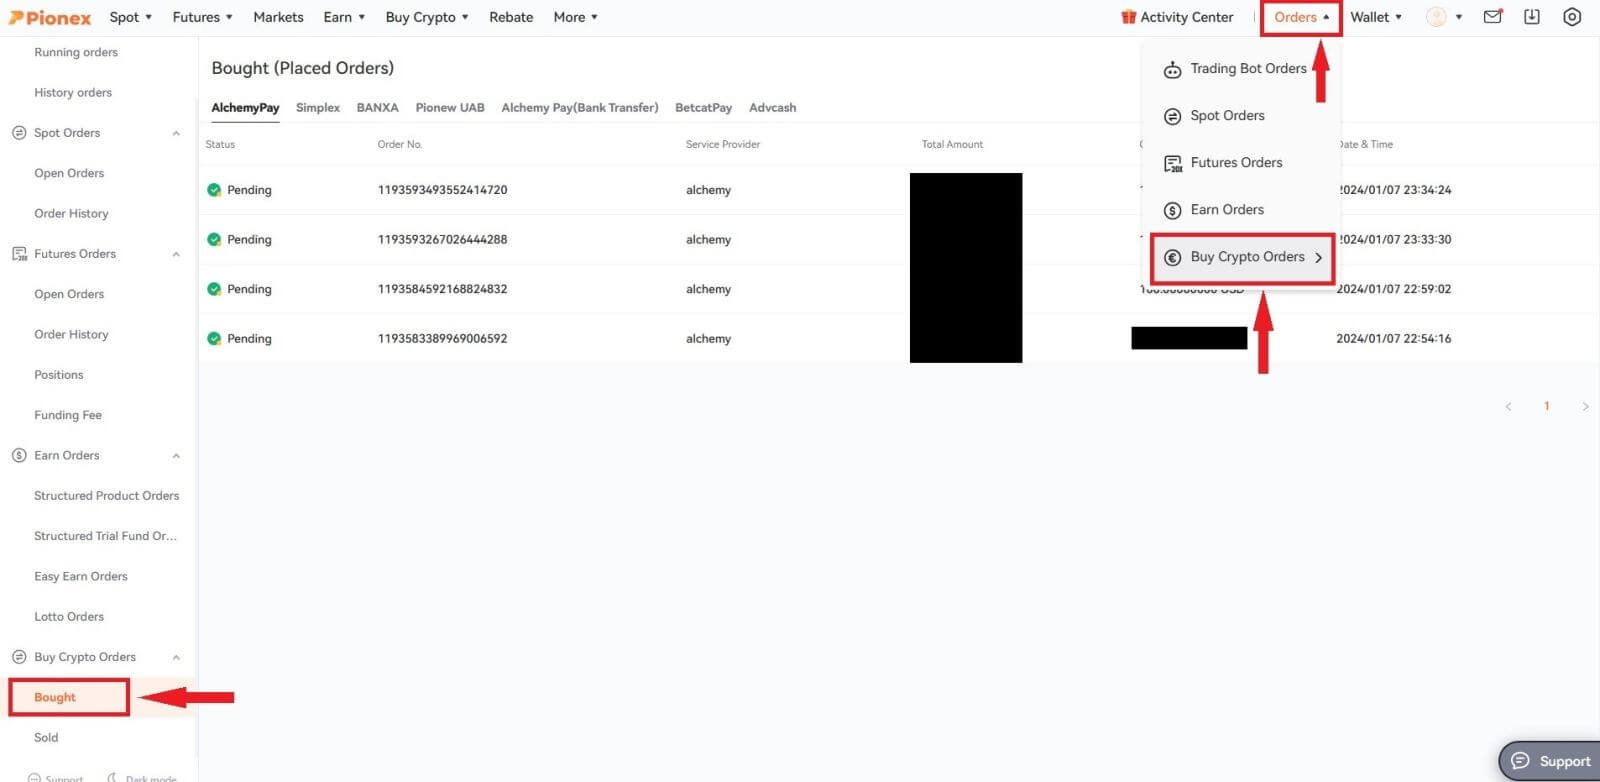
7. You can view your transfer details in the order history section by clicking [Orders] -- [Buy Crypto Orders] -- [Bought].
Buy Crypto via SEPA Bank Transfer (Euro Only)
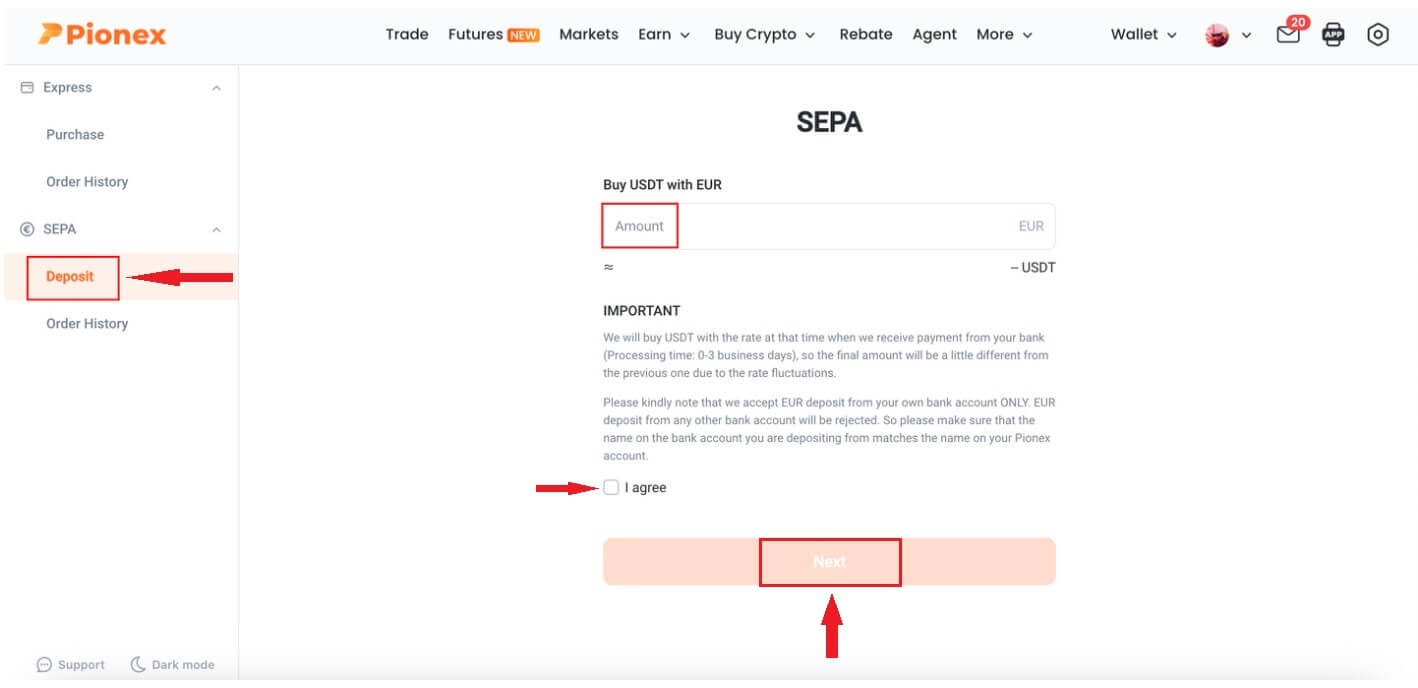
WebClick [Buy Crypto] -- [SEPA].
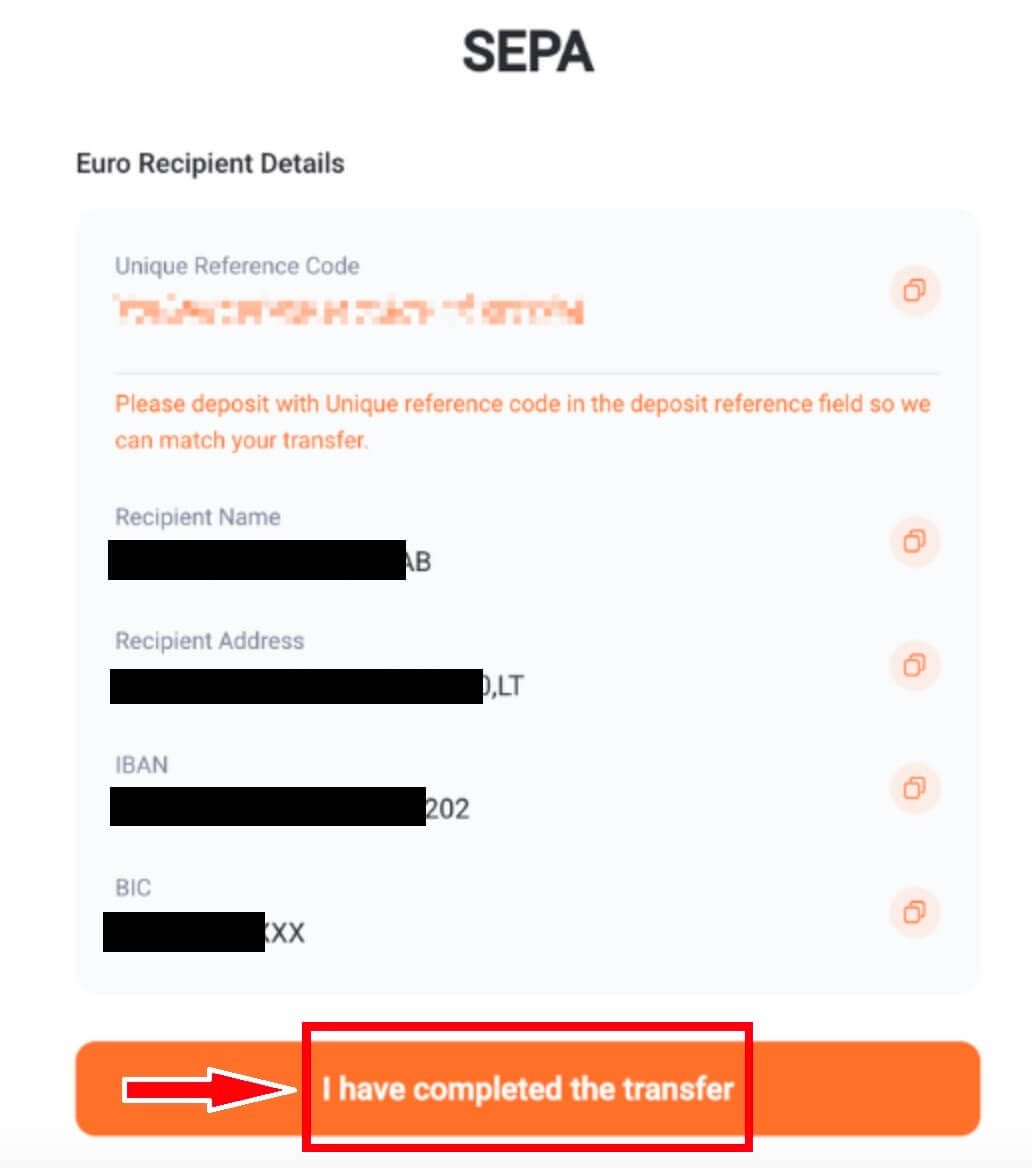
For European users, choose the deposit, input the quantity, and confirm by ticking "I agree". In the subsequent step, you will be presented with your unique reference code and the deposit details for AlchemyPay.
APP
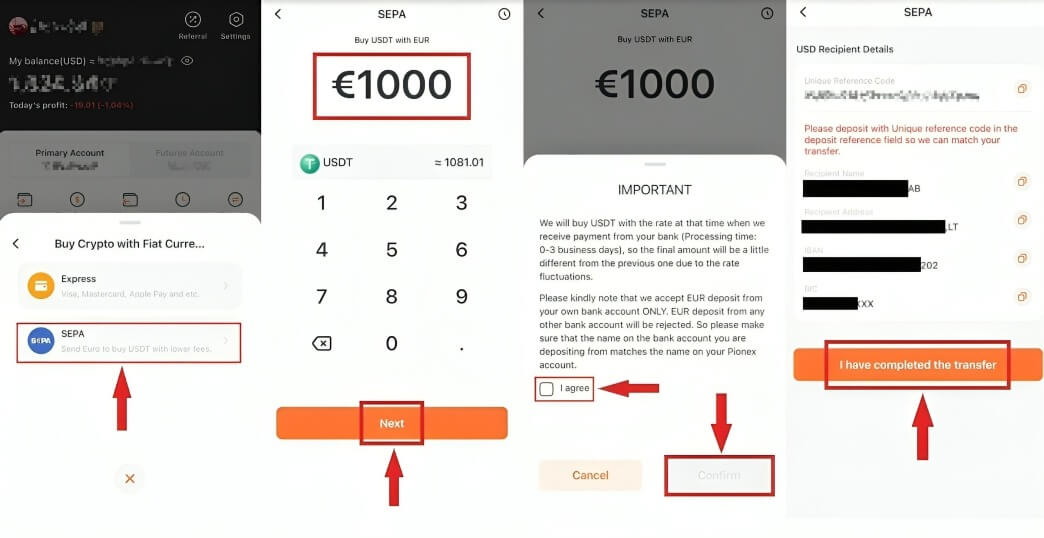
Tap [Account] -- [Deposit] -- [Fiat Deposit] -- [SEPA].
For European users, choose the deposit, input the quantity, and confirm by ticking "I agree". In the subsequent step, you will be presented with your unique reference code and the deposit details for AlchemyPay.
Steps for purchasing:
- Enter the desired amount for the SEPA transaction. Once you’ve reviewed the precautions, confirm by ticking "I agree".
- On the following page, you will find the unique reference code for your Pionex account. Ensure that you input the correct reference code during the bank transfer.
- After completing the transaction, kindly allow 0-7 business days for the cryptocurrency to be deposited into your Pionex account. If you haven’t received the deposit after 7 business days, please reach out to our Live chat, and our service agents will assist you.
- To review the historical records of SEPA transactions, you can access them in the "Order History" section.
How to Trade Cryptocurrency on Pionex
Upon acquiring your initial cryptocurrency, you can embark on exploring our diverse range of trading products. Within the market, you have the opportunity to trade hundreds of cryptocurrencies.
Trade Spot on Pionex (Web)
A spot trade involves a straightforward transaction between a buyer and a seller, executed at the prevailing market rate, commonly referred to as the spot price. This transaction occurs instantly upon the fulfillment of the order.
Users have the option to prearrange spot trades, activating them when a particular, more favorable spot price is achieved, a scenario known as a limit order. On Pionex, you can execute spot trades conveniently using our trading page interface.
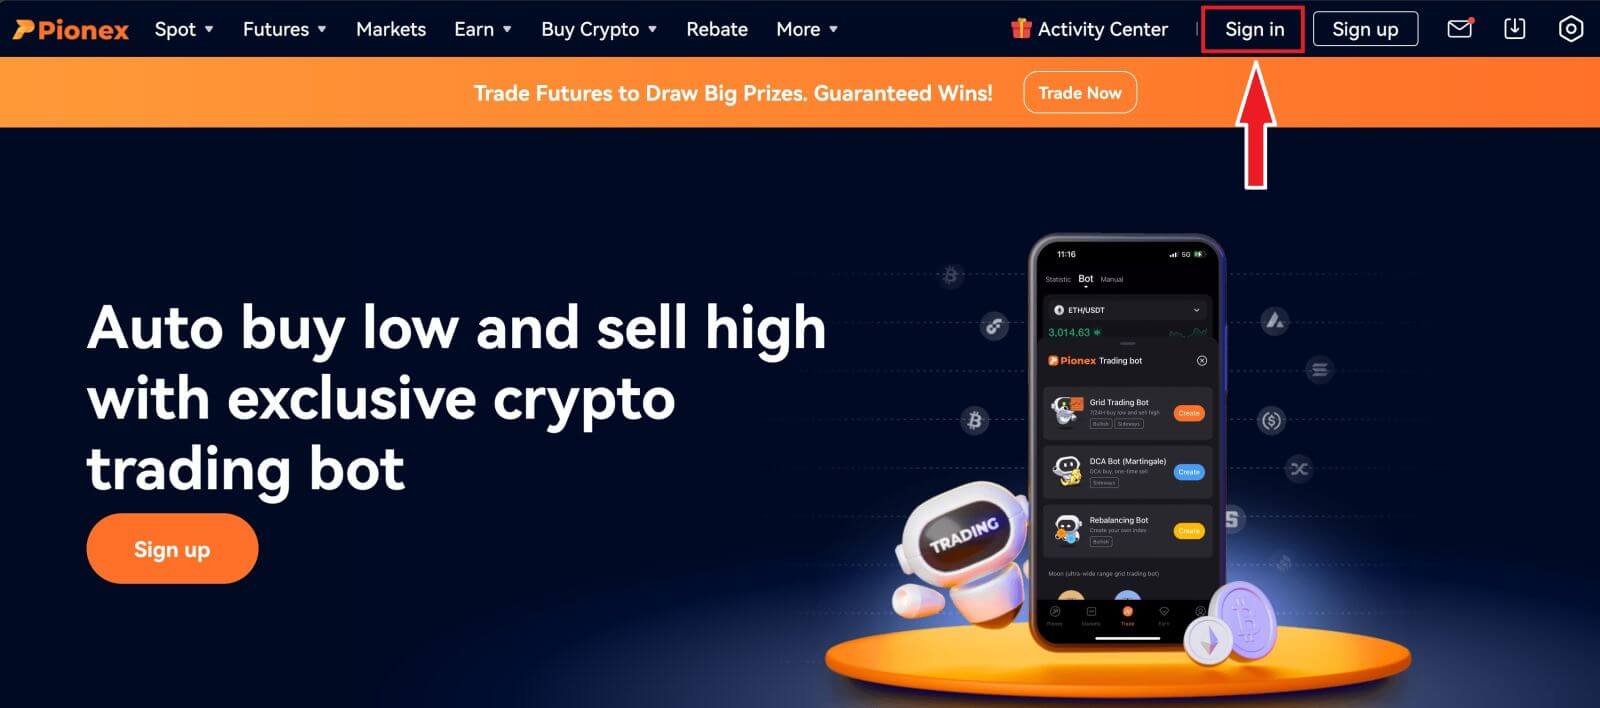
1. Visit our Pionex website, and click on [Sign in] at the top right of the page to log into your Pionex account.
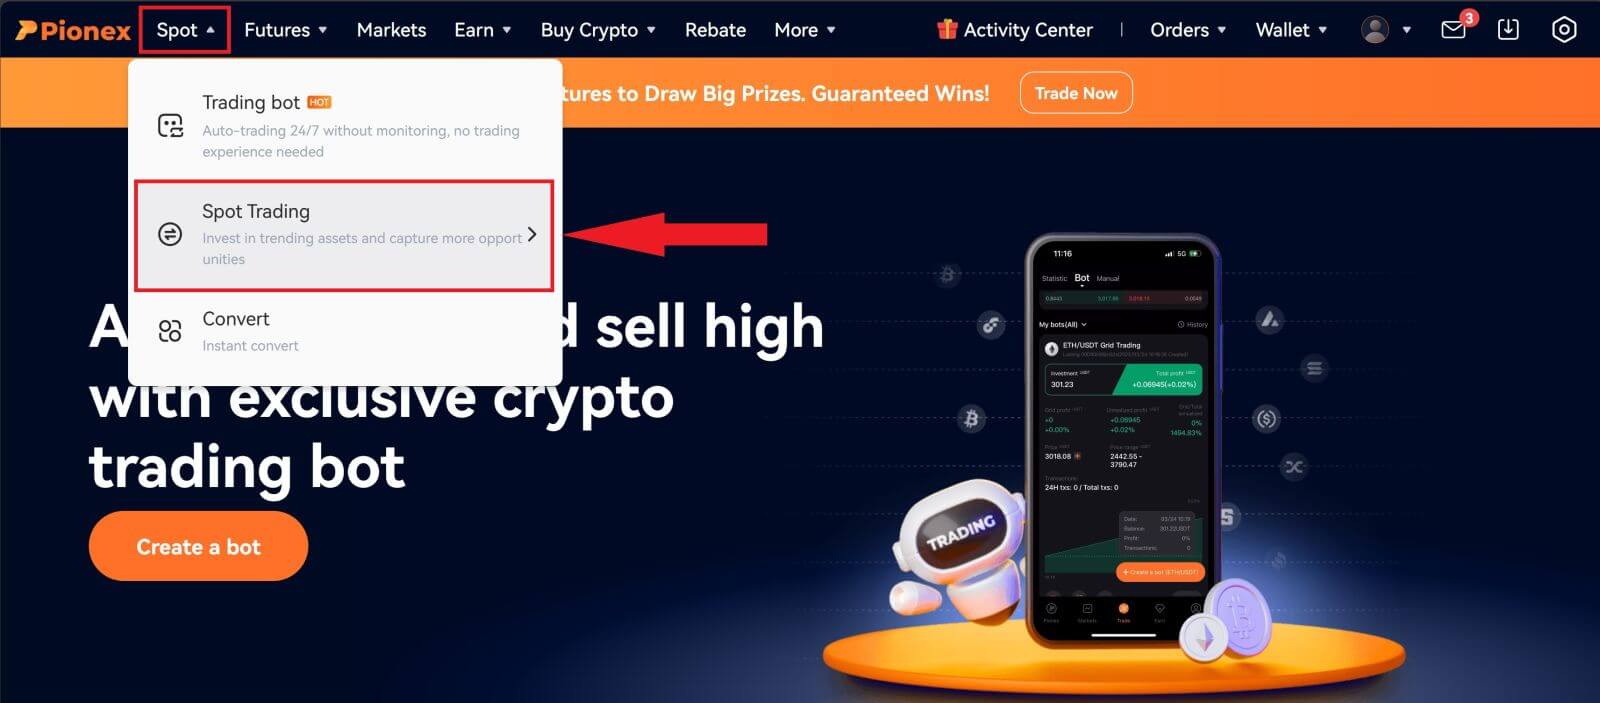
2. Navigate directly to the spot trading page by clicking on "Spot Trading" from the home page.
3. You are now on the trading page interface.
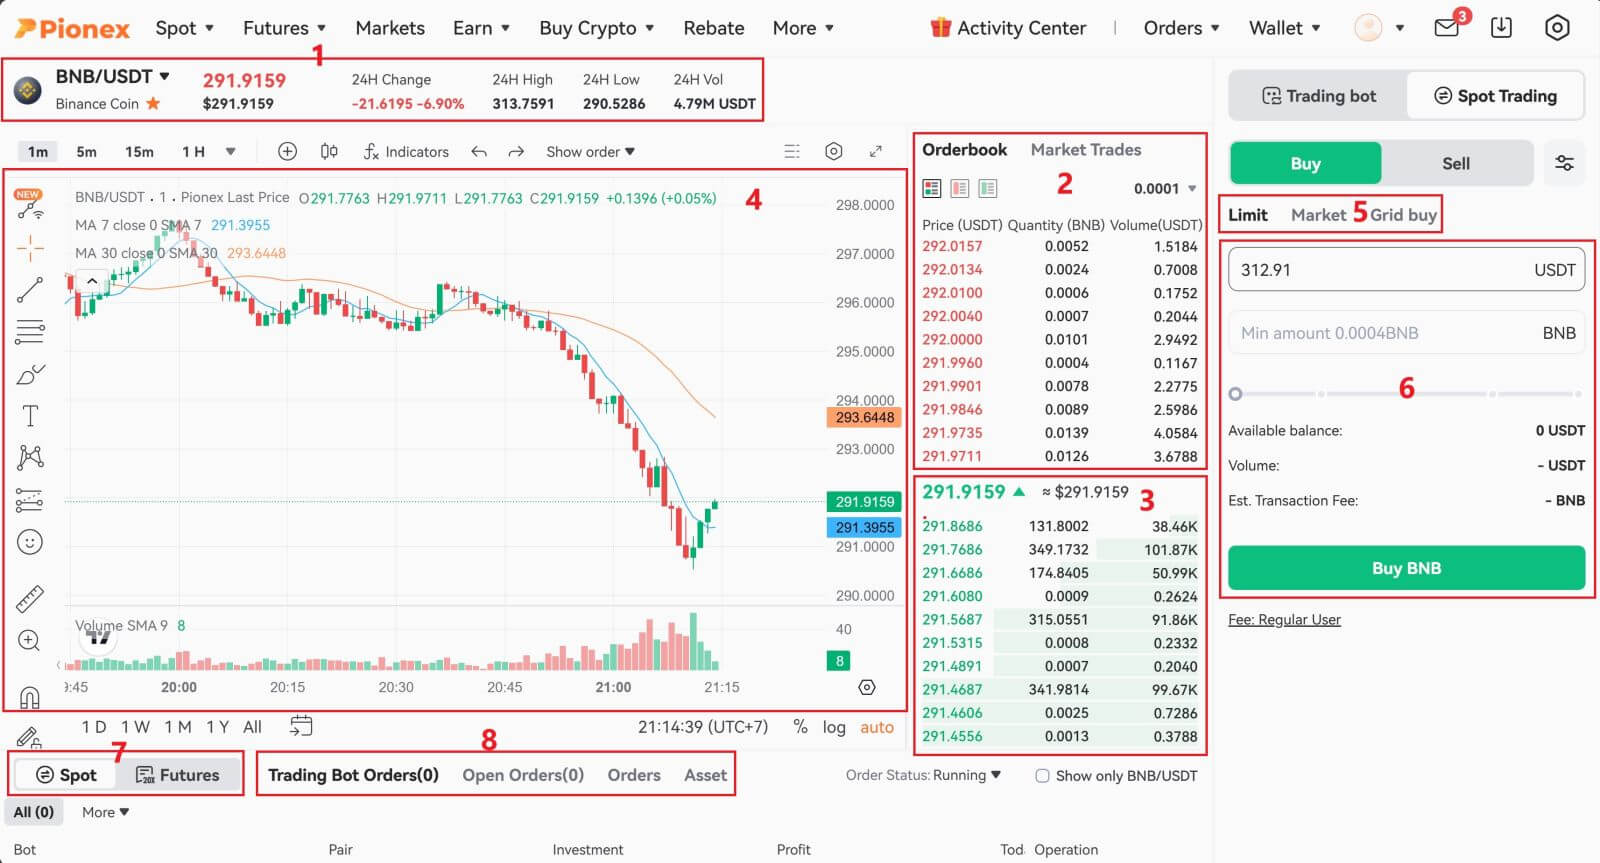
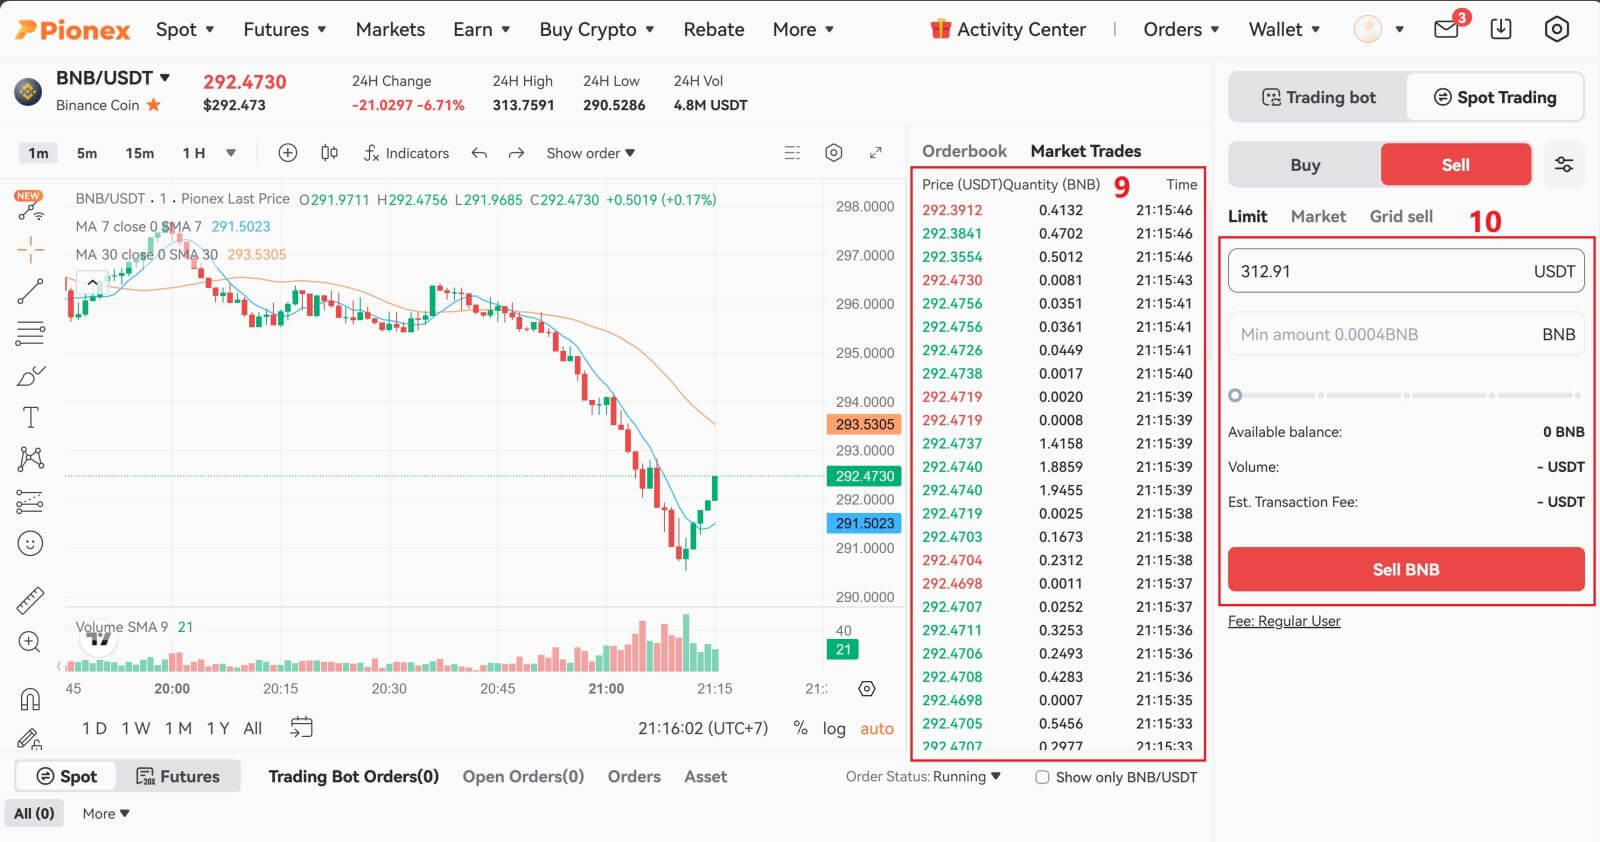
- Trading volume of trading pair in 24 hours
- Sell order book
- Buy order book
- Candlestick Chart and Market Depth
- Type of order: Limit/Market/Grid
- Buy Cryptocurrency
- Trading Type: Spot/ Futures Margin
- Trading bot orders and Open orders
- Market’s latest completed transaction
- Sell Cryptocurrency
4. Consider the following steps for purchasing BNB on Pionex: Navigate to the top left corner of the Pionex home page and select the [Trade] option.
Choose BNB/USDT as your trading pair and input the desired price and amount for your order. Finally, click on [Buy BNB] to execute the transaction.
You can follow the same steps to sell BNB.
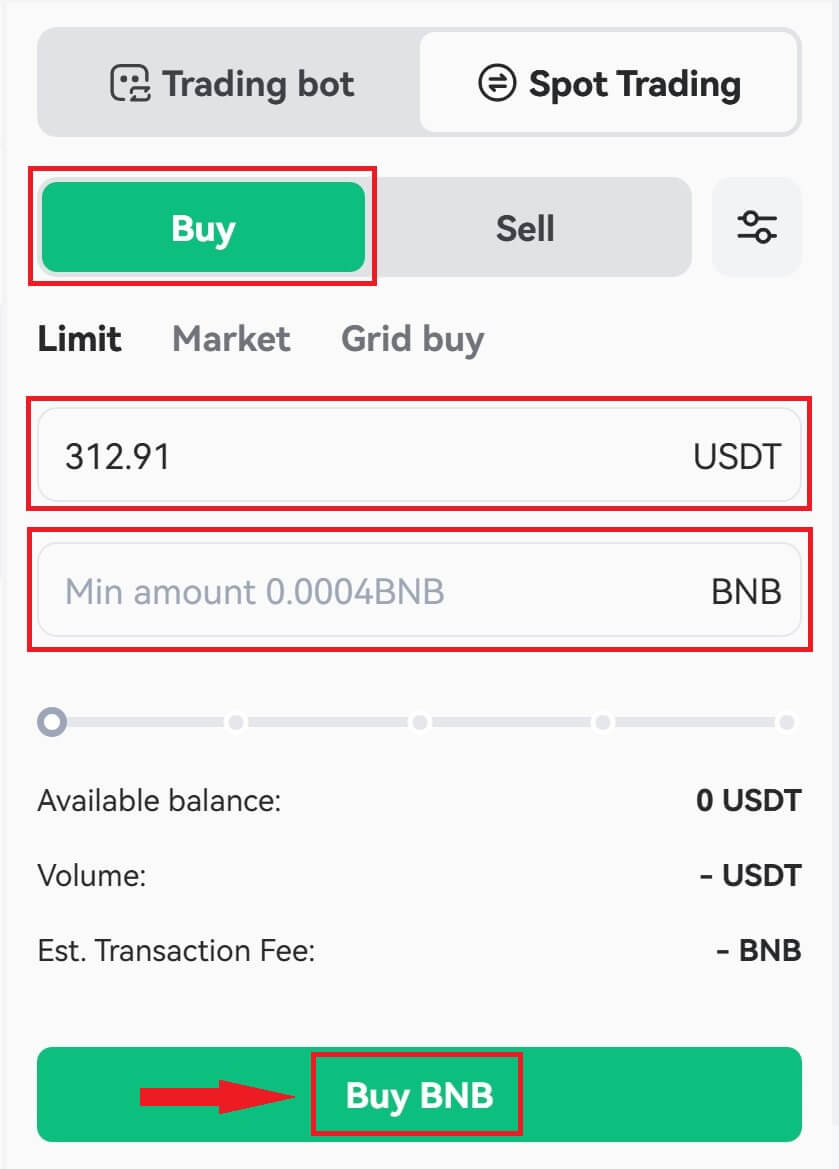
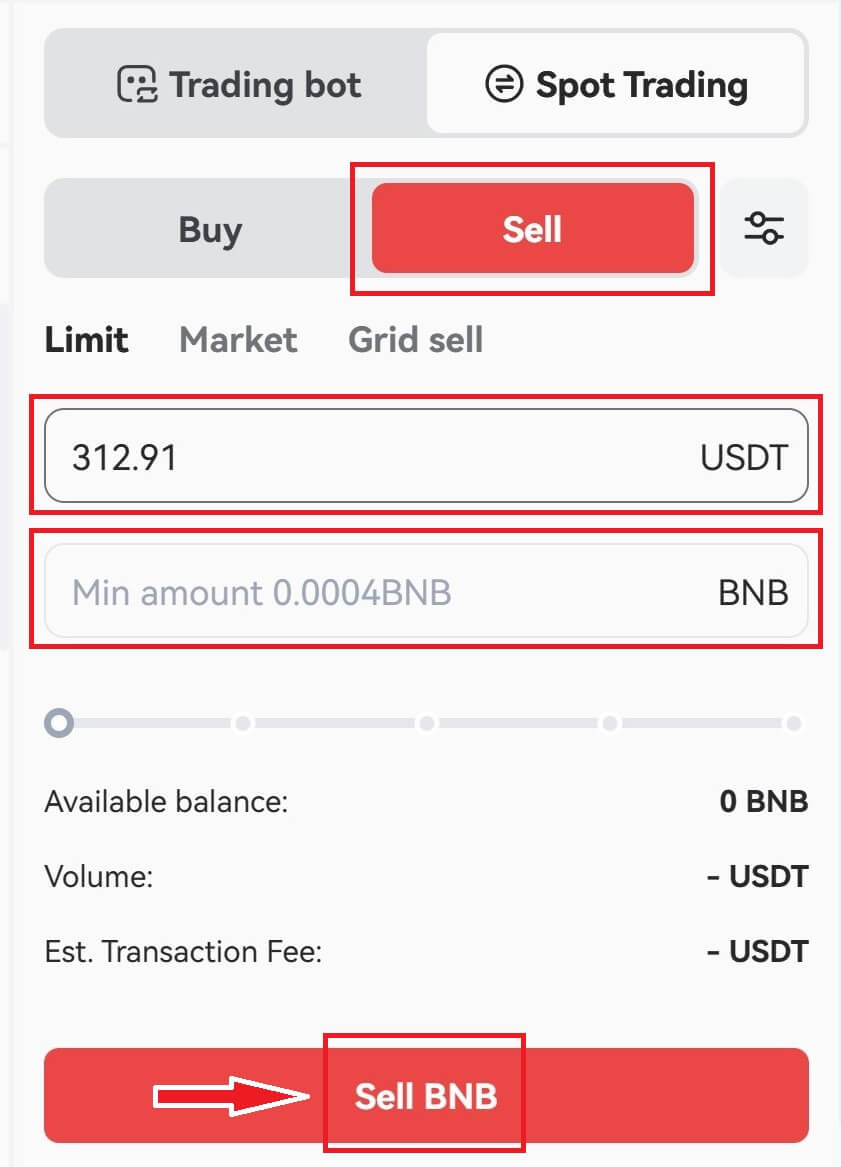
- The default order type is a limit order. To execute an order promptly, traders have the option to switch to a [Market] Order. Opting for a market order allows users to instantly trade at the prevailing market price.
- If the current market price for BNB/USDT is 312.91, but you prefer to purchase at a specific price, such as 310, you can utilize a [Limit] order. Your order will be executed once the market price reaches your designated price point.
- The percentages displayed within the BNB [Amount] field indicate the proportion of your available USDT holdings that you want to allocate for trading BNB. Adjust the slider to modify the desired amount accordingly.
Trade Spot on Pionex (App)
1. Log in to the Pionex App, and click on [Trade] to go to the spot trading page.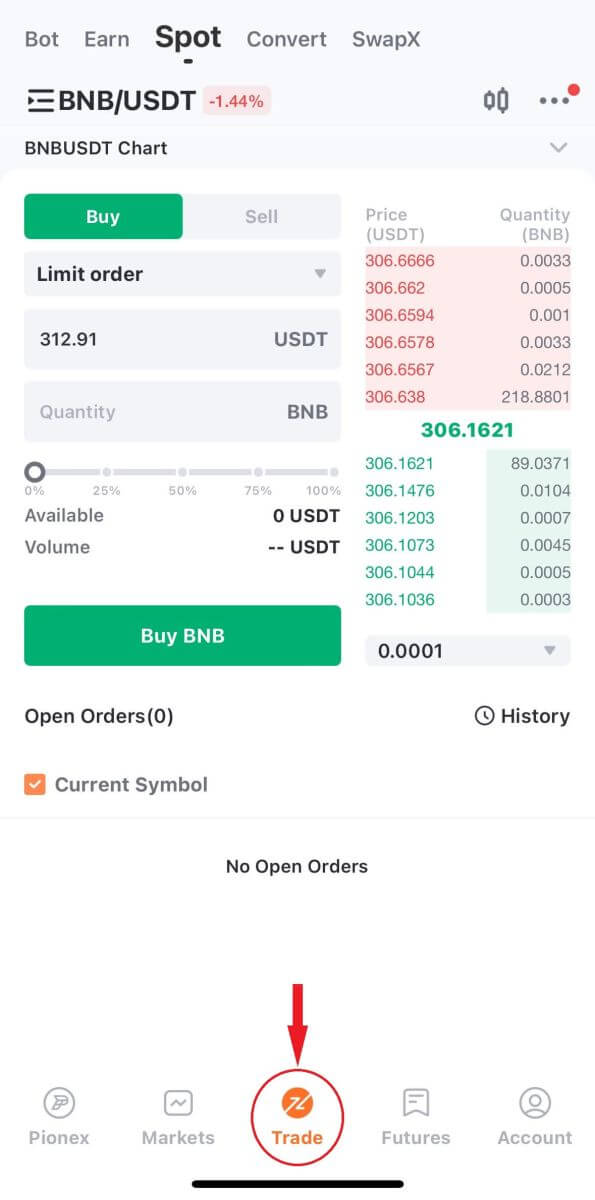
2. Here is the trading page interface.
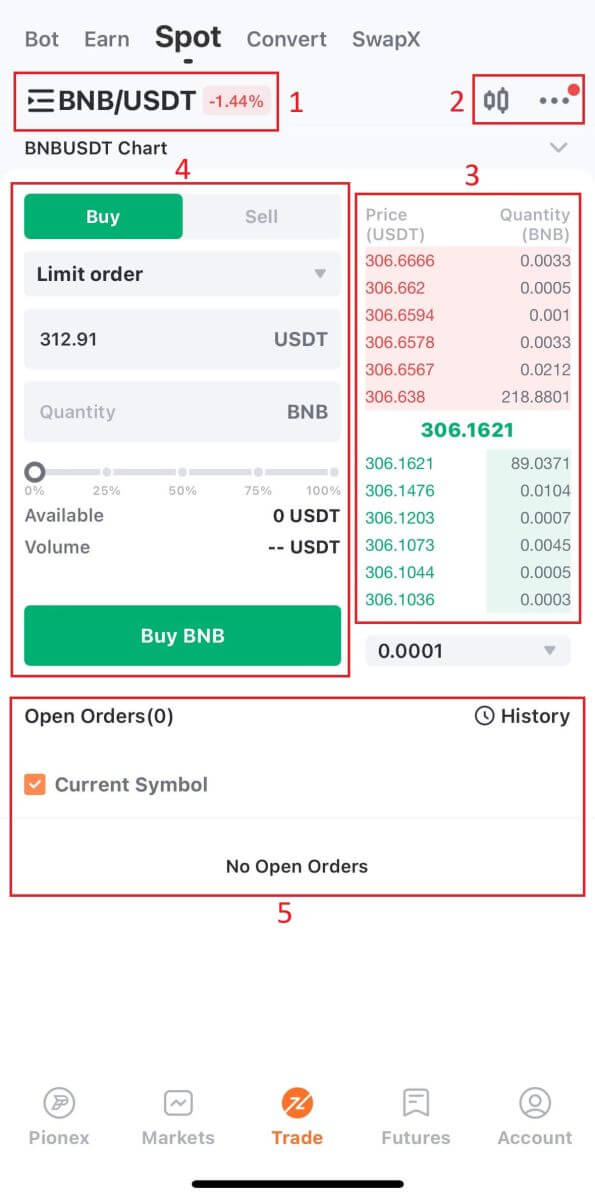
1. Market and Trading pairs.
2. Real-time market candlestick chart and Tutorial
3. Buy/Sell order book.
4. Buy/Sell Cryptocurrency.
5. Open orders and History
As an example, we will make a "Limit order" trade to buy BNB
(1). Enter the spot price at which you want to purchase your BNB to activate the limit order. We have configured this value at 312.91 USDT per BNB.
(2). Enter the desired amount of BNB you intend to purchase in the [Amount] field. Alternatively, utilize the percentages below to specify the portion of your available USDT you wish to allocate for buying BNB.
(3). Upon reaching a market price of 312.91 USDT for BNB, the limit order will be activated and finalized. Subsequently, 1 BNB will be transferred to your spot wallet.
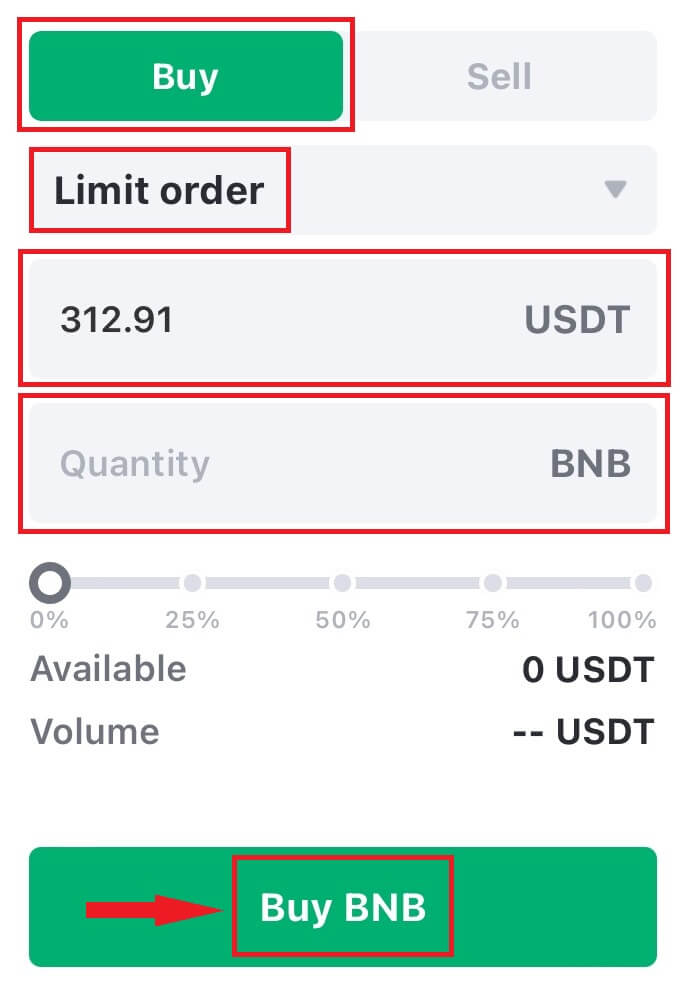
To sell BNB or any other preferred cryptocurrency, simply follow the same steps by choosing the [Sell] tab.
Note:
- The default order type is a limit order. If traders wish to execute an order promptly, they can switch to a [Market] Order. Opting for a market order enables users to trade instantly at the prevailing market price.
- If the market price of BNB/USDT is 312.91, but you desire to purchase at a specific price, such as 310, you can place a [Limit] order. Your order will be executed once the market price reaches the specified amount.
- The percentages displayed below the BNB [Amount] field indicate the percentage of your held USDT that you intend to trade for BNB. Adjust the slider to modify the desired amount.
What is the Stop-Limit Function and How to use it
What is a stop-limit order?
The Stop Limit bot allows you to predefine a trigger price, order price, and order quantity. Once the latest price reaches the trigger price, the bot automatically executes the order at the preset order price.For instance, suppose the current BTC price is 2990 USDT, with 3000 USDT being a resistance level. Anticipating a potential price increase beyond this level, you can set up the Stop Limit bot to buy more when the price hits 3000 USDT. This strategy is particularly useful when you cannot monitor the market continuously, providing an automated way to implement your trading ideas.
How to create a stop-limit order
Kindly visit pionex.com, log in to your account, click "Trading bot" and proceed to select the "Stop Limit" bot located on the right side of the page.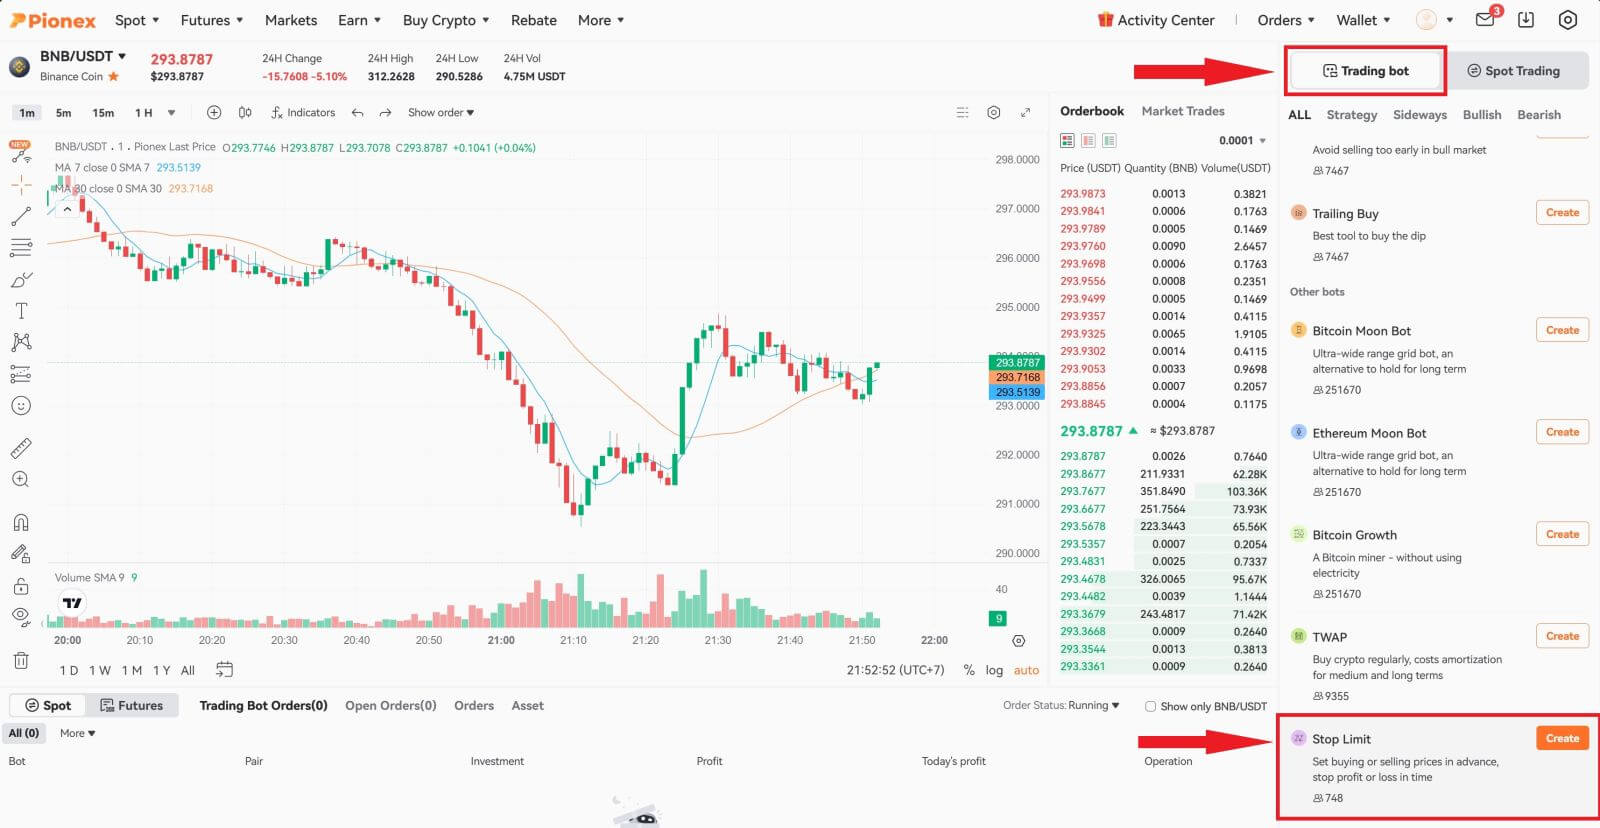
Once you locate the "Stop Limit" bot, click on the "CREATE" button to access the parameter setting page.
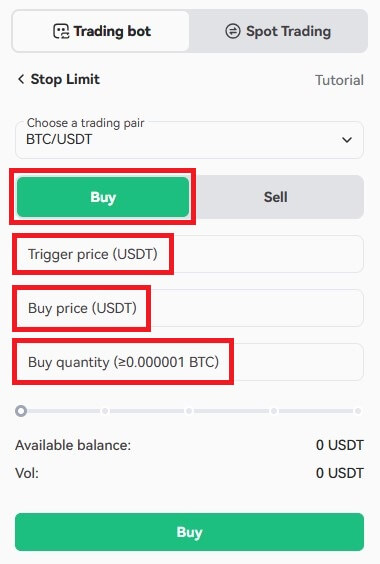
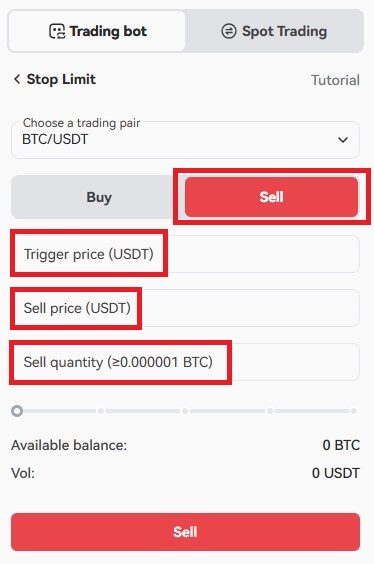
- Trigger Price: Once the "latest price" aligns with the user-set "trigger price", the trigger is activated, and the order is initiated.
- Buy/Sell Price: Following the trigger, the order is executed at the designated commission price.
- Buy/Sell Quantity: Specifies the quantity of orders placed post-trigger.
For example:
“Stop Limit(Sell)” Use Cases
Using BTC/USDT as an example: suppose you’ve purchased 10 BTC at 3000 USDT, with the current price hovering around 2950 USDT, considered as the support level. If the price falls below this support level, there’s a risk of further decline, necessitating a timely implementation of a stop-loss strategy. In such a scenario, you can proactively set an order to sell 10 BTC when the price reaches 2900 USDT to mitigate potential losses.
“Stop Limit(Buy)” Use Cases
Using BTC/USDT as an example: presently, the BTC price stands at 3000 USDT, with an identified resistance level near 3100 USDT according to indicator analysis. Should the price successfully surpass this resistance level, there is a potential for further upward movement. In anticipation of this, you can place an order to purchase 10 BTC when the price reaches 3110 USDT to capitalize on the potential rise.
How to Withdraw Crypto from Pionex
Interested in withdrawing from your trading accounts? This article will guide you through the process. Ensure you have a personal wallet ready for the withdrawal.
Withdraw Crypto on Pionex (Web)
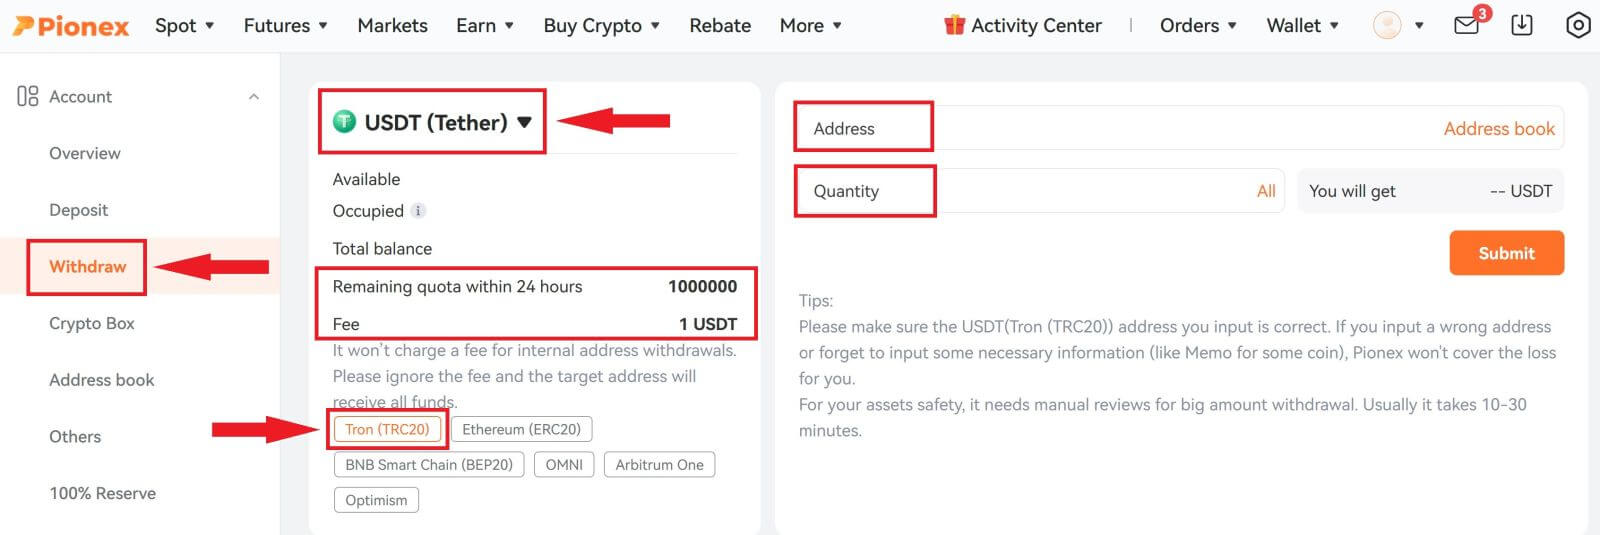
Navigate to the Pionex homepage, go to the [Wallet] section and then click on [Withdraw]. 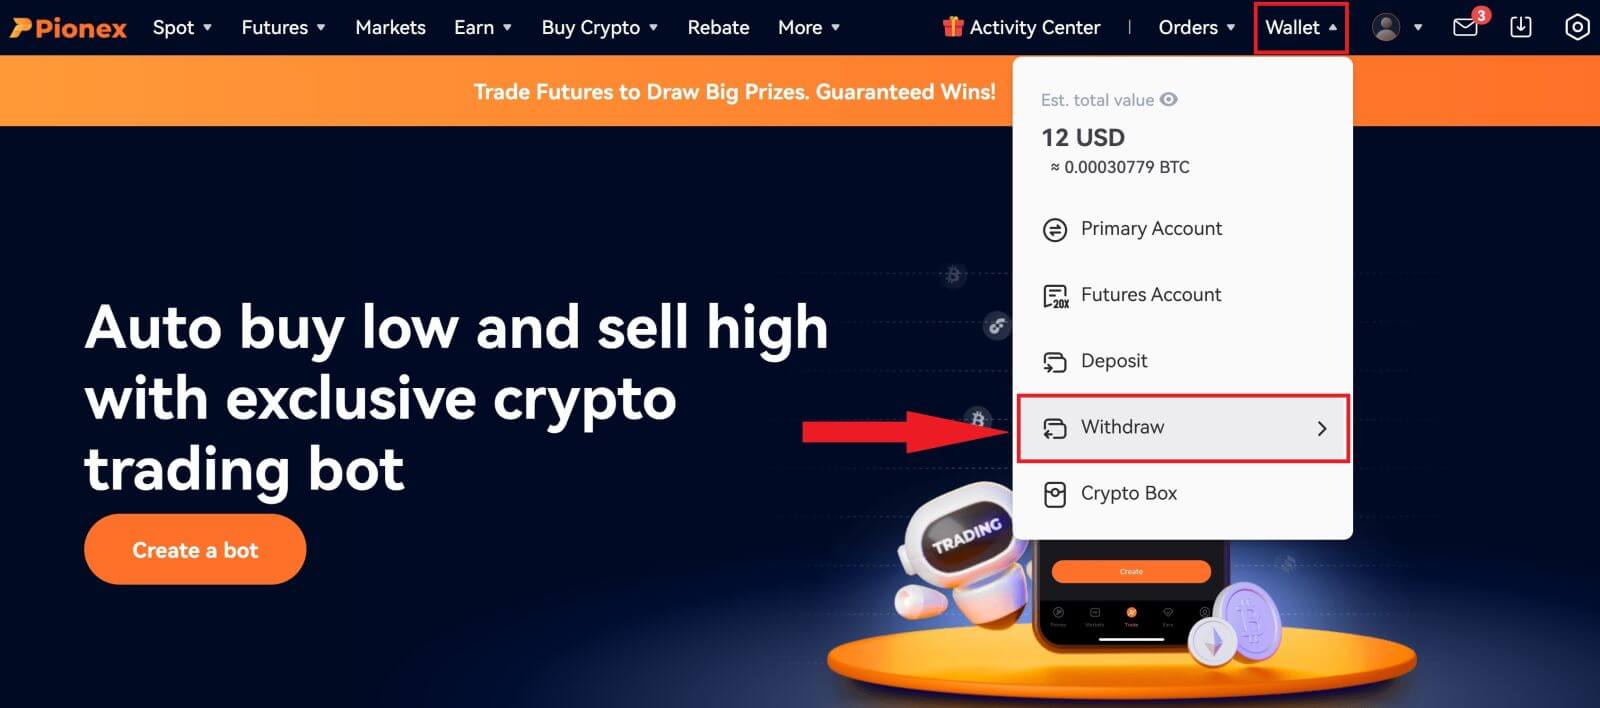
Choose the desired cryptocurrency for withdrawal, and ensure that the selected blockchain (network) is supported by both Pionex and the external exchange or wallet, input the address and amount for withdrawal. Additionally, the page provides information on the remaining quota within 24 hours and the associated withdrawal fee. Double-check this information before proceeding with the withdrawal.
Following that, you should choose the identical cryptocurrency and network on the external exchange or wallet. Obtain the corresponding deposit address associated with the selected cryptocurrency and network.
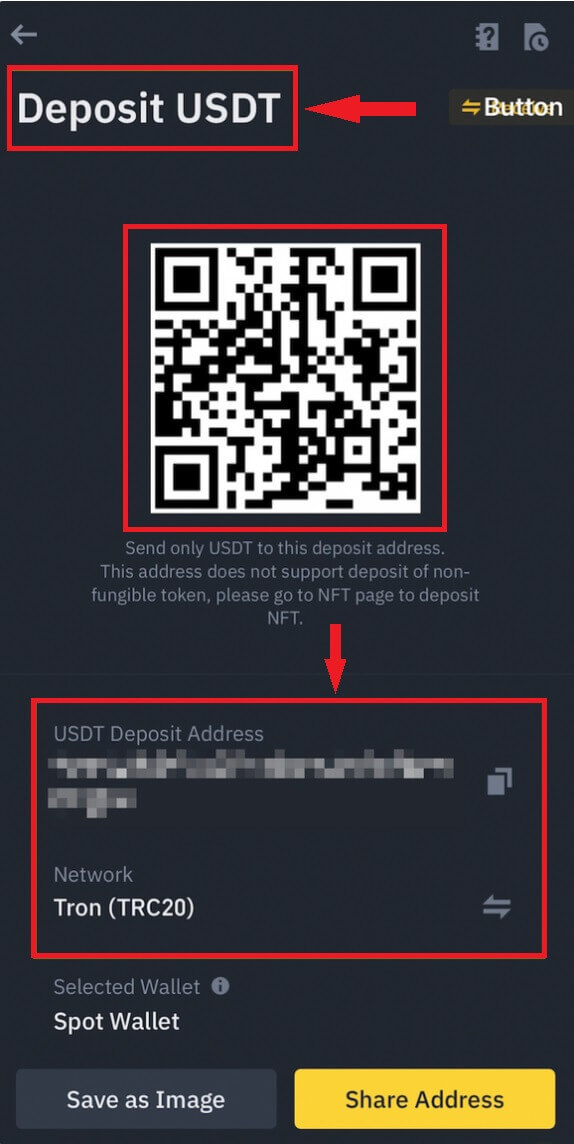
Once you have acquired the address and, if required, the memo/tag, kindly copy and paste them onto the Pionex withdrawal page (alternatively, you can scan the QR code). Finally, proceed to submit the withdrawal request.
Note: For specific tokens, it is essential to include a memo/tag during withdrawal. If a memo/tag is specified on this page, ensure accurate information entry to prevent any potential loss of assets during the asset transfer process.
Caution:
- Cross-chain deposits, where the selected networks on both sides are different, will result in a transaction failure.
- The withdrawal fee is visible on the withdrawal page and will be automatically deducted from the transaction by Pionex.
- If the withdrawal is successfully processed by Pionex but the deposit side does not receive the tokens, it is advisable to investigate the transaction status with the other exchange or wallet involved.
Withdraw Crypto on Pionex (App)
Go to the Pionex App, tap [Account] and then tap [Withdraw].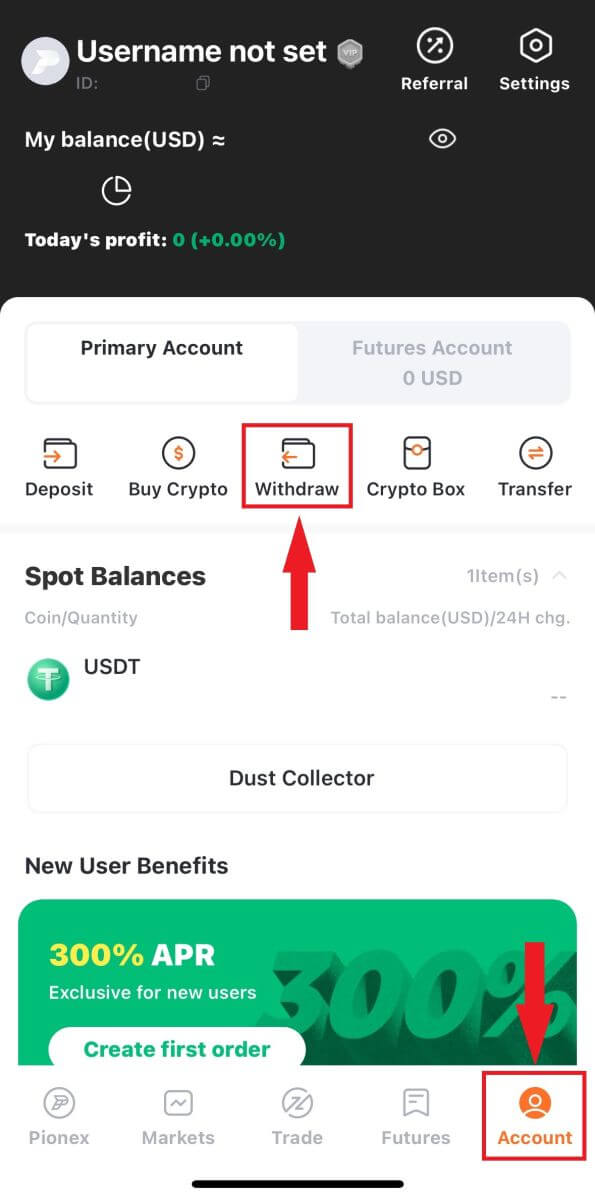
The page will display the cryptocurrencies in your possession along with the quantity of withdrawable tokens. Following this, you are required to choose the blockchain (network) and input the address and amount for withdrawal. Additionally, the page provides information on the remaining quota within 24 hours and the associated withdrawal fee. Double-check this information before proceeding with the withdrawal.
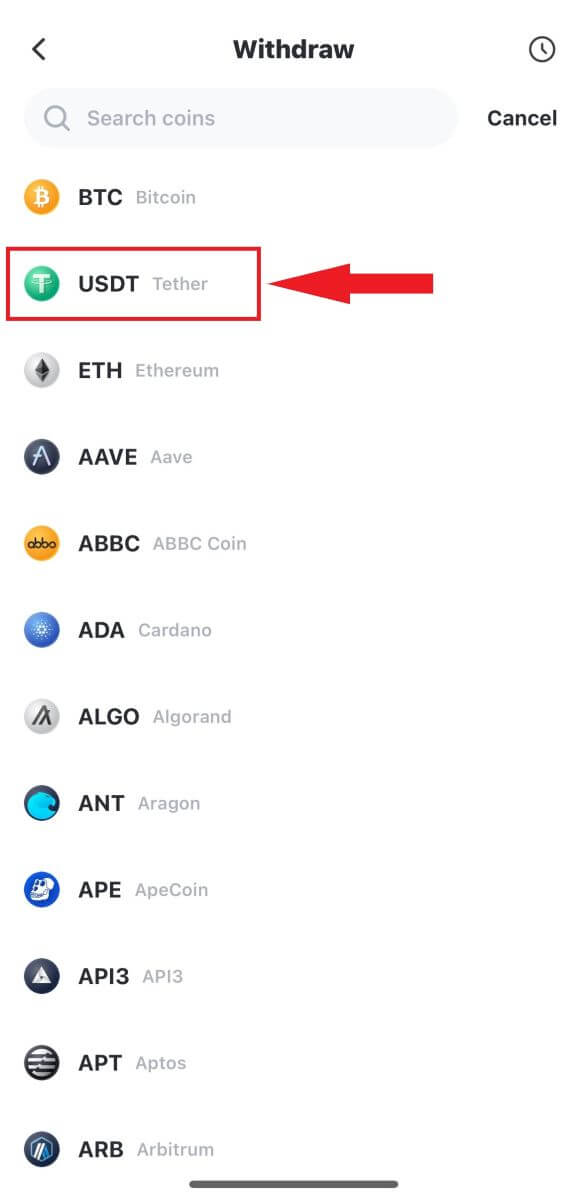
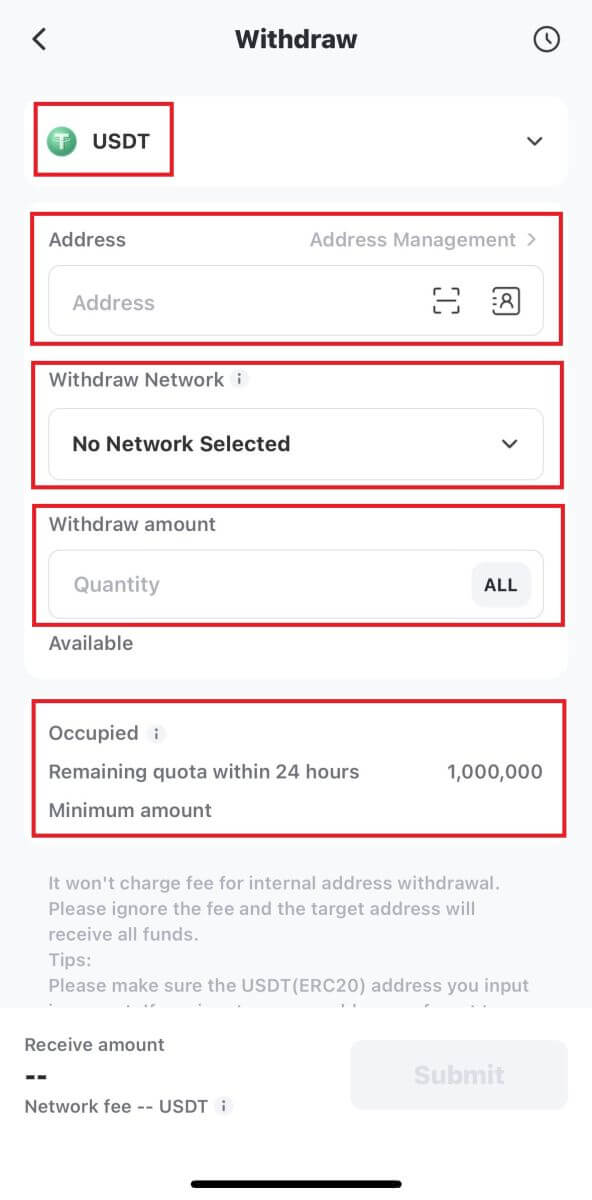
Following that, you should choose the identical cryptocurrency and network on the external exchange or wallet. Obtain the corresponding deposit address associated with the selected cryptocurrency and network.

Once you have acquired the address and, if required, the memo/tag, kindly copy and paste them onto the Pionex withdrawal page (alternatively, you can scan the QR code). Finally, proceed to submit the withdrawal request.
Note: For specific tokens, it is essential to include a memo/tag during withdrawal. If a memo/tag is specified on this page, ensure accurate information entry to prevent any potential loss of assets during the asset transfer process.
Caution:
- Cross-chain deposits, where the selected networks on both sides are different, will result in a transaction failure.
- The withdrawal fee is visible on the withdrawal page and will be automatically deducted from the transaction by Pionex.
- If the withdrawal is successfully processed by Pionex but the deposit side does not receive the tokens, it is advisable to investigate the transaction status with the other exchange or wallet involved.
Frequently Asked Questions (FAQ)
Account
Why Can’t I Receive Emails from Pionex
If you are not receiving emails sent from Pionex, please follow the instructions below to check your email’s settings:1. Are you logged in to the email address registered to your Pionex account? Sometimes you might be logged out of your email on your devices and hence can’t see Pionex’s emails. Please log in and refresh.
2. Have you checked the spam folder of your email? If you find that your email service provider is pushing Pionex emails into your spam folder, you can mark them as “safe” by whitelisting Pionex’s email addresses. You can refer to How to Whitelist Pionex Emails to set it up.
Addresses to whitelist:
- [email protected]
- [email protected]
- [email protected]
- [email protected]
- [email protected]
- [email protected]
- [email protected]
- [email protected]
- [email protected]
- [email protected]
- [email protected]
- [email protected]
- [email protected]
- [email protected]
- [email protected]
4. Is your email inbox full? If you have reached the limit, you won’t be able to send or receive emails. You can delete some of the old emails to free up some space for more emails.
5. If possible, register from common email domains, such as Gmail, Outlook, etc.
Why Can’t I Receive SMS Verification Codes
Pionex continuously improves our SMS Authentication coverage to enhance user experience. However, there are some countries and areas currently not supported.If you cannot enable SMS Authentication, please refer to our Global SMS coverage list to check if your area is covered. If your area is not covered on the list, please use Google Authentication as your primary two-factor authentication instead.
If you have enabled SMS Authentication or you are currently residing in a country or area that’s in our Global SMS coverage list, but you still cannot receive SMS codes, please take the following steps:
- Ensure that your mobile phone has a good network signal.
- Disable your anti-virus and/or firewall and/or call blocker apps on your mobile phone that might potentially block our SMS Codes number.
- Restart your mobile phone.
- Try voice verification instead.
- Reset SMS Authentication.
Verification
Why should I provide supplementary certificate information?
In uncommon instances where your selfie does not align with the provided ID documents, you will be required to submit additional documents and await manual verification. Kindly be aware that the manual verification process may extend over several days. Pionex prioritizes a thorough identity verification service to safeguard users’ funds, and it is crucial to ensure that the materials submitted meet the specified requirements during the information completion process.
Identity Verification for Buying Crypto with Credit/Debit Card
To ensure a secure and compliant fiat gateway experience, users purchasing cryptocurrencies with credit or debit cards must undergo Identity Verification. Those who have already completed Identity Verification for their Pionex account can seamlessly proceed with crypto purchases without any additional information required. Users needing extra information will receive prompts when attempting to make a crypto purchase with a credit or debit card.
Completing each level of Identity Verification will result in increased transaction limits, as detailed below. All transaction limits are denominated in Euro (€), irrespective of the fiat currency used, and may slightly fluctuate in other fiat currencies based on exchange rates.
Basic Info Verification: This level entails verifying the user’s name, address, and date of birth.
Common failed reasons and the methods on Pionex
APP: Click “Account” -- “Security” -- “Identity verification”.
Web: Click your profile avatar on the top-right of the page then into “Account” -- “KYC” -- “Check detail”.
If the verification fails, click "Check" and the system will display a prompt revealing the specific reasons for the failure.
Common reasons for verification failure and troubleshooting steps are as follows:
1. Incomplete Photo Upload:
Confirm that all photos have been successfully uploaded. The submit button will activate after all photos are uploaded.
2. Outdated Webpage:
If the webpage has been open for an extended period, simply refresh the page and re-upload all the photos.
3. Browser Issues:
If the problem persists, try using the Chrome browser for KYC submission. Alternatively, use the APP version.
4. Incomplete Document Photo:
Ensure that every edge of the document is captured in the photo.
If you are still unable to verify your KYC, please send an email to [email protected] with the subject "KYC failure" and provide your Pionex account Email/SMS in the content.
The KYC team will assist you in re-checking the status and respond via email. We appreciate your patience!
Deposit
Coins or Networks not supported on Pionex
Exercise caution when depositing coins or utilizing networks that are not supported by Pionex. If a network is not endorsed by Pionex, there is a possibility that you may be unable to recover your assets.If you discover that the coin or network is not supported by Pionex, kindly complete the form and await our processing (Note that not all coins and networks may be accommodated).
Why do some coins need a memo/tag?
Certain networks utilize a shared address for all users, and the memo/tag serves as a crucial identifier for transfer transactions. For instance, when depositing XRP, it is essential to provide both the address and memo/tag for a successful deposit. If there is an incorrect memo/tag entry, please complete the form and anticipate a processing time of 7-15 business days (Note that not all coins and networks may be accommodated).
Minimum deposit amount
Ensure that your deposit amount exceeds the specified minimum, as deposits below this threshold cannot be completed and are irretrievable.
Additionally, you can verify the minimum deposit and withdrawal amounts.
What do I do when I do not receive the deposit in my Pionex account?
If you haven’t received the deposit after 7 business days, please furnish the following details to service agents or email [email protected]:
- Owner’s name of the bank account.
- Owner’s name of the Pionex account along with the account email/phone number (including country code).
- Remittance amount and date.
- A screenshot of the remittance information from the bank.
Trading
What is a Limit Order
When analyzing a chart, there are instances where you aim to acquire a coin at a specific price. However, you also want to avoid paying more than necessary for that coin. This is where a limit order becomes essential. Various types of limit orders exist, and I will elucidate the distinctions, their functionalities, and how a limit order differs from a market order.When individuals engage in cryptocurrency transactions, they encounter various purchasing options, one of which is the limit order. A limit order involves specifying a particular price that must be reached before the transaction is completed.
For example, if you aim to purchase Bitcoin at $30,000, you can place a limit order for that amount. The purchase will only proceed once the actual price of Bitcoin reaches the designated $30,000 threshold. Essentially, a limit order hinges on the prerequisite of a specific price being attained for the order to be executed.
What is Market Order
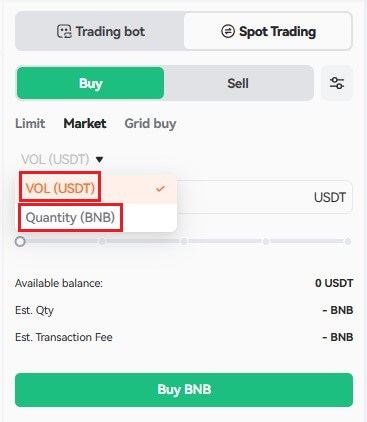
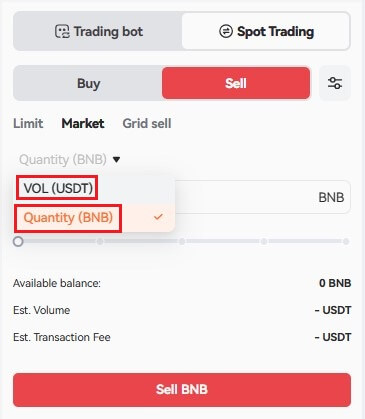
A market order is promptly executed at the prevailing market price upon placement, facilitating swift execution. This order type is versatile, allowing you to utilize it for both buying and selling transactions.You can select [VOL] or [Quantity] to place a buy or sell market order. For example, if you want to buy a certain quantity of BTC, you can enter the amount directly. But if you want to buy BTC with a certain amount of funds, such as 10,000 USDT, you can use [VOL] to place the buy order.
How to View My Spot Trading Activity
You can view your spot trading activities from the Orders and click Spot Orders. Simply switch between the tabs to check your open order status and previously executed orders.1. Open orders
Under the [Open Orders] tab, you can view details of your open orders, including:
- Trading pair
- Order operation
- Order time
- Order Price
- Order Quantity
- Filled %
- Action

2. Order history
Order history displays a record of your filled and unfilled orders over a certain period. You can view order details, including:
- Trading pair
- Order operation
- Filled time
- Average Price/Order Price
- Filled/Order Quantity
- Total
- Transaction fee
- Change
- Order Status

Withdrawal
Why hasn’t my withdrawal arrived on Pionex even though it shows as completed on my external platform/wallet?
This delay is attributed to the confirmation process on the blockchain, and the duration varies based on factors such as the coin type, network, and other considerations. As an illustration, withdrawing USDT via the TRC20 network mandates 27 confirmations, whereas the BEP20 (BSC) network necessitates 15 confirmations.
Withdrawals returned from other exchanges
In certain instances, withdrawals to alternative exchanges might be reversed, requiring manual processing.
While there are no fees for depositing coins into Pionex, withdrawing coins may incur charges from the withdrawal platform. The fees are contingent on the specific coin and network utilized.
If you encounter a situation where your crypto is returned from other exchanges, you can complete a form for asset recovery. We will reach out to you via email within 1-3 business days. The entire process spans up to 10 working days and may involve a fee ranging from 20 to 65 USD or equivalent tokens.
Why is my [Available] balance less than [Total] balance?
The reduction in [Available] balance compared to [Total] balance is typically due to the following reasons:
- The active trading bots commonly lock funds, rendering them unavailable for withdrawal.
- Manually placing sell or buy limit orders typically results in the funds being locked and unavailable for use.
What’s the minimum withdrawal amount?
Please refer to the [Fees] page or the [Withdrawal] page for detailed information.
If I only hold a small amount, how to withdraw it?
We recommend converting them into XRP (Mainnet) or ETH (BSC), both of which offer a low minimum withdrawal limit and nominal fees.
Why is my withdrawal reviewing time so long?
Withdrawals of substantial amounts undergo manual review to ensure security. If your withdrawal has exceeded one hour at this point, kindly reach out to Pionex’s online customer service for further assistance.
My withdrawal has been completed, but I haven’t received it yet
Kindly review the transfer status on the withdrawal transaction page. If the status indicates [Complete], it signifies that the withdrawal request has been processed. You can further verify the status on the blockchain (network) through the provided "Transaction ID (TXID)" link.
If the blockchain (network) confirms a successful/completed status, yet you have not received the transfer, please reach out to customer service at the receiving exchange or wallet for confirmation.


